プラグイン (JA)
フィーチャー・プラグイン・フレームワーク
1.アーキテクチャの概要
2.実施概要
3.標準手順
3.1 新しいプラグインを書く
3.2 既存プラグインの再実装
3.3 プラグインの発見
3.4 プラグインのインストールとアンインストール
付録
A.プラグインの例スクリプト言語コマンド
B.プラグインの例GUIコンポーネント
1.アーキテクチャの概要
T-Plan Robotは汎用的な機能プラグインフレームワークを提供し、ベース製品の再コンパイルや再インストールを必要とせずに、バイナリへカスタムコードをプラグイン可能にします。以下のシナリオをサポートするよう設計されています:
既存機能の置換。T-Plan Robot コードベースの多くのオブジェクトはプラグインとして設計されているため、旧機能の上に同一機能を実装した新規コードをインストールすることが可能です。この場合、フレームワークは旧コードを無効化し、代わりにプラグイン版を使用できます。このメカニズムにより、既存の顧客環境に対して安全にバグ修正やカスタム機能強化を提供することが可能となります。
新機能の提供。ポイントは、公開された機能インターフェース(プラグイン対応として定義されたJavaインターフェース)の上に新機能を実装できるようにすることです。これにより、特定の顧客向けに製品をカスタマイズしたり、オンデマンド機能を提供したりすることが可能になります。
2.実装の概要
プラグインの機能は2つのパッケージで実装されている、com.tplan.robot.pluginそしてcom.tplan.robot.plugin.gui.最初のプラグインは、プラグイン・インターフェイス、デフォルト・プラグイン・マップを備えたコア機能を提供します。PluginMap.xmlプラグインマネージャとプラグインファクトリ実装の基本クラスです。もう1つのパッケージには、プラグインマネージャーダイアログのクラスが含まれています。GUIを使用してユーザーがプラグインを変更すると、PluginMap.xmlファイルのローカルコピーがユーザーのホームフォルダに保存されます。インストールしたカスタムプラグインに起因する問題が発生した場合は、このファイルを削除して工場出荷時の設定に戻してください。
3.標準手順
以下の章では、プラグイン・フレームワークを使用する際の標準的な作業について説明します。説明は一般的な手順を説明しているだけです。実装の詳細については、個々のオブジェクトのコードドキュメントを参照してください。
3.1 新しいプラグインを書く
Pluginと、PluginMap.xmlマップテンプレートに列挙されている公開機能インターフェースのいずれか、または抽象プラグインクラス(利用可能な場合)の両方を実装するクラスを開発します。このクラスは private または abstract であってはならず、public でインスタンス化可能であること、および完全に初期化されたプラグインインスタンスを生成するパラメータなしのデフォルトコンストラクタを持つことが必須です。
Pluginインターフェースの全メソッドを、ドキュメントに従って実装してください。ププラグインの仕組み、特にgetCode()メソッドとgetUniqueId()メソッドの役割を確実に理解してください。
公開インターフェースのメソッドを開発し、期待されるプラグイン機能を提供します。
プラグインの準備が整ったら、Javaコードを.class形式またはJAR/ZIPアーカイブにコンパイルし、インストール方法についてはPluginのインストールとアンインストールの章に従ってください。
プラグインの例については、この文書のAppendixセクションを参照してください。
3.2 既存プラグインの再実装
この場合の再実装とは、既にインストール済みまたは組み込みのプラグインの置換を意味します。標準的な状況は次の2つです:
プラグインのアップグレードまたは将来的なダウングレード、すなわち、より高いまたはより低いプラグインバージョンでの再インストール
別のベンダー(製造元)のプラグインによる置換。
手順は以下の通りです:
新しいプラグインを開発し、getCode()メソッドを通じて、置き換えようとしているプラグインと同じコードを返すようにします。
バージョンをアップグレード/ダウングレードするには、getVersion()メソッドを実装してより高い/低いバージョン番号を返し、getUniqueId()メソッドが元のプラグインと同じコードを返すようにします。プラグインを別のベンダーとして実装するには、getUniqueId()メソッドが元のプラグインとは異なるコードを返すようにします。
プラグインのインストールに関する情報は、Pluginのインストールとアンインストールの章を参照してください。
3.3 プラグインの発見
プラグインは、コンパイル済みJavaクラス形式またはJava互換アーカイブ(JARまたはZIP)形式で、T-Plan Robot インストール環境に提供できます。プラグインマネージャは、クラスパス(コンパイル済み Java クラスを含むフォルダ)または単一の JAR ファイルもしくは ZIP ファイルからプラグインをスキャンするメソッドを提供します。指定されたリソース内のすべての Java クラスを調査し、Pluginインターフェースと公開されている機能インターフェースのいずれかを実装するクラスをすべて見つけ出します。公開インターフェースの一覧については、PluginMap.xmlファイルを参照してください。このメソッドは、このメソッドをプログラムで使用するにはPluginManager.getAvailablePlugins(java.io.File)によってプログラム的に呼び出すことができます。PluginManagerダイアログでも、「JAR、ZIP、またはクラスパスを追加...」ボタンを通じてこの機能にアクセスできます。
3.4 プラグインのインストールとアンインストール
プラグインはいくつかの方法でインストールできます:
推奨代替案 #1: 機能プラグインをインストール可能なプラグインとしてパッケージ化し、更新・アップグレードウィンドウとの互換性を確保してください。プラグイン・フレームワークドのドキュメントでは、この文書内の簡易プラグイン例を用いた手順を説明しています。
推奨代替方法 #2: プラグインのJARファイルを
<Robot_home>/pluginsディレクトリに配置し、Robotを再起動してください。起動時に検出されたすべての機能が自動的にインストールされ有効化されます。廃止済み/Java 8 専用: ロボット GUI で利用可能なプラグインマネージャーウィンドウを使用してください。
上級ユーザーは、XMLマップのいずれか(内部のPluginMap.xml、またはプラグインPluginManager.EXTERNAL_PLUGIN_XML変数で指定される外部ユーザー固有のもの)を修正し、新しいプラグインのエントリを追加できます。
プラグインはJavaプログラム(Javaテストスクリプトを含む)からもインストールおよびアンインストールできます。詳細はプラグインマネージャーのgetAvailablePlugins(java.io.File)、installPlugin(java.lang.String, java.lang.String, boolean, boolean)、uninstallPlugin(com.tplan.robot.plugin.Plugin)メソッドを参照してください。
APPENDIX
A.プラグインの例スクリプト言語コマンド
この例は、引数をコンソールウィンドウに出力する「Msg」という新しいT-Plan Robot スクリプト言語コマンドの記述方法を示しています。
一般的な開発手順:
Java IDE(NetBeans、Eclipseなど)で新規プロジェクトを作成し、robot.jarファイルをプロジェクトのライブラリリストに追加してください。
com.tplan.robot.scripting.commands.AbstractCommandHandlerクラスを拡張する新しい Java クラスを作成します。
少なくともgetCommandNames()、validate()、execute()メソッドを実装してください。コンソールにメッセージを出力する「msg」というコマンドの簡単な例を示すJavaソースコードは以下にあります。
classコマンドでJARファイルをビルドし、T-Plan Robotに接続します。
Javaコード:
|
/*
 * T-Plan Robot , automated testing tool based on remote desktop technologies.
 * Copyright (C) 2010 T-Plan Ltd (http://www.t-plan.com),
 */
package com.tplan.robot.scripting.commands.impl;

import com.tplan.robot.scripting.ScriptingContext;
import com.tplan.robot.scripting.SyntaxErrorException;
import com.tplan.robot.scripting.commands.AbstractCommandHandler;
import java.io.IOException;
import java.util.List;
import java.util.Map;

/**
 * Example of a simple custom command which prints out a message into
 * the console using <code>System.out.println()</code>.
 */
public class ConsoleMessageCommand extends AbstractCommandHandler {

    /**
 * Get the command name ("msg").
 * @return command name.
     */
    public String[] getCommandNames() {
        return new String[] {"msg"};
    }

    /**
 * Compile command arguments and parameters. This command accepts just one
 * mandatory argument which represents the text to be printed out into the console.
 *
 * @param params list of arguments and parameter names.
 * @param values map of parameters and their values parsed from the [param]=[value] pairs
 * @param variableContainer optional container for processed parameters.
 * Not used by this command.
 * @param context scripting context.
 * @throws com.tplan.robot.scripting.SyntaxErrorException on invalid command syntax.
     */
    public void validate(List params, Map values, Map variableContainer, ScriptingContext context) throws SyntaxErrorException {
        if (params.size() != 1) {
            throw new SyntaxErrorException("The Msg command must have exactly one argument.");
        }
    }

    /**
 * Execute command.
 *
 * @param params list of arguments and parameter names.
 * @param values map of parameters and their values parsed from the [param]=[value] pairs
 * @param context scripting context.
 * @throws com.tplan.robot.scripting.SyntaxErrorException on invalid command syntax.
     */
    public int execute(List params, Map values, ScriptingContext context) throws SyntaxErrorException, IOException {
        validate(params, values, values, context);
        System.out.println(params.get(0));
        return 0;
    }

    /**
 * Overriden method to indicate that this command can execute even if the
 * tool is not connected to any desktop.
 * @return always returns true.
     */
    @Override
    public boolean canRunWithoutConnection() {
        return true;
    }
}
インストール:
T-Plan Robot GUI を起動する(オフラインモードでも可)。
ツール>プラグインを選択して、プラグインマネージャーウィンドウを起動します。
「利用可能なプラグイン」タブを選択し、「JAR、Zip、またはクラスパスを追加」ボタンをクリックします。プラグインのJARファイルを選択します。
ウィンドウには利用可能なプラグインが1つあると表示されます。インストールをクリックしてプラグインをインストールし、ツールを再起動してください。
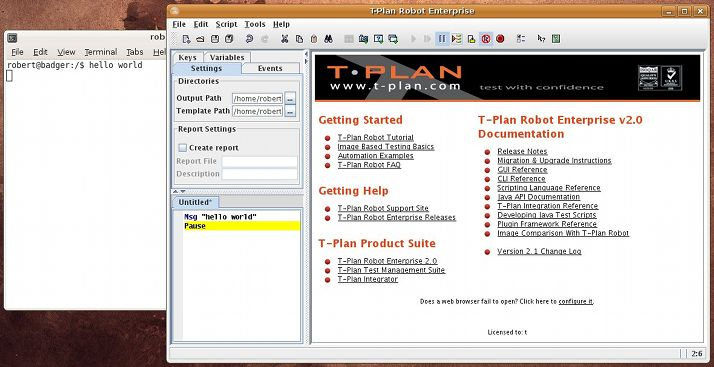
スクリプトエディタにコマンドを入力してください:
Msg "hello world"
次にスクリプトを実行し、コンソールウィンドウに表示されるテキストを確認してください。スクリーンショットは以下の通りです:
B.プラグインの例GUIコンポーネント
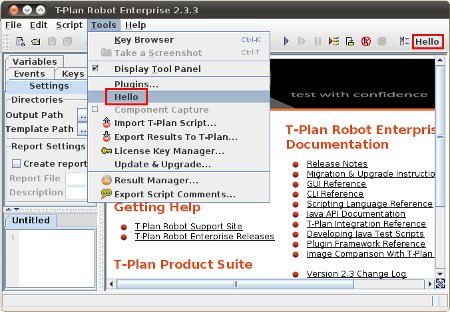
この例では、シンプルな「Hello world」ウィンドウを作成し、T-Plan Robot のメニューとツールバーに配置する方法を示します。
一般的な開発手順:
Java IDE(NetBeans、Eclipseなど)で新規プロジェクトを作成し、robot.jarファイルをプロジェクトのライブラリリストに追加してください。
com.tplan.robot.gui.GuiComponent および com.tplan.robot.plugin.Plugin インターフェースを実装する新しい Java クラスを作成してください。
両インターフェースのメソッドを実装する。アプリケーションメニューとツールバーにウィンドウを追加するには、GuiComponentインターフェースのsetMainFrame()メソッドの引数として渡されるメインウィンドウインスタンス(../com/tplan/robot/gui/MainFrame.html com.tplan.robot.gui.MainFrame)のgetJMenuBar()およびgetToolBar()メソッドを使用する。
プラグインクラスを含むJARファイルをビルドし、T-Plan Robot に組み込みます。
Javaコード:
pluginexamples/GuiPluginExample.java |
/*
 * T-Plan Robot , automated testing tool based on remote desktop technologies.
 * Copyright (C) 2010 T-Plan Ltd (http://www.t-plan.com),
 */
package pluginexamples;

import com.tplan.robot.ApplicationSupport;
import com.tplan.robot.gui.ActionManager;
import com.tplan.robot.gui.GuiComponent;
import com.tplan.robot.gui.MainFrame;
import com.tplan.robot.plugin.DependencyMissingException;
import com.tplan.robot.plugin.Plugin;
import com.tplan.robot.plugin.PluginManager;
import com.tplan.robot.util.Utils;
import java.awt.Component;
import java.awt.Insets;
import java.awt.event.ActionEvent;
import java.awt.event.ActionListener;
import java.util.Date;
import javax.swing.AbstractButton;
import javax.swing.JButton;
import javax.swing.JMenu;
import javax.swing.JMenuBar;
import javax.swing.JMenuItem;
import javax.swing.JOptionPane;
import javax.swing.JToolBar;

/**
 * <p>Example of a T-Plan Robot  plugin which adds a new item called "Hello"
 * to the Tools menu and a new button labeled "Hello" to the tool bar. The action
 * will open a dummy message window saying "Hello".</p>
 *
 * <p>To change the message window modify the content of the
 * {@link #actionPerformed(java.awt.event.ActionEvent)}
 * method of this class. Note that you don't have to reinstall the plugin after
 * every code change as long as you keep the plugin code ({@link #getCode()}) and
 * the unique ID ({@link #getUniqueId()}) untouched. You only have to restart
 * the Robot's GUI to pick up the recompiled classes or JAR.</p>
 */
public class GuiPluginExample implements Plugin, GuiComponent, ActionListener {

    JMenuItem mi;
    JButton btn;

    /**
 * Method from the GuiComponent interface. It gets called when the GUI starts
 * up and the main window (MainFrame) gets initialized.
 * @param frame the Robot's GUI window.
     */
    public void setMainFrame(MainFrame frame) {

        // The name is "Tools" but we rather load the string from the resource bundle.
        // This makes the plugin robust against menu name changes and/or eventual
        // localization into another language. Labels of Robot's menu items are located
        // in the Messages_en.properties file and they are always in form of "menu.<action>Text".
        // See the "Data And Text File List"document in Robot's documentation.
        // http://www.t-plan.com/robot/docs/v2.2ee/api/docs/files.html
        String name = ApplicationSupport.getString("menu.ToolsText");

        // Remove the evenual hot key which is typically after comma
        if (name.contains(ActionManager.HOT_KEY_SEPARATOR)) {
            name = name.substring(0, name.indexOf(ActionManager.HOT_KEY_SEPARATOR));
        }

        // Locate the Tools menu
        JMenu m, toolsMenu = null;
        JMenuBar mb = frame.getJMenuBar();

        // Iterate over all menus of the main window and locate the "Tools" one
        for (int i = 0; i < mb.getMenuCount(); i++) {
            m = mb.getMenu(i);
            if (m.getText().equals(name)) {
                toolsMenu = m;
                break;
            }
        }

        // Fallback mechanism - if "Tools" is not found, use the first menu group
        if (toolsMenu == null) {
            toolsMenu = mb.getMenu(0);
        }

        // Create and add the "Hello" menu item.
        mi = new JMenuItem("Hello");
        mi.addActionListener(this);
        toolsMenu.add(mi);

        // Create the tool bar button.
        btn = new JButton("Hello");
        btn.setBorderPainted(false);
        btn.setOpaque(false);
        btn.setMargin(new Insets(1, 1, 1, 1));
        btn.addActionListener(this);

        // This piece of code shows how to insert the new tool bar button
        // to a certain place in the tool bar. This example will put the tool
        // bar button right after the "Preferences" one.
        // The code uses the action command "preferences" to find the button.
        // The action commands are defined together with the default tool bar
        // structure in the MenuAndToolbar.properties file. See the "Data And Text File List"
        // document in Robot's documentation.
        // http://www.t-plan.com/robot/docs/v2.2ee/api/docs/files.html
        JToolBar toolBar = frame.getToolBar();
        final int cnt = toolBar.getComponentCount();
        Component c;
        for (int i = 0; i < cnt; i++) {
            c = toolBar.getComponent(i);
            if (c instanceof AbstractButton && "preferences".equals(((AbstractButton) c).getActionCommand())) {
                toolBar.add(btn, i + 1);
                return;
            }
        }

        // Default location -> end of tool bar
        toolBar.add(btn);
    }

    // ActionListener INTERFACE METHODS ========================================
    /**
 * Implementation of the {@link ActionListener} interface which gets called
 * when either the menu item or the tool bar button are selected. The method
 * just displays a dummy message box saying "Hello"
 * @param e an action event.
     */
    public void actionPerformed(ActionEvent e) {
        JOptionPane.showMessageDialog(MainFrame.getInstance(), "Hello");
    }

    // Plugin INTERFACE METHODS ================================================
    public String getCode() {
        return "hello GUI plugin";
    }

    public String getDisplayName() {
        return "GUI Plugin Example";
    }

    public String getDescription() {
        return "Example of a GUI plugin which installs both into the menu " +
                "and tool bar and displays a simple message of \"Hello\"";
    }

    public String getVendorName() {
        return ApplicationSupport.APPLICATION_NAME;
    }

    public String getSupportContact() {
        return ApplicationSupport.APPLICATION_SUPPORT_CONTACT;
    }

    public int[] getVersion() {
        return Utils.getVersion();
    }

    public Class getImplementedInterface() {
        return GuiComponent.class;
    }

    public boolean requiresRestart() {
        return true;
    }

    public String getVendorHomePage() {
        return ApplicationSupport.APPLICATION_HOME_PAGE;
    }

    public Date getDate() {
        return Utils.getReleaseDate();
    }

    public String getUniqueId() {
        return "TPlan_examples_GUI_plugin";
    }

    public int[] getLowestSupportedVersion() {
        return Utils.getVersion();
    }

    public String getMessageBeforeInstall() {
        return null;
    }

    public String getMessageAfterInstall() {
        return null;
    }

    public void checkDependencies(PluginManager manager) throws DependencyMissingException {
    }
}
インストール:
T-Plan Robot GUI を起動(オフラインモード可)。
ツール>プラグインを選択して、プラグインマネージャーウィンドウを起動します。
「利用可能なプラグイン」タブを選択し、「JAR、Zip、またはクラスパスを追加」ボタンをクリックします。プラグインのJARファイルを選択します。
ウィンドウには利用可能なプラグインが1つあると表示されます。インストールをクリックしてプラグインをインストールし、ツールを再起動してください。
ツールメニューとツールバーで「Hello」項目を確認してください。選択すると、シンプルな「Hello」メッセージボックスが表示されます。スクリーンショットを以下に示します。