1.はじめに
1.1 目的
このドキュメントは、T-Plan Robot がサポートするスクリプト言語の完全な仕様を提供します。 その目的は、このツールとそのテストフレームワークを使用して自動化スクリプトを書く人に、完全な構文と機能のリファレンスを提供することです。スクリプト言語はJavaスクリプトAPIと緊密に連携しているため、Javaスクリプトの設計における補完的な機能リファレンスとしても意図されています。
この文書で説明されている言語のスクリプトはTPRスクリプトと呼ばれる。Java Script APIに基づくスクリプトはJavaスクリプトと呼ばれる本ドキュメントで定義される言語によるスクリプトはTPRスクリプトと呼ばれます。Java Script APIに基づくスクリプトはJavaスクリプトと呼ばれます。
本ドキュメントでは、スクリプトの要件、解析および処理ルール、言語構造、ならびに文、式、コマンド、画像比較メソッドなどの特定要素の構文について記述します。
1.2 概要
T-Plan Robot は、自動化スクリプトを記述するためのシンプルなスクリプト言語をサポートしています。これは Linux/Unix のシェルスクリプトにやや似た、構造化された手続き型言語です。以下のような、現代のプログラミング言語でよく知られた構造や要素をサポートしています:
T-Plan Robotは、ほとんどの一般的なリモートおよびローカルデスクトップ技術で動作するように設計されているため、スクリプト言語がサポートするコマンドは、おおよそ4つの機能領域に分類されます:
-
デスクトップコマンドデスクトップへの接続や切断、マウスやキーボードの入力(キーを押す、テキストを入力する、マウスを動かす、クリックする、ドラッグする、ホイールする)などのクライアントとサーバー間の通信を行います。
-
管理および実行制御コマンドスクリプトの実行制御(一時停止、停止、デスクトップ画像解析、指定時間または特定のイベントの待機)に必要なインフラストラクチャを提供し、変数、ライブラリ、外部OSコマンドコールをサポートします。
-
レポートコマンド自動テストの出力を定義し、ユーザーに報告します。このカテゴリのコマンドでは、たとえば、デスクトップ画像またはその一部のスクリーンショットを撮影したり、レポートを作成したり、電子メールを送信したり、関連するテスト管理ツールに結果をアップロードしたりすることができます。
-
I/O コマンドさまざまなデータソースからの入力やデータソースへの出力を扱います。
一部のコマンドの動作は、ユーザー設定によってカスタマイズされる場合があります。このようなパラメータは実装固有のものであり、必ずしもこのドキュメントの一部を構成するものではありません。設定可能な値があるかどうかを調べるには、T-Plan Robot GUIのPreferencesウィンドウを開き、Pluginsセクションの下にコマンド設定パネルがあるかどうかを確認してください。スクリプト言語は高速で簡単な自動化の方法を提供しますが、機能が限られており、オブジェクト指向のアプローチに欠けています。このため、T-Plan Robot バージョン 2.0 では Java Script API を導入し、このリファレンスで指定されたコマンドの機能にアクセスするメソッドの呼び出しを通じて、純粋な Java でスクリプトを記述できるようにしました。そのため、Javaに固執するつもりであっても、この仕様を参照する必要があります。詳細についてはJava APIドキュメント、特にJavaスクリプトの開発スクリプトは、Javaソース・コードのスニペットを埋め込んでカスタマイズすることもできます (Javaコードブロックの章を参照)。Javaでコード化されたカスタム・アクションで言語を拡張するもう1つの方法は実行コマンドコマンドです。v2.2以降、Javaのパラメトリック呼び出しをサポートしています。
1.3 Robot機能
T-Plan Robotは機能的に豊富で成熟した製品であり、以前のバージョンで開発された言語仕様の上に構築されています。一般論として、T-Plan Robot は旧バージョンの上にさらに機能を追加し、その言語はレポートジェネレーター、画像比較アルゴリズム、デスクトップクライアントなどの追加コマンドやサービスプロバイダーで拡張されています。以前の製品バージョンでデザインされたスクリプトはT-Plan Robot言語と互換性があります。
2. 言語構文
2.1 言語構造
T-Plan Robot の言語はテキストベースのプログラミング言語であり、スクリプトは通常プレーンテキストファイルとして保存されます。以下の一般的なルールが適用されます:
-
ISO8859-1 (Latin-1) 文字を推奨する。ISO8859-1(Latin-1)文字が推奨されます。このセット以外の文字をコマンド引数やパラメータ値に使用することもできますが、特定のリモートデスクトップクライアントとそのプロトコルの機能によってサポートが異なります。ISO8859-1以外の文字を使用する前に、クライアントのドキュメントを読んでください。
-
このドキュメントに明示的に記載されていない限り、言語は大文字と小文字を区別しません。
スクリプトは次の規則に従って解釈されます:
-
スクリプトは一行ずつ処理されます。スクリプトは一行ずつ処理されます。仕様で明示されていない限り、1つのコマンドや式を複数行に分割することはできません。
-
行には、先頭または末尾に任意の数の空白文字(スペース、タ ブレーターなど)を含めることができます。それらは、処理を進める前に切り取られます。
-
空行は無視される。
-
ハッシュ '#' で始まる行はコメントとみなされ、無視されます。バージョン2.3以降では、ダブルスラッシュ'//'で始まるJava/C++スタイルのコメントも受け付けます:
# これはコメントです
// これはコメントです。
-
上記の規則で排除されない他のテキスト行には、コマンド、プロシージャーヘッダー、プロシージャーコール、if/else/for文、またはその終端である右中括弧('}')など、スクリプト言語の要素が1つ含まれている可能性があります。このようなテキスト行は、それぞれ次のように処理される:
-
テキストは、1つ以上の空白によってトークンに分割される。テキストは、1 つ以上のスペースによってトークンに分割されます。スペースが先行し、2 つ の二重引用符 ("...") で囲まれたテキストは、1 つのトークンと見なされます。エスケープされた二重引用符 (\") はトークンの先頭または末尾を示すものとは見なされず、以降の処理では二重引用符に置き換えられます。identifier=value'または'identifier="value with spaces"'の形式を持つ文字列は、1つのトークンとみなされ、さらに識別子と値のペアに解析されます。
例:
This is a text containing spaces
- 'This', 'is', 'a', 'text', 'containing', 'spaces' の6つのトークンに解析される。This "is a text" containing spaces
- 'This', 'is a text', 'containing', 'spaces' の4つのトークンに解析される。This text contains "double quote (\")"
- 'This', 'text', 'contains', 'double quote (")' の4つのトークンに解析されます。Var SAMPLE_VAR_1="スペースを含む値" SAMPLE_VAR_2=no_spaces "NO_VAR=not_a_variable"
- 4つのトークンに解析されます:Var」、「SAMPLE_VAR_1="空白を含む値"」、「SAMPLE_VAR_2=no_spaces」、「NO_VAR=not_a_variable」です。2番目と3番目のトークンは、さらに識別子と値のペアに解析される。この設計では、末尾にバックスラッシュを含む値を指定することはできません。
Var SAMPLE_VAR="これはバックスラッシュです ୧"
末尾の'୧'シーケンスは、バックスラッシュの後に閉じる二重引用符ではなく、エスケープされた二重 引用符として解釈されるため、コンパイラはエラーを報告します。
Var SAMPLE_VAR="これはバックスラッシュ %26bs; "です。
-
最初のトークンは、コマンド名またはプロシージャー名とみなされ、コマンドおよびプロシージャーテーブルと照合されます。コマンド名は大文字と小文字を区別しません。
-
さらなる処理と構文検証は、コマンド/プロシージャ・ハンドラによって実行されます。Command Syntax と Procedures の章で説明する。
2.2 時間値
コマンド引数 Wait コマンドの引数や他のコマンドのwait/timeout/delayパラメータなどの時間値は、以下の構文をサポートしている:
-
「1」は1ミリ秒として解析される、
-
「1s」は1秒、
-
「1m」は1分、
-
「1h」は1時間、
-
「1d」は1日。
-
「1w」は1週間
-
「1M」は1ヶ月
-
「1y」は1年
浮動小数点変数は英語フォーマットでのみ使用可能で、例えば '3.5h' は3.5時間(3時間30分)として解析されます。時間値には数値式を含めることができます。Numeric Expressions の章を参照してください。
例:
Wait "1.5d"
– 1日半(36時間)待つ。
Press Ctrl+C wait=5s
– Ctrl+Cを押して5秒間一時停止。
2.3 変数
変数は Var と Eval コマンドで作成することができる。変数は大文字と小文字を区別する名前と値を持つ。Var/Evalコマンドを含む)動的な内容を必要とするあらゆる場所で、変数を参照することができます。T-Plan Robotのプリプロセッサは、コマンド行を解析する前に{<var_name>}を<var_name>変数の値に置き換えます。
典型的な例
Var PATH=/tmp
Typeline "mkdir -p {PATH}; cd {PATH}"
Var 1="test"'のような、数字だけの変数名は避けてください。これらの変数はプロシージャー・パラメーター用に予約されており、プロシージャーを実行すると警告なしに書き換えられてしまいます。
変数が定義されていない場合、置換は行われません。以下の例では、変数定義がコメントアウトされているため、'cd /tmp'よりも'cd {PATH}'とタイプされます:
# var PATH=/tmp
Typeline "cd {PATH}"
プリプロセッサはネストされた変数参照をサポートします。この機能は、マッチの座標がSEARCH_X<数値>として保存される画像比較メソッド'search'の複数のマッチを処理するために必要であり、ループの中で変数名を動的に生成する必要があります。次の例はそのような使い方を示しています。リモートデスクトップからアイコンを検索し、表示されたアイコンをクリックするとします:
Compareto "search.png" method=search
for(i=1; {i}<{_SEARCH_MATCH_COUNT}+1; i={i}+1) {
# ネストされた変数は、接尾辞とインデックスから変数名を構成する
 Mouse click to=x:{_SEARCH_X{i}},y:{SEARCH_Y{i}}
 }
T-Plan Robot は、オブジェクト指向プログラミング(OOP)におけるメンバクラスとローカル変数に似たグローバル 変数とローカル 変数の概念もサポートしています。変数のタイプは明示的に宣言されませんが、コードのどこで作成されるかに依存します:
-
スクリプト本体に作成された変数はグローバル変数とみなされ、定義した時点からスクリプトの実行が終了するまでアクセス可能です。
-
構造化されたコードブロック(プロシージャ、if/else、for文)内で作成された変数はローカル変数とみなされ、そのコードブロック内(ネストされたブロックを含む)でしか使用できません。
ローカル変数はグローバル変数を上書きすることはできません。つまり、コードブロック内でVarコマンドやEvalコマンドを実行し、その変数名がすでに存在するグローバル変数と一致した場合、同じ名前のローカル変数を定義するよりも、むしろグローバル変数を変更する方がよいということです。次の例は、その原則を示しています。
# グローバル変数
Var GLOBAL=global
If (1 == 1) {
  # ローカル変数を作成し、GLOBALの値を'modified'に変更する。
  Var LOCAL=local GLOBAL=modified
  If (1 > 0) {
    Var LOCAL2=local2
    # ここで、GLOBAL、LOCAL、LOCAL2 が利用可能である。
    # コマンドは "GLOBAL=modified, LOCAL=local, LOCAL2=local2" とタイプする。
    Type "GLOBAL={GLOBAL}, LOCAL={LOCAL}, LOCAL2={LOCAL2}"
  }
  # ここで、GLOBALとLOCALは利用可能であり、LOCAL2はもう存在しない。
  # コマンドは "GLOBAL=変更済み, LOCAL=local, LOCAL2={LOCAL2}" とタイプする.
  Type "GLOBAL={GLOBAL}, LOCAL={LOCAL}, LOCAL2={LOCAL2}"
}
# ここで、GLOBALは利用可能であり、LOCALとLOCAL2はもう存在しない。
# コマンドは "GLOBAL=modified, LOCAL={LOCAL}, LOCAL2={LOCAL2}" とタイプする.
Type "GLOBAL={GLOBAL}, LOCAL={LOCAL}, LOCAL2={LOCAL2}"
同じルールが Include と Run コマンドでロードされたスクリプト内で定義された変数にも同じルールが適用されます。T-Plan Robotは、スクリプトから参照できる定義済み(明示的とも呼ばれる)変数のセットを提供します。これらの変数には、実行開始日、デスクトップサーバーのホスト名、実行されたスクリプトの名前など、様々な有用なデータが含まれています。定義済み変数の完全なリストについては Var コマンド仕様を参照してください。変数値は、CLI を使用してスクリプト実行時にオーバーライドできます。で指定されている v/-variable パラメータを参照してください。CLI Optionsドキュメントを参照してください。これにより、特定のスクリプト実行をパラメトリック化したり、スクリプトコード内の機密情報(ユーザー名、パスワード...)の漏洩を回避したりすることができます。CLIで設定すると、変数は「読み取り専用」になり、スクリプト実行中ずっとその値が固定されます。スクリプト内で実行されるこの変数を変更する Var/Eval コマンドはすべて無視され、その値には影響しません。これは、明示的な(定義済みの)変数を含む、あらゆる変数に適用されます。
2.4 プロシージャ
T-Plan Robot は簡単なプロシージャをサポートしています。プロシージャは、その名前を呼び出すことで実行できる、必要な形式で記述された言語要素の名前付きブロックです。プロシージャは、ヘッダ、ボディ、右中括弧で終わります。
プロシージャの書式は
Procedure <procedure_name> {
   command1
   command2
   ...
   commandN
}
以下のルールが適用されます:
-
プロシージャー名は大文字と小文字を区別せず、他のコマンド名や言語要素名と衝突してはなりません。v3.0.1以降、二重引用符で囲まれている場合、名前にスペースが含まれていても構いません:
Procedure "Perform action A" {
   ...
}
...
"Perform action A"
-
左中括弧'{'は、プロシージャーヘッダーと同じ行になければなりません。
-
終端の右中括弧 '}' は、1行に1つでなければなりません。
-
プロシージャー定義は、すでに定義されている同名のプロシージャーを上書きします。
-
プロシージャーは、その定義の後にスクリプトの任意の場所で呼び出すことができます。
-
他のスクリプト(ファイル)で定義されたプロシージャは Include コマンドで取り込むことができます。
プロシージャー呼び出しには、以下のようにスペースで区切られたパラメータをいくつでも渡すことができます:
<procedure_name> parameter1 "parameter2 with spaces" ... parameterN
パラメータは、'0', '1' ... 'N'という名前の変数として利用できます。インデックス0の最初の変数には、常にプロシージャー名が格納されます。プロシージャが受け付けるパラメータは、プロシージャのヘッダのどこにも宣言されていないことに注意してください。
バージョン2.1以降、_PROCEDURE_ARG_COUNT 変数から多くの入力引数が利用できるようになりました。これらは、パラメータの数に応じて動作を分岐させたり、省略されたパラメータにデフォルト値を代入したりするために使用されます。
次の例は、可変画像フォーマットでスクリーンショットを作成する簡単なプロシージャの書き方と呼び出し方を示しています。デフォルト値の代入(Var extension=png)は、パラメータ代入(Var extension={2})の後に指定しなければならないことに注意してください。これは、正しいコマンド構文を検証するために、if/else構造に関係なくコンパイル時にすべての変数代入を実行するコンパイラの制限によるものです。
# プロシージャの定義。期待されるパラメータは以下の通り:
# 1} ... ファイル名(拡張子なし)
# 2} ... 画像の拡張子(jpg, jpeg, pngのいずれか).省略時のデフォルトは "png"。
procedure take_screenshot {
 Var  extension={2}
 if ({_PROCEDURE_ARG_COUNT} == 1) {
 Var extension=png
 }
  Screenshot {1}.{extension} desc="このスクリーンショットは {0} というプロシージャによって作成されました。"
}

take_screenshot image1 jpg
take_screenshot image2
プロシージャは常に、プロシージャ本体内で最後に実行されたコマンドの終了コードを返します。特定の終了コードでプロシージャを終了するには Exit コマンドを scopeラメータを procedure. 例を以下に示します:
# プロシージャの定義
Procedure exit2 {
 Exit 2 scope=procedure
}

# 手続き呼び出し
exit2

if ({_EXIT_CODE} == 2) {
# exit2 が 2 を返すため、ここにあるコードはすべて実行されます。
}
パラメータがないと、コードが正しいかどうかを判断できないため、プロシージャ定義時にプロシージャの内容がコンパイルされることはありません。T-Plan Robot Enterprise は、代わりにプロシージャ呼び出しをコンパイルします。例えば
take_screenshot image3 tiff
と入力すると、T-Plan Robot はこの行でエラーを報告します。なぜなら 'tiff' は Java がサポートしていない画像形式であるため、例のプロシージャ本体の Screenshot コマンドはコンパイルエラーを投げるからです。
2.5 フォールバック手順
T-Plan Robot バージョン 2.3 では、いわゆるフォールバック手続きが導入されました。これは予約された名前の手続きで、特定の条件(イベント)が満たされたときに自動的に呼び出されます。フォールバック手続きは、それ以外は標準的な手続きであり、一般的な手続き規則がすべて適用されます。above が適用されます。要するに、(1)名前の大文字と小文字は区別されません。Include または Run (3)プロシージャは、それを呼び出すコードの前に定義されていなければなりません。
-
DisconnectFallback と 呼ばれるプロシージャは、VNCサーバへの接続がクラッシュしたときに、initフェーズ(コマンドの内部)か、それ以降に呼び出されます。Connectコマンドの内部)、またはサーバが終了(kill)したときやネットワークエラーが発生したときなど、それ以降の任意のタイミングで呼び出されます。コマンドの呼び出しは Disconnect コマンドの呼び出しは、予期された接続の終了であるため、プロシージャを開始しません。Connectがフォールバック・プロシージャ本体で呼び出された場合、無限接続ループを防ぐために、失敗時にプロシージャを再度呼び出すことはありません。スクリプト実行中の通常操作フェーズで接続のクラッシュが検出されると、現在実行中のコマンドが終了した直後にプロシージャが呼び出されます。このような場合、サーバーに正しく転送されたデータの範囲が不明なため、プロシージャを安全なリカバリ(再接続とスクリプトの再開を意味する)に使用できない可能性があることに注意してください。これは、例えばテキスト入力の途中でクラッシュが発生し、接続に失敗する前に何文字が正常に入力されたかを判断できない場合に問題となります。
-
ComparisonFailureFallbackと 呼ばれるプロシージャが Compareto Command または Waitfor Command のマッチ/ミスマッチが失敗し、onfail または ontimeout パラメータで明示的なフェイル・アクションが指定されていない場合に、ComparisonFailureFallback と呼ばれるプロシージャが実行されます。プロシージャ本体内で"{1}"として取得できる最初のプロシージャ引数には、常に呼び出し元の比較コマンドの数値終了コードが含まれます。これは通常、オブジェクトが見つからない場合は "1"、1つ以上のテンプレート画像が見つからないか、読み取ることができない場合は "2 "となります。
次の例は、フォールバック手続きの使用方法を示しています。どちらも単に特定の終了コードでスクリプトを終了します。比較の方は、さらに、後でデバッグできるようにスクリーンショットを作成します。この例は、他の適切なアクションを実行するように簡単に拡張できます。Sendmail コマンドによる電子メールの送信や Pause.
Procedure DisconnectFallback {
 Exit 3
}

Procedure ComparisonFailureFallback {
 Screenshot comparison_failure.png
 Exit {1}
}

// スクリプト本体
Connect localhost:1 password=welcome
Compareto button.png method=search
// ...
バージョン 7.2.4 では、BrowserFailureFallback プロシージャがサポートされました。スクリプトで定義すると、ブラウザのopen/find/closeコマンドが失敗するたびに呼び出されます。これは、3つの追加引数を公開します:
{1} はコマンドの数値終了コード、
{2} は操作を示します。これは、無関係な呼び出しを除外するために使用できます。
-
失敗したコマンドが "Browser open/close" の場合、"open" または "close" に設定されます。
-
失敗したコマンドが "Browser find " で、"elaction" パラメータが指定されていない場合、引数は "find" に設定されます。
-
そうでなければ、引数は失敗したエレメントアクションを指定します。"click"、"submit"、"clear"、"type"、"select" のいずれかです。
{3} はエラーメッセージで、通常は実行ログに記録されるものと同じです。
以下はその例です(Chromiumプラグインが必要です):
Procedure BrowserFailureFallback {
  Log "Failed action: {2} (exit code: {1})"
  Log "Reported error: {3}"
}

Browser open url="https://www.t-plan.com" browser="chromium"

// このコマンドは、間違ったボタンテキストに対して失敗し、"BrowserFailureFallback "プロシージャを呼び出します。
Browser find class="elementor-button-text" text="Why T-Plans" timeout="5s"
2.6 数値表現
数値式は v1.3 からサポートされています。
浮動小数点変数は英語形式(例:「1.25」)で記述してください。
'5s'(5秒)のような時間変数は、time修飾子が式の最後にある場合を除き、受け付けられません。例
-
正解:Wait 5+5s
-
不正解:Wait 5s+5s
サポートされている数値演算子
-
括弧 '(' および ')'
-
プラス '+'
-
マイナス '-'
-
単項マイナス '-' (負の数)
-
乗算 '*'
-
除算 '/'
-
モジュロ除算 '%'
-
累乗演算子 '^'
数値式は、言語内で数値を表す場所であればどこでも使用できます。
# 1 時間待つ - ミリ秒単位
Wait "1*60*60*1000"

# 画像を検索し、その左上隅から10ポイント離れた位置をクリックする
Compareto "pattern.png" method="search2"
Mouse click to="x:{_SEARCH_X}+10,y:{_SEARCH_Y}+10"
数値式に基づいて変数を定義するには Eval コマンドの代わりに Var 例えば、'Eval HOUR_IN_MS=1*60*60*1000'である。
2.7 ブール式
論理式はif/elseやforのような構文を容易にします。以下の演算子がサポートされています:
-
括弧 '(' および ')'
-
大'>'、大 '>='、小 '<'、小'<='。これらの演算子は数値引数を必要とします。
-
'==' と等しく、'!=' または'<>'と等しくない。引数の少なくとも1つが数値でない場合(二重引用符で囲まれた文字列)、プレーンな文字列比較が実行されます。例
-
'yes == no' の結果は偽となる。
-
'yes != no'の結果は真になります。
-
どちらの引数も数値に変換でき、数値が等しいので、'1.0 == 1' の結果は真となります。
-
-
演算子 '&&' と '||' - 論理的な "and" と "or"。これらの演算子はブール引数、つまり他の式を必要とします。例
-
式 '1 > 0 || yes != no' は、2つの式のどちらかが真であるため、真となります。
-
式 '1 > 0 && yes != no' は、一方の式が偽なので偽となります。
-
バージョン2.2以降では、変数の存在や文字列の比較を行う演算子もサポートされています:
-
単項演算子 'exists <variableName>' は変数の存在をテストする。例
-
式
'exists _REPORT_FILE'は、スクリプトがReportコマンドでレポートを作成する場合に真になります。
-
-
演算子 'contains' は、最初の文字列引数がもう一方の引数を含むかどうかをテストします(大文字と小文字が区別されます)。例
-
式
'"{_MACHINE}" contains "sourceforge"'は、接続されているVNCサーバー名に 'sourceforge' が含まれている場合に真になります。
-
-
演算子 'hasphrase' は、最初の文字列がもう一方の文字列を含むかどうかを検証します(7.2.2以降)。”contains” と似ていますが、改行や不要なスペースに寛容です。これにより、OCRで認識されたテキストを画面上で簡単に評価することができます。例
-
式
'"{_TOCR_TEXT}" hasphrase "Hello world I am here"'は、複数行に分割されているか、複数のスペースが含まれているかに関係なく、先に実行された OCR の結果のテキストに指定されたフレーズが含まれていれば真になります。
-
-
演算子 'startswith' は、最初の文字列引数がもう一方の引数で始まっているかどうかをテストします(大文字小文字を区別します)。例
-
式
'"{_DISPLAY}" startswith "localhost"'は、接続されているVNCデスクトップ名が ‘localhost’ で始まる場合、例えば ‘localhost:1’ のように真になります。
-
-
演算子 'endswith' は、最初の文字列引数が他の文字列引数で終わっているかどうかをテストします(大文字と小文字を区別します)。例
-
式
'"{_DISPLAY}" endswith ":3"'は、接続されている VNC サーバーがポート 5903 で動作している場合 (これは通常、デスクトップ名の ':3' ディスプレイ番号で示されます) に真になります。
-
-
オペレータ 'matches' は、最初の文字列引数をjava.util.regex.Pattern 準拠の正規表現と比較します。例
-
例
'"{_DATE}" matches "201008[12][1-5]"は、現在の日付が2010年8月11日から15日の間、あるいは21日から25日の間にある場合に真
-
ブール式は、次の例に示すように、if/elseとfor構文でのみ使用されます。また、ブール式は Eval コマンドに渡すこともできます。
# リモートデスクトップ上の画像を探す
Compareto "pattern.png" method=search

# 画像が見つからなかった場合は終了します、
if ({_EXIT_CODE} > 0) {
  Exit 1
}
詳細は If/Else Statement および For Statement の章をお読みください。
2.8 関数
関数はリリース5で導入されました。これらの関数は、if/else文やfor文、コマンド、その他この仕様で数値表現をサポートするコマンド・パラメータなど、ブーリアン式や数値式が期待される場所であればどこでも使用することができます。 Eval コマンドや、この仕様で数値式をサポートしているその他のコマンド・パラメータなどです。関数名は大文字と小文字を区別しません。
例えば、以下のfor文は10回繰り返し処理を行います:
for (i=0; i<MAX(6,10,9); i=i+1) {
  ...
}
サポートされている関数(カスタム関数が必要な場合はサポートにお問い合わせください):
|
関数 |
説明 |
|---|---|
|
NOT(式) |
ブール値の否定、式がゼロでなければ 1(真を意味する |
|
IF(条件,真の場合の値,偽の場合の値) |
条件が真と評価された場合は一方の値を、偽と評価された場合は他方の値を返す。 |
|
RANDOM() |
0から1の間の乱数を返す |
|
MIN(e1,e2,...) |
与えられた式のうち最小のものを返す |
|
MAX(e1,e2,...) |
与えられた式のうち最大のものを返す |
|
ABS(式) |
式の(負でない)絶対値を返す。 |
|
ROUND(式,精度) |
現在の丸めモードを使用し、指定された桁数に値を丸めます。 |
|
FLOOR(式) |
最も近い整数に値を丸める |
|
CEILING(式) |
最も近い整数に値を丸める |
|
LOG(式) |
式の自然対数(底e)を返します。 |
|
LOG10(式) |
LOG10関数は、式の常用対数(底10)を返します。 |
|
SQRT(式) |
SQRT関数は、式の平方根を返します。 |
|
SIN(式) |
SIN関数は、角度(度単位)の三角正弦を返します。 |
|
COS(式) |
COS関数は、角度(度単位)の三角余弦を返します。 |
|
TAN(式) |
TAN関数は、角度の三角タンゲンを(度単位で)返します。 |
|
COT(式) |
COT関数は、角度の三角コタンジェン(度単位)を返します。 |
|
ASIN(式) |
ASIN関数は、asinの角度を度単位で返します。 |
|
ACOS(式) |
acos角(度単位)を返します。 |
|
ATAN(式) |
atanの角度(度単位)を返します。 |
|
ACOT(式) |
acotの角度を(度単位で)返します。 |
|
ATAN2(y,x) |
atan2の角度(度単位)を返します。 |
|
SINH(式) |
SINH関数は、値の双曲線正弦を返します。 |
|
COSH(式) |
COSH関数は、値のハイパーボリックコサインを返します。 |
|
TANH(式) |
値の双曲線正接 |
|
COTH(式) |
COTH関数は、値の双曲線コタンジェンスを返します。 |
|
SEC(式) |
secant(度単位)関数を返します。 |
|
CSC(式) |
CSC関数は、コセカント(度)を返します。 |
|
SECH(式) |
双曲線セカント(度)を返します。 |
|
CSCH(式) |
CSCH関数は、双曲線コセカント(度)を返します。 |
|
ASINH(式) |
ASINH関数は、双曲線正弦の角度を度単位で返します。 |
|
ACOSH(式) |
ACOSH関数は、ハイパボリックコサインの角度を度単位で返します。 |
|
ATANH(式) |
ATANH関数は、値のハイパボリックタンゲンの角度を返します。 |
|
RAD(式) |
度単位で測定される角度をラジアン単位で測定されるほぼ等価な角度に変換します。 |
|
DEG(式) |
ラジアン単位で測定される角度を、度単位で測定されるほぼ等価な角度に変換します。 |
|
FACT(式) |
整数の階乗値を返します。0または負数の場合は1を返します。 |
2.9 If/Else 文
T-Plan Robotは、Javaで使用されるものと類似した機能と構文を持つif/else文をサポートしています。フォーマットは次のとおりです
if (<boolean expression>) {
    <commands>
} else if (<boolean expression>) {
    <commands>
} else {
    <commands>
}
'else if'および'else'分岐は省略可能です。'else if'分岐の数に制限はありませんが、'else'構文は1つだけ存在できます。注意:囲み中括弧'{'と}'は、上記で示されている通り、関連するif/else/else ifキーワードと正確に同じ行に記述する必要があります。
構造化ブロック全体を終了させる右中括弧'}'は唯一の例外で、1行に1つでなければなりません。例
# リモートデスクトップ上の画像を探す
Compareto "pattern.png" method=search

# 画像が見つからなかった場合は終了します、
if ({_EXIT_CODE} > 0) {
  Exit 1

# 画像がそれ以上見つかった場合、スクリーンショットを撮り、HTMLレポートに警告を追加します。
} else if ({_SEARCH_MATCH_COUNT} > 1) {
  Screenshot unexpected.png
  Warning "Unexpected behavior - the template image was found
{_SEARCH_MATCH_COUNT} times!" image=unexpected.png
}
If/Else 文は、他の構造化プログラミング言語と同様に、ネストしたりFor 文など他の構文と組み合わせたりすることができます。
2.10 For ステートメント
T-Plan Robot は for 文をサポートしており、特定の条件が満たされる限り、値の範囲を反復したり、ループしたりすることができます。for文には2つの一般的な形式があります。
1.条件付き for 文
for 文の最初の型は、指定された論理式の結果が真である限り実行されます:
for (<statement1>; <boolean expression>; <statement2>) {
     <commands>
}
ブール式はすべてのループの前に評価されるので、ループ内のコマンドは、式が最初からfalseであれば、まったく実行されません。
ステートメント1とステートメント2は Eval コマンドを使って評価され、'<変数>=<数値式>'のような構文になります。これらは空でも構いません。以下の例は等価であり、0から5までの変数'index'の値をループします:
for (index=0; {index}<6; index={index}+1) {
  Type {index}
}

Eval index=0
for( ; {index} < 6; ) {
   Type {index}
   Eval index={index}+1
}
バージョン2.3以降では、文のヘッダー内の変数呼び出しが中括弧を省略する、より単純な構文もサポートしています:
for(index=0; index<6; index=index+1) {
}
2.あらかじめ定義された値の集合を反復処理するfor文
この書式では、あらかじめ定義された値の集合を繰り返し処理することができます:
for <変数名> in <スペースで区切られた値のリスト> {
<commands>
}
次の例では、"I speak a English, Spanish, Brazilian Portuguese. "という文章を入力します。
Type "I speak "
for language in English Spanish "Brazilian Portuguese" {
    if ("{language}" == "Brazilian Portuguese") {
        Type "{language}."
    } else {
        Type "{language}, "
    }
}
変数で指定することもできます。バージョン3.0.1以降では、変数で指定したスペースを含む値をサポートしています。次のコードは、変数で値セットを指定した前の例を示しています。
変数呼び出しはダブルクォーテーションで囲んではなりません。
Type "I speak "
Var VALUES="English Spanish \"Brazilian Portuguese\""
for language in {VALUES} {
    if ("{language}" == "Brazilian Portuguese") {
        Type "{language}."
    } else {
        Type "{language}, "
    }
}
for文の実行は、コマンドによって中断することができます。Break コマンドで中断できます。現在のループは Continue コマンドでスキップできます。ループが入れ子になっている場合、break/continue コマンドは最も内側のfor文に適用されます。
次の例では、for 文と Waitfor Command を組み合わせて、リモートデスクトップが更新を停止するまで実行を継続する方法を示します。
# 無限ループ
for (; 0 == 0; ) {
# リモート画面が少なくとも20% 更新されるまで待つ。
# 10秒間更新されなかった場合、ループを抜けます。
 Waitfor update extent=20% timeout="10s" ontimeout="break"
}
2.11 戻り値
v1.3 以降、すべてのコマンドは_EXIT_CODEという変数として利用可能な整数値を返します。0(ゼロ)は通常成功を意味し、それ以外の数値は失敗を意味します。定義された終了コードの値とその意味については、特定のコマンドのドキュメントを参照してください。
戻り値(「終了コード」とも呼ばれる)は、スクリプトの実行を制御し、予期される結果と予期されない結果の両方を処理する方法を定義するために効果的に使用することができます。例えば compareto コマンドは、例えば画像比較が成功した場合は0を返し、そうでない場合は0以外の値を返します。例えば Waitfor Command コマンドは、期待されるイベントを受信すると0を返し、タイムアウトに 達すると0以外の値を返します。 以下の例は、これらの戻り値の使い方を示しています。
# Alt+F2 でGnomeのプログラム実行ウィンドウを開く。
Press Alt+F2 wait=3s

# Gnomeテキストエディタを起動する
Typeline gnome-text-editor

# リモートデスクトップの更新を待つ
Waitfor update extent=30% timeout="10s"

# もし Waitfor が0以外の値を返した場合、タイムアウトに到達した # と判断されます。
# テキストエディタが開けなかった可能性がある
If ({_EXIT_CODE} > 0) {

# スクリーンショットを撮る
  Screenshot failure.png

# スクリーンショットをEメールでテスターに送る
  Sendmail to="tester@dummyserver.com" from="robot@dummyserver.com" server="http://mail.dummyserver.com" subject="Gnome editor failed to open!" attach="{_REPORT_DIR}/failure.png"

# 実行を一時停止し、テスターが修正するのを待つ
 Pause "Paused because Gnome Text Editor failed to start"
}
If/else、for、break 呼び出しは値を返さないことに注意してください。これらのコマンドの後に _EXIT_CODE 変数にアクセスすると、最後に実行されたコマンドの終了コードが格納されます。
2.12 Java コードブロック
JavaコードブロックはTPRスクリプトからJavaコードを直接呼び出すことを可能にします。これは、スクリプト言語にこだわりたいが、特定のカスタム機能が必要な場合をサポートするために設計されました。
Javaコードブロックを正しく動作させるには、"java -jar robot.jar"コマンドではなく、"java -classpath <libs> com.tplan.robot.ApplicationSupport" コマンドを使ってJDK上でRobotを実行するようにしてください。後者の構文は、環境によってはJavaコンパイラの'CLASSPATH'への入力に失敗し、Javaソースコードのコンパイルと実行に失敗します。詳細はリリースノートの startup chapter を参照してください。
Javaコード・ブロックの一般的な構文を以下に示します。import句のサポートはv2.2で提供されたことに注意してください。以前のバージョンでは、クラスを完全修飾名で参照するか、環境設定preferencesで管理されるテストクラステンプレートにインポートを追加する必要があります。
java {
  <import clauses>
  <Java code>
} endjava
このような各ブロックは内部的に DefaultJavaTestScript クラスを拡張した Java スクリプトに変換され、ブロック内の Java コードはその test() メソッドに挿入されます。クラス・テンプレートは Java コード・ブロック構成で公開され、Preferences ウィンドウからカスタマイズできます。次の例はその例です:
|
Java コード・ブロック |
結果の Java スクリプト・クラス |
|---|---|
|
Java
|
Java
|
このメカニズムには、いくつかの実用的な影響があります:
-
Java コードブロックは Java コンパイラへのアクセスを必要とするため、T-Plan Robot は Java Development Kit (JDK) 上で動作するか、有効な JDK インストールパス (v2.3.3 以降) で設定されている必要があります。もしツールがJava Runtime Environment (JRE)だけで動作し、JDKが利用できない場合、コンパイラはエラーを報告します。このドキュメントの第1章を参照してください。Release Notes 章を参照してください。
-
スクリプト内でJavaコード・ブロックを使いすぎないようにしてください。スクリプトとツール全体のパフォーマンスが低下する可能性があります。プリコンパイルされたJavaコードの再利用可能なパラメトライズされた部分を作成したい場合は Run 機能を探します。
-
デフォルトでは、テンプレートは com.tplan.robot.scripting、java.io、java.util パッケージのすべてのクラスをインポートします。他のパッケージのクラスを使いたい場合は、Javaコードの前に import 句を置きます。他の方法としては、完全修飾名(例えば java.awt.Point など)でクラスを参照するか、Java コード・ブロックの環境設定でクラス・テンプレートにインポートを追加します。テンプレートの方法を選択した場合は、スクリプトを別のマシンに移行するときに、必ずそれを再適用してください。
-
各 Java コード・ブロックはスタンドアロンのJavaクラスとして動作するため、あるブロックで作成されたローカル変数やオブジェクトは、別のブロックでは表示されません。複数の Java ブロックでオブジェクトを共有する必要がある場合は、それらをコンテキストに格納します。コンテキストは基本的にマップであり、スクリプトのコンパイルや実行の間ずっと存在し、重要なオートメーション・フレームワーク・オブジェクトへの参照を保持します。オブジェクトをコンテキストに格納するには getContext().put() を使用し、オブジェクトを取得するには getContext().get() を使用します。すでに存在するフレームワークオブジェクトの参照を上書きしないように、必ず一意のキーを使用してください。詳細については、ScriptingContext インタフェース仕様を参照してください。
-
Javaコードブロックは、コンテキストのgetContext().getVariable()とgetContext().setVariable()メソッドを通して、TPRスクリプトとグローバル変数を共有することができます。コードブロックは DefaultJavaTestScript クラスを継承しているので、スクリプト言語のコマンドに対応するメソッドを呼び出すこともできます。
次の例では、変数の共有について説明します。スクリプトはまず、テンプレート・パスを "C:/templates" に設定します。Javaコードはコンテキストを通してパスを取得し、ディレクトリ内のすべての PNG ファイルをリストアップし、FILE<n> と呼ばれる番号付き変数として、ファイル・カウンタFILECNTとともにコンテキスト変数に格納します。TPR スクリプトが再開すると、リストされたファイルを繰り返し、各 PNG ファイルに対して画像比較を実行します。
Var TEMPLATE_DIR="C:\templates"

# この行はJavaコードによって入力される変数のダミー値を宣言します。
# コンパイラが for() ループやCompareToコマンドでエラーを報告するのを防ぎます。
Var FILECNT=0 FILE1=dummy.png

java {
  File files[] = getContext().getTemplateDir().listFiles();
  int i = 0;
  for (File file : files) {
    if (file.isFile() && file.getName().endsWith(".png")) {
      i++;
      getContext().setVariable("FILE"+i, file.getName());
      }
    }
  getContext().setVariable("FILECNT", Integer.toString(i));
} endjava

for (i=1; {i}<{FILECNT}+1; i={i}+1) {
  Compareto "{FILE{i}}" method=search
}
3.コマンド構文
3.1 デスクトップコマンド
3.1.1 AI
説明
AI - AIと対話する(8.2以降)。
"AI Chat" は、AIにメッセージを送信し、その応答を_AI_RESPONSEスクリプト変数に保存します。現在のデスクトップ画面の画像やテキストファイルを添付するには、screenと attach パラメータを使用します。
AIの応答は3つの方法でテストできます:
-
“contains" およびオプションの "distance" パラメータを使用して、AI応答が特定の語句を含んでいることを確認します。 応答が一致しない場合、スクリプトは終了します 。
-
より柔軟なテキストマッチングを行うには、"pattern"正規表現にマッチする応答を検索する。応答が一致しない場合、スクリプトは終了 します。
-
“contains” も "pattern" も指定しなかった場合、応答はスクリプト変数 _AI_RESPONSE に保存され、スクリプトの続行が許可されます。その後、if/else を使用して変数をテストすることができます。 論理式 contains"、"startswith"、"endswith"、または "matches" などのブール式を使用して変数をテストすることができます。もうひとつの方法は 文字列コマンド(Stringコマンド)でテキストを解析することです。.
以下の 例セクションをご覧ください。
利用方法
ai chat [message=<text>] [ai=<Claude|OpenAI>] [screen=<true|false>] [attach=<file(s)>] [contains=<pattern>] [distance=<number>] [pattern=<regexp>]
-
赤色は 必須パラメータです。
オプション
message=<text>
-
メッセージテキスト("質問")、例えば "Is there a dog on the screen?"。
ai=<Claude|OpenAI>。
-
オプションのAI名。"Claude" または "OpenAI" のいずれかです。。この名前は通常、複数のAIが設定されていて、特定のAIをターゲットにしたい場合にのみ指定します。名前が指定されていない場合、コマンドは設定されているAIを使用するか、両方が設定されている場合はClaudeを使用します。
screen=<true|false>
-
true "を指定すると、接続されているデスクトップ画像のコピーをAI質問に添付します(オプション)。デフォルト値は "false"(画面を添付しない)です。
attach=<ファイル>
-
オプションのファイル、または質問に添付するファイルのコロンまたはセミコロンで区切られたリスト。これは以下のものに限られます:
-
Javaでサポートされている画像ファイル (PNG、JPG、BMP、GIF、TIFF、WBMP)
-
プレーンテキストファイル、およびXML、HTMLなどの可読テキストコンテンツを含むファイル。
-
[text=<パターン>]
-
AIの回答を照合するためのオプションの大文字文字(「含む」)。例えば、"dog "という値を指定すると、AI応答が "dog "という単語を含む場合は合格となりますが、"DOG" や "Dog" を含む場合は不合格となります。寛容なマッチングには、"distance "または "pattern "パラメータを使用します。text "および"pattern "パラメータは相互に排他的であり、一度に使用できるのは1つだけです。
[distance=<数値>](距離=<数値>)
-
許容テキスト検索を行うために”contains”パラメータと組み合わせてオプションの距離を使います。。パラメータがデフォルト値0(距離なし)に設定されている場合、コマンドはプレーン文字列検索に戻り、提供された文字列の最初の出現箇所を引数テキストで検索します。
許容(ファジー)テキスト検索は、距離値が 1 以上の場合に実行されます。テキストは、指定された文字列と十分に類似した文字列の出現を検索します。許容度(類似度)はレーベンシュタイン距離に基づいています。これは、一方の文字列を他方の文字列に変換するのに必要な最小の編集回数として定義され、許容される編集操作は1文字の挿入、削除、置換です。この距離は、最大で何文字が省略されるか、または正しく認識されないと、サンプルテキストが等価であるとみなされるかをおおよそ規定しています。
例えば、"dog "の1文字を置換すると"fog "になるため、"contains=dog distance=1" のパラメータでは、"There is fog" という応答がマッチします。
[pattern=<正規表現>]
-
java.util.regex.Pattern に準拠した正規表現で応答を検索します(オプション)。. "の正規表現は、デフォルトでは行末を除くすべての文字にマッチします。この動作は、コマンドの環境設定で変更することができます。
contains "と"pattern "パラメータは互いに排他的であり、一度に使用できるのは1つだけです。
例
-
画面上に犬がいることを確認し、いない場合はスクリプトを終了してください。
Ai chat message="Does the screen show a dog? Answer just \"yes\" or \"no\"." screen=true ai=OpenAI pattern=[Yy]es
-
画面上に犬がいることを確認し、その結果に基づいて行動してください。
Ai chat message="Does the screen show a dog? Answer just \"yes\" or \"no\"." screen=true ai=OpenAI
if ("{_AI_RESPONSE}" matches "[Yy]es") {
    // There's a dog on the screen -> do something
    ...
} else {
    // There's no dog -> do something else
    ...
}
3.1.2 Browser
Browser - Selenium 駆動のウェブブラウザを自動化します(v5 以降)。技術と設定ステップの概要は、別の documentでまとめられています。コマンドは以下のアクションをサポートします:
-
“browser_open” 選択されたウェブブラウザを開き、指定されたウェブページをロードします。ブラウザはローカルでもリモートでもかまいません(Selenium Grid、6.3以降でサポート)。バージョン 8 以降、コマンドは新しいタブやウィンドウを開くこともできます。
-
“browser_find” 指定された条件でウェブページの要素(HTML タグ)を検索し、オプションのアクション(クリック、タイプ、サブミット、クリア)を適用します。
-
"browser_switch" は、タブやウィンドウを切り替えたり、それらを記述する変数を更新したりします。v8からサポートされています。
-
“browser_close” タブ、ウィンドウ、あるいはブラウザ全体を閉じ、 Selenium セッションを終了します。
リリース 8 から、ほとんどのブラウザコマンド操作は、利用可能なタブとウィンドウを記述する変数のセットを次のように入力します。追加パラメータなしで "Browser switch" を実行することで、強制的に更新することもできます:
|
変数名 |
変数名 |
|---|---|
|
_BROWSER_WINDOW_COUNT |
利用可能なウィンドウ/タブの数。 |
|
_BROWSER_WINDOW_NUMBER |
現在のウィンドウの通常番号。 |
|
_BROWSER_WINDOW_ID |
現在のウィンドウ/タブID。Selenium によって各ウィンドウまたはタブに割り当てられたユニークな文字列です。 |
|
_BROWSER_WINDOW_ID<n> |
n番目のウィンドウの ID。'n'は1から _BROWSER_WINDOW_COUNT で指定されたウィンドウ数です。 |
|
_BROWSER_WINDOW_TITLE |
現在のウィンドウ/タブのタイトル。 |
|
_BROWSER_WINDOW_TITLE<n> |
n番目のウィンドウのタイトル。 'n'は1から_BROWSER_WINDOW_COUNT で指定されたウィンドウ数です。 |
|
_BROWSER_WINDOW_URL |
現在のウィンドウ/タブの URL。 |
|
_BROWSER_WINDOW_URL<n> |
n番目のウィンドウのURLで、'n'は1から_BROWSER_WINDOW_COUNT で指定されたウィンドウ数です。 |
SYNOPSIS
ローカルブラウザ:
Browser open browser=<browser_code> [url=<web_page>] [args=<CLI_arguments>] [opt-<name>=<value>]
リモート・ブラウザ:
Browser open browserName=<browser_code> hub=<hub_address> [url=<;web_page>]
すでに開いているブラウザで新しい URL を開く:
Browser open url=<webpage> [target=<self|window|tab>]
*赤色は必須パラメータ
オプション
browser=<browser_code>
– ブラウザのコードネーム。現在サポートされている値は以下の通りです:
-
"ie" - Microsoft Internet Explorer
-
"edge" - Microsoft Edge
-
"firefox" - Firefox (Gecko)
-
“chrome" - Google Chrome
-
"safari" - Safari(Mac OS X)
-
"chromium" - プラグインのインストールが必要 Chromium Web Driver プラグインがインストールされている必要があります (v7.0+)
url=<ウェブページ>
-
読み込むウェブページ。例:"https://www.t-plan.com"。
args=<CLI_引数>
-
ブラウザの種類によってサポートされている場合、ブラウザプロセスに渡される CLI 引数。v7.0 からサポートされています。詳細は seleniumの説明を参照してください。
opt-<名前>=<値>
-
ブラウザの種類がサポートしている場合に、ブラウザプロセスに渡されるプリファレンス値。v7.0 からサポートされています。例えば、Chromeは "download.default_directory" 環境設定を使ってデフォルトのダウンロードディレクトリを設定します。ダウンロードを
C:\MyStuff にリダイレクトするには、opt-download.default_directory="C:\MyStuff" を 使用してください。
hub=<ハブアドレス>
-
Selenium Grid の ハブアドレス。
browserName=<browser_name>
-
ハブが認識するブラウザ名。
target=<self|window|tab>
-
指定したウェブページを開く場所。"self" (現在のウィンドウで開く)、"window" または "tab" (新しいウィンドウ/タブで開く) のいずれか。デフォルト値は "self"。v8 以降でサポートされています。
Browser find [timeout=<time_interval>] [elaction=<action>] [elnumber=<element_number>] [eltext=<text>] [elindex=<dropdown_item_index>] [elvalue=<dropdown_item_value>] [continue=<true|false>] [<attributes>]
オプション
timeout=<time_value>
– 要素を探し続ける任意の時間です。。有効な time_valuesでなければなりません。
-
タイムアウトが指定されていない場合、コマンドは要素を一度だけ探します。
-
タイムアウトが指定され、それが0より大きい場合、コマンドは時間が経過するか要素が見つかるまで要素を探し続けます。
elaction=<アクション>
– 結果の要素に適用するオプションのアクション。検索によって複数の要素が生成された場合、elnumberパラメータを使用してターゲット要素を選択することができます。サポートされるアクションは以下の通りです:
-
"click" - 要素をクリックします。リンクやボタンなどのクリック可能な要素にのみ適用されます。
-
“type" -eltextパラメータで指定したテキストを入力します。text要素にのみ適用されます。
-
"clear" - 要素のテキストをクリアします。text要素にのみ適用されます。
-
"submit" - フォームを送信します。
-
"select" - 表示テキスト(eltext)、項目インデックス(elindex)、または "option" HTMLタグの "value " 属性で指定された値(elvalue)のいずれかによって、ドロップダウン項目を選択します。
elnumber=<要素番号>
– elaction で指定されたアクションで対象とする要素の序数。デフォルト値は1です(最初の要素を使用します)。要素数が elnumber より小さい場合、コマンドはエラーを投げます。
eltext=<テキスト>
– elaction アクションが "type" の場合、パラメータはtext要素に入力するテキストを指定します。アクションが "select" の場合、パラメータは選択されるドロップダウンの可視テキストを指定するために使用されます。 elaction=type パラメータとともに使用する必要があります。
elindex=<dropdown_item_index>
– 選択するドロップダウン項目のインデックス。インデックスは0から始まります。”select" HTML タグで表されるドロップダウン要素にのみ適用可能。
elvalue=<ドロップダウン項目の値>
– 検索・選択されるドロップダウン項目の値。”option" HTMLタグの "value "属性で指定します。ドロップダウン要素("select" HTML タグ)にのみ適用可能。
continue=<true|false>
– 失敗した場合の処理方法を指定します。要素が見つからず、このパラメータが指定されていないか false の 場合、コマンドはスクリプトを終了します。このパラメータがtrueの場合、スクリプトの続行が許可され、コマンドは0以外の終了コードを返します。
-次のような name=value ペアの形式の属性 (検索条件) のリスト:
-
"xpath=<xpath_expression>" XPath式による検索を行います。このオプションを使用する場合、他の属性を指定することはできません。
-
"css=<css_selector> CSS セレクタで検索します。このオプションを使用する場合、他の属性を指定することはできません。
-
"id=<element_id>" 要素IDで検索します。
-
"class=<class(es)>" CSS クラス、または要素が属するクラスの空白区切りのリスト。
-
"tagname=<tag_name>" ”a", "div", "img" などの HTML タグ名。
-
"text=<text>"正確な要素テキスト。
-
"parttext=<partial_text>"-". テキストが指定された部分テキストを含む要素を検索します。要素のテキストは親要素に継承されるため、これらの基準は一意ではないことに注意してください。例えば、ページ全体のテキストを取得するには、"HTML" または "body" タグを検索します。
-
"link=<link_text>" 指定されたテキストのリンクを検索します。
-
"partlink=<partial_link_text>" テキストが指定された文字列を含むリンクを検索します。
-
Selenium がサポートするパラメータに加えて、コマンドは任意の HTML タグの属性とその値を受け入れます。たとえば、フォームのボタンを名前で識別するにはname=<name> を使います。
HTML 属性の概要については Mozilla dev docs を 参照してください。属性のサポートはブラウザによって異なり、認識できないものもあります。
Browser switch[id=<window_ID>] [title=<title_or_part>] [number=<window_number>] [url=<URL_or_part>] [continue=<true|false>] です。
-
タイトル、URL、番号、ウィンドウIDのいずれかで識別される特定のタブまたはウィンドウに切り替えます。識別パラメータが指定されていない場合、コマンドは browser_varsを更新します。
OPTIONS
id=<id=<window_ID>
-
ウィンドウ/タブID。Seleniumが各タブやウィンドウに割り当てる一意の文字列です。ウィンドウ変数から利用可能なIDを取得する利ことができます browser_vars.
title=<title_or_part>
-
ウィンドウ/タブのタイトルまたはその一部。利用可能なタイトルの一覧は browser_vars を参照してください。タイトルの検索では大文字と小文字が区別されます。例えば、「Google」というタイトルのタブがある場合、title="Goo "を使ってそのタブに切り替えることができます。指定したタイトルに一致するタブが複数ある場合は、最初に見つかったタブが選択されます。一致するタブが見つからない場合、"continue=true "パラメータが指定されない限り、コマンドはスクリプトを終了します。
number=<window_number>
-
1(1)から始まるウィンドウ/タブの序数。ウィンドウの順番はSeleniumによって決定され、通常は作成された順番を反映します。現在利用可能なウィンドウの数は_BROWSER_WINDOW_COUNTbrowser_varsによって反映されます。 利用可能なウィンドウの数が要求された数より少ない場合、"continue=true" パラメータが指定されない限り、コマンドはスクリプトを終了します。
url=<URL_or_part>
-
ウィンドウ/タブのURLまたはその一部。利用可能なURLの一覧は browser_vars を参照してください。検索では大文字と小文字が区別されます。例えば、"https://www.google.com" のタブがある場合、url="google "を使って切り替えることができます。指定したタイトルに一致するタブが複数ある場合は、最初に見つかったものが選択されます。一致するタブが見つからない場合、"continue=true "パラメータが指定されない限り、コマンドはスクリプトを終了します。
continue=<true|false>
-
失敗時の処理方法を指定する。ターゲットウィンドウまたはタブが見つからず、このパラメータが指定されていないか、falseの 場合、コマンドはスクリプトを終了します。このパラメータがtrueの場合、スクリプトの続行が許可され、コマンドは0以外の終了コードを返します。
Browser close
*赤色は必須パラメータを示します。
オプション
scope=<tab|all>
-
閉じるスコープ。all" はデフォルトで、ブラウザ全体 (すべてのタブとウィンドウ) を閉じ、Selenium 接続を終了します。tab "の値は、現在のタブまたはウィンドウだけを閉じ、残りのタブまたはウィンドウがない場合にのみ接続を終了します。
例
Browser open browser=edge url="https://t-plan.com"
3.1.3 Connect
説明
Connect - デスクトップに接続する。プロトコル、ホスト名または IP アドレス、オプションのポートが引数 URL に指定されます。接続が確立されると、暗黙の変数_MACHINE と_DISPLAY の暗黙の変数が更新されます。
サーバー接続のための中央障害ポイントの設定方法については、 DisconnectFallback Fallback Procedures を参照してください。
SYNOPSIS
connect <URL> [user=<user>] [password=<password>] [force=<false|true>] [onpass=<command>] [onfail=<command>] [params=<parameters>] [paramseparator=<delimeter>]
-
赤は必須パラメータを示します。
オプション
URL
-引数は既知の connectionmanager (v4.2以降)、または <protocol>://<host_or_IP>[:<port>] の形式で有効なURLでなければなりません。プロトコルは、サポートされているプロトコルコードのいずれかと等しくなければなりません。T-Plan Robotはデフォルトで7つのクライアント (プロトコル) をサポートしています:
-
RFB (Remote Frame Buffer) v3.3クライアント (プロトコルコード "rfb")。これはVirtual Network ComputingまたはVNCとしてよく知られています。このクライアントは互換性があり、TightVNC、RealVNC、UltraVNC などの RFB v3.3 準拠のVNCサーバーに接続できます。テスト環境は Release Notes#vnc ドキュメントを参照してください。クライアントの実装の詳細は vnc.
-
Static Image (プロトコルコード "file"; v2.2以降) では、ファイルから画像を読み込み、ライブデスクトップと同じようにテストすることができます。クライアントは、PNG、BMP、WBMP、GIF など、Javaに準拠したすべてのロスレス画像フォーマットをサポートしています。ファイルが更新されるとクライアントが画像を再読み込みするメカニズムがあるので、ファイルシステム内の画像にグラフィカルな出力を生成するアプリケーションのテストにも使用できます。接続 URL は "file://<image_path>" という標準的な形式で、相対パスや ZIP ファイルやJARファイルにバンドルされた画像を特別に扱います。詳細は staticimage.
-
Android over ADB(プロトコルコード "adb"、3.1以降)により、Android Debug Bridge(ADB)経由でAndroidデバイスを自動化できます。詳細は android.
-
ローカルデスクトップ(プロトコルコード「java」、3.2以降)では、ローカルデスクトップ上に表示されるアプリケーションやシステムコンポーネントを自動化できます。詳細は local.
-
iOS Mirror(プロトコルコード "apple"、3.3以降)では、AirPlayスクリーンミラーリングとVNCサーバーを組み合わせて、iOSデバイス(iPhone、iPad)を自動化できます。プレーンなVNC接続と比較して、このソリューションは画面パフォーマンスが非常に速く、ゲームやグラフィックプログラムなどのOpenGLコンテンツをサポートしています。詳細は ios.
-
iOS Over Xcode (プロトコルコード "xcode"、4.3.1以降)は、WiFiネットワークとLightning USBケーブルを介してMac OS Xマシンの両方に接続されたiOSデバイスの自動化を可能にします。詳細は xcode.
-
RDP Server (プロトコルコード "rdp"、4.3以降)は、Microsoft Terminal Servicesとしても知られるRDPプロトコルによる自動化をサポートします。詳細は rdp.
ポートが明示的に指定されていない場合、デフォルトはプロトコル固有のウェルノウンポートになります。例えば、RFB/VNCサーバーはデフォルトで5900番ポート、Java RMIは1099番ポート、RDP(Windows Terminal Services)は 3389 番ポートで起動します。Linux/Unix上で動作するVNCに接続したい場合、デフォルトのRFBポートはX-Windowsサーバーによって占有されているため、通常は5901以上のポートを指定する必要があります。
URL にプロトコルが省略されている場合、スクリプトのデフォルトはRFB(VNC)である。この場合、ポート番号は、ポート番号から5900を引いた表示番号として扱われます。直接ポートを指定する場合は、ダブルコロンで指定します。例えば、"localhost:1 "と "localhost::5901" の両方は、ポート5901 で動作する同じローカルVNCサーバーを参照します。標準的なURL形式の同じアドレスは、"rfb://localhost:5901" です。
user=<username>
デスクトップを認証するためのユーザー名(ID)。このパラメータは将来の使用やサードパーティの拡張のために予約されており、現在サポートされているプロトコルでは使用されません。
password=<password>
デスクトップサーバーを認証するためのパスワード。サーバーがパスワードを必要としないように構成されている場合、このパラメータは無視されます。
force=<false|true>
同じサーバーとポート(ディスプレイ)がすでに接続されている場合、再接続は行われません(force=false)。現在の接続を強制的に終了してサーバーに再接続するには、このパラメータをtrueに設定します。デフォルト値は false です。
onpass=<コマンド>
。サーバーへの接続に成功したときに実行するコマンド。単一のコマンドでなければなりません。一連のコマンドを呼び出すには、プロシージャまたは後続のIf/Else Statementコマンドの終了コードをテストします。
onfail=<command>
-Connectが接続に失敗したときに実行するコマンド。単一のコマンドでなければなりません。一連のコマンドを呼び出すには、プロシージャまたは後続のIf/Else Statementコマンドの終了コードをテストする。
params=<param_name_and_value_pairs>
-カスタムクライアントパラメータのリスト。このオプションは、paramseparator オプションと一緒に、現在サポートされているプロトコルでは使用されておらず、将来の使用やカスタム拡張のために予約されています。これらは、サードパーティのクライアントプラグインへの汎用的なログインデータの転送をサポートするためのものです。リストには、カンマ(',')または paramseparator 引数で指定されたカスタムセパレータで区切られた、任意の数のパラメータ名と値のペアを含めることができます。
例えば、2つのパラメータ PARAM_A=value_A と PARAM_B=value_B を指定する場合、引数は "PARAM_A,value_A,PARAM_B,value_B" のようになります。
paramseparator=<delimeter>
-params 引数で指定されたパラメータ名と値のリストのためのオプションのセパレータ。指定しない場合、デフォルトはカンマ(",")。
戻り値
コマンドは、成功すると 0 (ゼロ) を返し、指定されていない理由で接続に失敗すると 1 を返します。UltraVNCサーバがMSログオンを要求するなど、サポートされていない認証方法で失敗した場合、コマンドは値10を返します。
例
Connect rfb://localhost:5901 password=テスト
Connect localhost:1 password=テスト
Connect localhost::5901 password=テスト
これら3つの例はすべて同じで、ローカルマシンのディスプレイ番号1(ポート5901)で動作するVNCサーバーに接続されています。パスワード認証は期待されます。これはLinux/Unixシステムで典型的で、ポート5900は通常X-Windowsサーバーが占有し、VNCサーバーは通常ポート5901以上で動作します。
Connect "Local VNC"
-
connectionmanagerに登録されている「ローカルVNC」接続に接続します。サーバーURLとパスワードは接続レコードから読み込まれます。
Connect rfb://mywindows.companyxy.com:5902 password=mypassword force=true onfail="exit 2"
-mywindows.companyxy.com というサーバー上で動作しているRFB(VNC)サーバーに接続します。ツールがすでにこのサーバーに接続されている場合は、セッションを終了して再接続する。接続に失敗した場合は、終了コード 2 でスクリプトの実行を終了します。
Connect File://C:¦Screen.png
-
指定された画像を読み込み、デスクトップの代わりに表示します。
Connect file://C:¦testdata¦mages¦images.jar!/data/screen.png
-
指定したJARファイル(ZIPも可)内の/data/screen.pngとしてzip圧縮された画像を読み込み、デスクトップの代わりに表示します。
Connect file://screen.png
-
指定された画像を読み込み、デスクトップの代わりに表示する。URLは相対URLのため、画像は製品のインストールパスから読み込まれます。
Connect file://{_SCRIPT_DIR}/screen.png
-
このコマンドを呼び出しているスクリプトと同じフォルダにある画像を読み込んで、デスクトップの代わりに表示します。
Connect rfb://mywindows.companyxy.com:5902 password=mypassword force=true onfail="exit 2"
-mywindows.companyxy.comというサーバー上で動いているRFB(VNC)サーバーに接続する。ツールがすでにこのサーバーに接続されている場合は、セッションを終了して再接続する。接続に失敗した場合は、終了コード 2 でスクリプトの実行を終了します。
Connect adb://default
-
USBケーブルでローカルPCに接続された最初のAndroidデバイスに接続します。
Connect adb://MB104PY14322
-
指定したシリアル番号のAndroid端末にUSBケーブルで接続します。
Connect java://localhost
-
ローカルのデスクトップに接続します。
Connect apple://192.168.1.2:5901
-iOSデバイスに ios 接続します。この例では、デバイスがネットワークに接続され、指定されたIPアドレスを持ち、5901番ポートでVNCサーバーを実行していると仮定しています。
3.1.4 Disconnect
説明
Disconnect - デスクトップ・サーバとの接続を切断します。接続がない場合、コマンドは何もしません。接続が切断されると、定義済みの変数 _MACHINE と _DISPLAY はクリアされます。
利用方法
disconnect
戻り値
このコマンドは、切断に成功すると0(ゼロ)を返し、切断に失敗すると1を返します。
例
Disconnect
-現在接続しているデスクトップから切断します。
3.1.5 ジェスチャー
ジェスチャー - タッチスクリーンジェスチャーをデザインして実行します(v6.2以降)。これは、以下のようなモバイルデバイス接続でのみサポートされています:
このコマンドは以下の動作をサポートします:
-
Gesture press 指定した位置で指を押したことをジェスチャバッファに記録します。
-
Gesture Move 指定した指の新しい場所への移動(ドラッグ)を記録します。
-
Gesture Release 指定した指のリリースを記録します。
-
Gesture Save 指定した名前でジェスチャを保存し、ジェスチャバッファをクリアする。
-
Gesture Execute 接続デバイス上でジェスチャを実行し、ジェスチャバッファをクリアする。
-
Gesture Clear ジェスチャバッファをクリアして、新しいジェスチャを設計できる状態にします。これは保存されたジェスチャには影響しません。バッファはデフォルトで "ジェスチャ実行"および "ジェスチャ保存"によってバッファがクリアされるので、通常はこのコマンドは必要ありません。
典型的なジェスチャーのシナリオ
-
押す」、「動かす」、「離す」のアクションを組み合わせてジェスチャーをデザインします。複数の指を使うジェスチャーは、常に並行して実行されます。例えば、1本指のL字ドラッグなどです:
JavaScriptGesture press finger=0 to=x:200,y:200 Gesture move finger=0 to=x:200,y:500 Gesture move finger=0 to=x:350,y:500 Gesture release finger=0 -
一度だけのジェスチャーはすぐに実行され、破棄されることがあります:
JavaScriptGesture execute -
ジェスチャーを再利用したい場合は、まずジェスチャーを保存し、いつでも名前を付けて実行できます:
JavaScriptGesture save name=L-shape Gesture execute name=L-shape -
保存されたジェスチャーは、カスタム位置から開始することができます。 デフォルトのジェスチャー開始位置は、最も低い指IDの「プレス」位置です(通常は指番号0ですが、許可された範囲内で任意の指番号を付けることができます)。たとえば、この例では [200,200] です。350,200]より右から開始させるには、次のようにします:
JavaScriptGesture execute name=L-shape start=x:350,y:200移動したジェスチャーがスクリーンに収まることを確認してください。そうしないと、このコマンドはジェスチャをスクリーン境界にトリミングし、ジェスチャの機能を変更する可能性があります。
SYNOPSIS
press finger=<fingerID> to=x:<X-coordinate>,y:<Y-coordinate>
*赤い色は必須パラメータを示します。
オプション
finger=<指ID>
-
指のID。サポートされる指の最大数は接続とデバイスに依存しますが、通常は5以上です。
to=x:<X座標>,y:<Y座標>
-
指を押す位置。
move finger=<fingerID> to=x:<X-coordinate>,y:<Y-coordinate>
※ 赤色は必須パラメータです。
オプション
finger=<fingerID>
-
指のID。サポートされる指の最大数は接続とデバイスに依存しますが、通常は5以上です。
to=x:<X-座標>,y:<Y-座標>
-
最後の位置から指を移動(ドラッグ)する場所。
release finger=<fingerID>
*赤い色は必須パラメータを示します。
オプション
finger=<fingerID>
-
指のID。サポートされる指の最大数は接続とデバイスに依存しますが、通常は5以上です。
save name=<name> clear=<true|false>
※ 赤色は必須パラメータを示します。
オプション
name=<name>
-
ジェスチャー名。ジェスチャー名は大文字と小文字を区別します。同じ名前を繰り返し使用すると、元のジェスチャーが上書きされます。
保存されたジェスチャーは、「clear」アクションやパラメータによって消去されることはありません。作成した時点からスクリプトが終了するまで使用できます。環境用の標準ジェスチャのセットを作成するには、名前を付けたジェスチャのライブラリ(スクリプト)を作成し、スクリプトにリンクするには Includeまたは Runコマンドを使用してスクリプトにリンクします。
clear=<false|true>
-
ジェスチャバッファをクリアして、新しいジェスチャを設計できるようにするかどうかを示します。クリアすると、これまでに記録されたすべての「押す」「動かす」「離す」アクションが破棄されます。保存されたジェスチャには影響しません。デフォルト値は 'true' (バッファをクリア) です。
ジェスチャの実行 name=<name> start=x:<X-coordinate>,y:<Y-coordinate> duration=<time> clear=<true|false> count=<number> wait=<time>
*赤色は必須パラメータ
オプション
name=<名前>
-
実行するジェスチャー。スクリプトによって作成され、「Gesture save」によって保存された既存のジェスチャの名前でなければなりません。ジェスチャー名は大文字と小文字を区別します。
ジェスチャ名が指定されていない場合、コマンドはジェスチャバッファの内容を実行します、
start=x:<X座標>;,y:<Y座標>
-
カスタム開始点からジェスチャを実行します。デフォルトのジェスチャ開始ポイントは、最も低い指IDの「押す」位置です(通常は指#0ですが、許可された範囲内で任意の指番号を付けることができます)。このパラメータを使用すると、画面上の別の場所からジェスチャーを実行できます。
再配置されたジェスチャーがスクリーンにフィットしない場合、コマンドはそれをスクリーンの境界線にトリミングします。これは予期しない結果につながる可能性があります。
duration=<時間>
-
ジェスチャの継続時間。値はミリ秒か有効な時間でなければなりません。Time Values.デフォルト値は 500 ミリ秒 (0.5 秒) です。
clear=<false|true>
-
ジェスチャバッファをクリアして、新しいジェスチャを設計できるようにするかどうかを示します。クリアすると、これまでに記録されたすべての「押す」「動かす」「離す」アクションが破棄されます。保存されたジェスチャには影響しません。デフォルト値は 'true' (バッファをクリア) です。
count=<数値>
-
ジェスチャを実行する回数。デフォルト値は1(1回実行)。
wait=<時間>
-
ジェスチャが実行された後に待つ時間。次のコマンドが
「Wait <time>」であった場合と同じ効果があります。値はミリ秒数か有効な値でなければなりません。Time Values. デフォルト値は0(待機しない)です。スクリプトは、_GESTURE_WAIT 変数に希望の遅延を設定することで、デフォルト値を設定できます。
Gesture clear
*赤色は必須パラメータを示します。
オプション
なし。
例
Gesture press finger=0 to=x:125,y:202
Gesture release finger=0
Gesture save name=press
Gesture execute name=press duration=1s
– 指定した場所を1秒間長押しする。
Gesture press finger=0 to=x:300,y:200
Gesture press finger=1 to=x:100,y:500
Gesture move finger=1 to=x:500,y:500まで
Gesture release finger=1
Gesture release finger=0
Gesture save name=rotate
Gesture execute name=rotate
-
一本の指を長押ししながら、もう一本の指をその下の水平方向にドラッグする。
-
これは例えばGoogleマップを回転させます。
3.1.6 モバイル
モバイルコマンドは7.1からサポートされている。このコマンドは Android Over ADB および xcode 接続でモバイル固有の機能を提供します。
このコマンドは、別々の製品として提供されていた従来の Androidと iOSの 拡張機能(プラグイン)に取って代わるものです。その目的は、モバイルデバイスの自動化のための共通言語を提供し、プラグインのインストールによるオーバーヘッドを回避することです。iOSとAndroidのオペレーティングシステムの性質が異なるため、すべてのモバイルコマンド機能が両方の接続で同じようにサポートされているわけではありません。例えば、ファイルのダウンロードとアップロードはAndroidでのみサポートされ、キーボードマップの操作はiOSに固有です。両プラットフォームを対象とした単一のスクリプトを作成する場合は、本文書の機能互換性に関する注意事項に注意してください。
サポートされている操作の完全なリストは次のとおりです:
|
操作 |
説明 |
iOS Xcode経由 |
Android ADB経由 |
レガシーiOS/Android
|
|---|---|---|---|---|
|
モバイルアラート |
アラート処理 |
対応 |
未対応 |
はい/いいえ |
|
モバイルアプリ |
現在のアプリIDを取得 |
対応 |
対応 |
はい/いいえ |
|
モバイル検索 |
UI要素の操作 |
対応 |
対応 |
いいえ/いいえ |
|
モバイルインストール |
デバイスにアプリをインストール |
非対応 |
対応 |
いいえ/はい |
|
モバイルキーボード |
キーボード操作 |
一部対応
|
一部対応
|
一部対応(ロード、リマップ)/非対応 |
|
モバイルキル |
デバイス上のアプリをキル |
対応 |
対応 |
はい/はい |
|
モバイルの向き |
画面の向きのハンドリング |
対応 |
対応 |
はい/いいえ |
|
モバイルプル |
デバイスからファイルをダウンロード |
非対応 |
対応 |
いいえ/はい |
|
モバイルプッシュ |
デバイスにファイルをアップロード |
非対応 |
対応 |
いいえ/はい |
|
モバイルシェル |
シェルコマンドの実行 |
非対応 |
対応 |
いいえ/はい |
|
モバイルスタート |
デバイス上でアプリを起動 |
対応 |
対応 |
はい/はい |
|
モバイルアンインストール |
デバイスからアプリをアンインストール |
非対応 |
対応 |
いいえ/はい |
このコマンドは、レガシープラグインの拡張機能に加え、モバイル検索と呼ばれる新機能を提供します。これは、属性(テキスト、タイプなど)によってデバイス画面上のUIコンポーネントを特定し、そのプロパティを取得し、オプションでアクションを適用(クリック)することができます。これは、iOSとAndroidがXMLドキュメントの形でUIコンポーネントのツリーを取得する機能に基づいています。これは Browser コマンドがSelenium駆動のウェブブラウザでコンポーネントを特定するのとよく似ています。
-
Mobile findの利点は信頼性である。とは異なり Image Search V2 (または Text OCR (“tocr”) と異なり、画面上の標準的なUIコンポーネントをより正確かつ確実に特定することができます。
-
欠点は、スピード (XML階層の検索が遅い)と、グラフィカル出力(ゲーム)やモバイルウェブブラウザコンテンツのようなカスタムコンテンツを識別できないことです。
コンポーネントを識別するために使用されるアルゴリズムは、次のような画像比較コマンドにもさらされます。 Compareto Command と Waitfor Command と呼ばれるメソッドとして"モバイル".passrate"パラメータは使用されず、このメソッドでは無視されます。将来のリリースで変更される可能性がありますが、"cmparea "も無視されます。
SYNOPSIS
Mobile alert action=get
-モバイルデバイスの画面上にアラートウィンドウがあるかどうかをテストします。
Mobile alert action=dismiss [button=<button>] [text=<text_to_type>] [accept=<true|false>].
-
アラートを解除する。アラートがない場合は何もしません。
オプション
action=<get|dimiss>
-
アラートアクション名。現在サポートされている値は以下の通りです:
-
"get" - モバイルデバイスにアラートが表示されているかどうかをテストします。アラートがある場合、このメソッドは_MOBILE_ALERT_TEXT、_MOBILE_ALERT_BUTTON_COUNT、_MOBILE_ALERT_BUTTON[n]変数にアラートテキストとボタンの数、およびそれらのラベルを入力します。
-
"dismiss" - アラートを終了します。オプションで、ボタン、テキスト 、およびaccept パラメータを使用してアラートを閉じる方法を指定できます。
button=<ボタン>
-
アラートを解除するボタンの名前(オプション)。以前の「モバイルアラート action=get」の呼び出しによって_MOBILE_ALERT_BUTTON[n]変数に格納されたボタン名のいずれかを使用することができます。ボタンが指定されていない場合、コマンドは1つを選択します。
text=<text_to_type>
-
アラートを解除する前にアラートのテキストフィールドに入力するテキスト(オプション)。アラートにテキストフィールドがない場合、このパラメータは無視されます。
accept=<true|false>
-
ボタンが指定されていない場合、このパラメータを使用して、アラートを受け入れるかキャンセルするかを指定します。これはアラートに2つ以上のボタン(例えば「OK」と「キャンセル」)が含まれている場合にのみ考慮されます。このパラメータが省略された場合、コマンドはアラートを閉じる方法を選択します。
戻り値:
「get」アクションはアラートがなければ0、警告がなければ1を返します。「解散」アクションは、アラート解散に成功した場合に0を返し、そうでなければ1を返します。
Mobile app
|
変数名 |
変数説明 |
|
_MOBILE_OS_VERSION |
デバイスのOSバージョン。8.0.3以降でサポートされています。 |
|
_MOBILE_OS_NAME |
デバイスのOS名(iOSまたはAndroid)。バージョン8.0.3以降でサポートされています。 |
|
_MOBILE_DEVICE_NAME |
デバイス名(ユーザーがデバイス上でカスタマイズ可能で、Bluetooth上に表示される名称)。バージョン8.0.3以降でサポートされています。 |
|
_MOBILE_DEVICE_MANUFACTURER |
「Apple」、「Google」、「Samsung」などのデバイスメーカー。バージョン8.0.3以降でサポートされています。 |
|
_MOBILE_DEVICE_MANUFACTURER |
「iPhone 16」「Pixel 7」などのデバイスモデル。バージョン8.0.3以降でサポートされています。 |
|
_MOBILE_ACTIVE_ID |
アクティブ(現在表示中)アプリケーションのID:
|
戻り値
このコマンドは常に0を返します。
Mobile find [timeout=<time_interval>] [action=<action>] [number=<element_number>]【continue=<true|false>】【<attributes>】。
-
端末画面上のUI要素を指定された属性で検索 し、オプションでクリックします。要素の属性は、_MOBIlE _FIND接頭辞を持つ変数に格納されます。 クリックが必要な場合は、continueパラメータを使用して、要素が見つからないときにスクリプトをクラッシュさせるか、続行させるかを決定します。
要素検索アルゴリズムは、次のような画像比較コマンドにも公開されています。 Compareto と Waitfor. mobile "と呼ばれるメソッドを探してください。
オプション
timeout=<時間値>
-
要素を探し続けるオプションの時間。有効な time_values.
-
タイムアウトが指定されない場合、コマンドは要素を一度だけ探します。
-
タイムアウトが指定され、それが0より大きい場合、コマンドは時間が経過するか要素が見つかるまで要素を探し続けます。
action=<アクション>
-
結果の要素に適用するオプションのアクション。検索によって複数の要素が生成された場合は、numberパラメータを使用してターゲット要素を選択できます。サポートされるアクションは以下のとおりです:
-
"click" - 要素をクリックします。リンクやボタンなどのクリック可能な要素にのみ適用されます。
number=<要素番号>
-
actionで指定したアクションで対象とする要素の序数。デフォルト値は1(最初の要素を使用)。要素数がnumberより小さい場合、コマンドはエラーを投げてスクリプトを終了します。
continue=<true|false>
-
失敗した場合の処理方法を指定します。要素が見つからず、このパラメータが指定されていない場合、またはfalseの 場合、コマンドはスクリプトを終了します。このパラメータがtrueの場合、スクリプトの続行が許可され、コマンドは0以外の終了コードを返します。
<属性>
-属性(検索条件)のリスト:
-
"xpath=<xpath_expression>" のようなname=valueペアの形式の属性(検索条件)のリスト。 XPath式による検索を行います。このオプションを使用する場合、他の属性を指定することはできません。
-
"type=<button|input|text>" を指定します。 要素のタイプ。"button" (任意の認識されたタイプの標準ボタン)、"input" (編集可能なテキストコンポーネント)、または "text" (静的テキストを表示するコンポーネント) のいずれか。
-
"text=<text>"正確には要素のテキスト。
-
"parttext=<partial_text>"-". 指定された部分テキストをテキストに含む要素を検索します。上記のパラメータに加えて、コマンドは任意のUI階層ツリーの属性とその値を受け付けます。このような検索は、iOSまたはAndroidに固有のものとなります。例えば、現在Androidにフォーカスしているものを特定するにはfocused=trueを使用します。
戻り値:
actionパラメータなしで呼び出された場合、このコマンドは少なくとも 1 つの要素が見つかれば 0 を返し、見つからなければ 1 を返します。特定された要素の数は _MOBILE_FIND_COUNT 変数に格納され、個々の要素の属性は
MOBILEFIND_ 接頭辞を持つ番号付き変数として公開されます。
actionパラメータが存在し、アクションが要素に正常に適用されると、コマンドは0を返します:
-
continueが 指定されていないかfalseの 場合、コマンドはエラーを投げてスクリプトを終了します。
-
continueがtrueの場合、スクリプトの実行は続行され、コマンドは 1 (要素が見つからなかった) または 2 (番号で指定した要素と一致する要素が見つからなかった) を返します。
Mobile install [file=<app_file>] [reinstall=<true|false>]
*赤色は必須パラメータ
-
指定されたローカルファイルからアプリケーションをデバイスにインストールします。成功すると、コマンドは _MOBILE_INSTALLED_ID 変数にアプリケーションIDを格納し、これを使用してアプリケーションを起動、終了、アンインストールします。
OPTIONS
file=<アプリファイル>
-
Androidアプリケーション・ファイル(.apk)へのパス。
reinstall=<true|false>
-
trueを指定すると、アプリがすでにデバイスに存在する場合、強制的に再インストールされます。
を返します:
コマンドは、正常に完了した場合は 0 を返し、そうでない場合はエラーをスローしてスクリプトを終了します。
Mobile keyboard action=get
-
変数 _MOBILE_KEYBOARD_VISIBLE にtrue/falseを代入し、ソフトキーボードが表示されているかどうかを示します。このコマンドは0を返すか、キーボードのステータスの決定に失敗した場合(サポートされていないOS、...)スクリプトを終了します。
Mobile keyboard action=show
-Androidのみ:デバイスにソフトキーボードを表示しようと試み、その結果を終了コードで示します。この機能は、編集可能なUIコンポーネントが現在フォーカスされているかなどの条件に左右されるため、失敗することが多いことに注意してください。結果のリターンコードを必ずテストしてください。コマンドは、キーボードのステータスを決定するのに失敗した場合(サポートされていないOS、...)、エラーを投げてスクリプトを終了することがあります。
Mobile keyboard action=dismiss [keys=<semicolon_separated_list>]
-
デバイス上に現在表示されているソフトキーボードの終了を試み、その結果を終了コードで示します。keysパラメータはiOSでのみ必要で、Androidでは不要で無視されることに注意してください。このコマンドは、キーボードの状態を判断できない場合(サポートされていないOSなど)、エラーを投げてスクリプトを終了することがあります。
Mobile keyboard action=load [file=<map_file>]。
-iOSのみ:保存されているキーボードマップを 読み込みます 。ファイルが利用できないか、形式が正しくない場合、コマンドはエラーを投げてスクリプトを終了します。
Mobile keyboard action=remap
-iOSのみ:現在表示されているソフトキーボードを即座にリマップします。ソフトキーボードが表示されていないか、予期しないエラーが発生した場合、コマンドはエラーをスローし、スクリプトを終了します。
*赤色は必須パラメータです。
オプション
action=<get|show|dismiss|load|remap>
-
アクション名。"get"、"show"、"dismiss"、"load"、"remap "のいずれか。
file=<マップファイル>
-
キーボードマップファイル (.keymap) へのパス。
keys=<セミコロンで区切られたキー>
-
キーボードを閉じるためにタップするセミコロンで区切られたキー名のリスト。このパラメータはiOSでのみ必要で、Androidでは無視されます。
を返します:
返される終了コードとエラースローについては、各アクションの説明を参照してください。
Mobile kill [id=<application_id>] [force=<true|false>] [timeout=<time_interval>] [log=<true|false>]
-指定したアプリケーションを終了させるか、最終的にバックグラウンドに送ります。
オプション
id=<アプリケーションID>
-
アプリケーションID。iOSの場合はアプリケーションバンドル名で、例えばSafariブラウザの場合は"com.apple.mobilesafari "と なります。Androidでは、Chromeアプリの"com.android.chrome "の ようにアプリケーションパッケージのみ("kill "アクションと "uninstall " アクション)、または "com.android.chrome/com.google.android.apps.chrome.Main "のようにパッケージの後にスラッシュとアクティビティ("start " アクション)が続きます。 アプリケーションIDが指定されていない場合、コマンドは、"Mobile install"(Androidのみ)の呼び出しによって最近インストールされたアプリケーション、または"Mobile app "の 呼び出しによって提供されたアプリケーションを強制終了します。 MOBILE_ACTIVE_ID変数).現在表示されているアプリを終了するには、"Mobile app "コマンドと"Mobile kill "コマンドを連続して使用します。アプリケーションIDが解決できない場合、コマンドはエラーを投げてスクリプトを終了します。
force=<true|false>
-
trueを指定すると、コマンドはアプリを強制終了させようとします。内部実装はターゲットOSに依存するため、このフラグが無視されることもあります。デフォルト値はtrueです。
timeout=<時間値>
-
シェルコマンドが終了するまでの待機時間(オプション)。有効なtime_values.シェルコマンドによってアプリが強制終了されるAndroidでのみ使用されます。iOSでは無視されます。
log=<true|false>
-
trueを指定すると、デバッグのために操作の出力を実行ログに記録します。デフォルト値はfalseです。
を返します:
コマンドは 0 を返します。
Mobile orientation action=get
- MOBILE_SCREEN_ORIENTATION_NAME 変数と _MOBILE_SCREEN_ORIENTATION 変数に、現在の画面の向きの名前とコードを代入します。名前は「Portrait」(コード0)、「LandscapeLeft」(1)、「UpsideDown」(2)、「LandscapeRight」(3)。
Mobile orientation action=set [set=<orientation>]
-
赤は必須パラメータ
-
画面の向きを設定し、"get "アクションと同じ変数を入力します。
オプション
action=<get|set>
-
アクション名。"get "または"set "のいずれか。
set=<オリエンテーション>
-
名前または数値コードで特定されるターゲット方向。使用可能な値は、"Portrait"(コード0)、"LandscapeLeft"(1)、"UpsideDown"(2)、および"LandscapeRight"(3)です。Androidは、画面の向きをジャイロスコープが示す向きにリセットする「Auto」(コード4)もサポートしています。
戻り値:
コマンドは 0 を返す。
Mobile pull [remote=<リモートファイル>] [local=<ローカルファイル>]
*赤色は必須パラメータ
-Androidのみ:デバイスからローカルファイルシステムにファイルをプル(ダウンロード)します。
オプション
remote=<リモートファイル>
-
デバイス上のファイル。
local=<ローカルファイル>
-
ローカルファイルシステム内のファイル。
を返す:
コマンドは成功すると0を返し、失敗するとエラーを投げてスクリプトを終了します。
Mobile push [local=<local_file>] [remote=<remote_file>]
*赤色は必須パラメータ
-Androidのみ:デバイスにファイルをプッシュ(アップロード)します。
オプション
local=<ローカルファイル>
-
ローカルファイルシステム内のファイル。
remote=<リモートファイル>
-
デバイス上のファイル。
戻り値:
コマンドは成功すると0を返し、失敗するとエラーを投げてスクリプトを終了します。
Mobile shell [command=<command>] [remote=<remote_file>] [timeout=<time_interval>] [log=<true|false>]
*赤色は必須パラメータ
-Androidのみ:デバイス上でシェルコマンドを実行する。コマンド出力は_MOBILE_OUTPUT変数に格納されます。
オプション
command=<コマンド>
-
実行するシェルコマンド。
timeout=<時間値>
-
シェルコマンドが終了するまでの待機時間(オプション)。有効な time_values.
log=<true|false>
-
trueを指定すると、デバッグのために操作の出力を実行ログに記録します。デフォルト値はfalse です。
を返します:
コマンドは成功すると0を返し、失敗するとエラーを投げてスクリプトを終了します。
Mobile start [id=<application_id>] [timeout=<time_interval>] [log=<true|false>]
-
デバイス上でアプリケーションを起動する。タイムアウトが指定されない限り、アプリの起動コマンドはキックオフされますが、アプリが正しく表示されるかどうかを確認する努力は行われません。コマンドは終了コードによって、起動処理が正しく実行されたかどうかを示し MOBILE_OUTPUT変数にエラー出力を入力します。アプリが起動して画面に表示されたことを確認するには、タイムアウトパラメーターを使用します。
OPTIONS
id=<アプリケーションID>
-
アプリケーションID。iOSの場合はアプリケーションバンドル名で、例えばSafariブラウザの場合は"com.apple.mobilesafari "と なります。Androidの場合は、パッケージの後にスラッシュとアクティビティが続く必要があります。AndroidでアプリケーションIDが指定されていない場合、コマンドは「Mobile install」の呼び出しによって最近インストールされたアプリケーションを起動します(IDは IDは_MOBILE_INSTALLED_ID変数から取得されます)。アプリケーションIDが解決できない場合、コマンドはエラーを投げてスクリプトを終了します。
timeout=<時間値>
-
シェルコマンドが終了するまでの待機時間(オプション)。有効な time_values.
log=<true|false>
-
trueを指定すると、デバッグのために操作の出力を実行ログに記録します。デフォルト値はfalseです。
戻り値:
タイムアウトパラメータが指定されていない場合、または 0 に設定されている場合、コマンドはアプリケー ションをキックオフして 0 を返します。
タイムアウトが 設定されると、コマンドは、指定された時間内にアクティブなアプリと引数のidをテストすることで、アプリが起動し、画面に表示されていることを確認します。アプリが表示されない場合は、エラーがスローされ、スクリプトが終了します。
Mobile uninstall [id=<application_id>]
-Androidのみ:デバイスからアプリケーションをアンインストールします。操作に失敗した場合、_MOBILE_OUTPUT 変数にその理由が入力されます。
オプション
id=<アプリケーションID>
-
アプリケーションID。Chromeアプリの場合は "com.android.chrome " の ようにAndroidアプリのパッケージのみ、または "com.android.chrome/com.google.android.apps.chrome.Main "のようにパッケージの後にスラッシュとアクティビティ("start "アクション)が続く。アプリケーションIDが指定されていない場合、コマンドは「Mobile install」の 呼び出しによって最近インストールされたアプリケーションをアンインストールします(IDは 変数 _MOBILE_INSTALLED_ID から取得されます。).現在表示されているアプリをアンインストールするには、「Mobile app」と「Mobile uninstall id="{_MOBILE_ACTIVE_ID}"」の一連のコマンドを使用します。アプリケーション ID が解決できない場合、コマンドはエラーを投げてスクリプトを終了します。
戻り値:
このコマンドは、成功すると 0 を返し、失敗すると 1 を返します。アプリ ID を解決できない場合、または予期しない I/O エラーが発生した場合は、エラーをスローしてスクリプトを終了します。
3.1.7 Mouse
説明
Mouse - マウス・イベントを実行します。このコマンドは、マウス・ポインタの移動、マウス・クリック、マウス・プレス、マウス・リリース、ドラッグ、マウス・ホイール・イベントなど、さまざまなマウス・アクションを自動化することができます。このコマンドは、マウス押下、マウス移動、マウスリリースイベントのシーケンスで構成されるカスタムドラッグにも対応しています(2.0.2以降)。構成されたイベント(クリック、ドラッグ)が失敗する場合は、マウスコマンドの環境設定でキャリブレーションパラメータを確認してください。
現在のマウスポインタの座標は、スクリプトの_MOUSE_X and _MOUSE_Y dynamic variables を通して利用できます。
SYNOPSIS
mouse [<modifier_1>+...+<modifier_N>+] <event_id> [btn=<button_name>] [modifiers=<modifier_1>+...+<modifier_N>] [to=[x:<x>][,y:<y>]] [from=[x:<x>][,y:<y>]] [center=[x:<x>][,y:<y>]] [start=<number>] [end=<number] [count=<number>] [wait=<time>]
-
赤色は必須パラメーターを示します。
オプション
modifier
-Shift、Alt、Ctrlをプラス「+」記号で区切った任意の組み合わせ。
event_id
-サポートされるイベント
-
-
"move"、任意の移動先からターゲットポイントへのマウスポインタの移動、
-
"click"、指定されたマウスボタンを使用したターゲットポイントでの1回以上のクリック、
-
"press"、マウスボタンの押下(リリースなし)、
-
"release"、マウスボタンのリリース(論理的には、その前に押下イベントが必要)、
-
“drag” 指定されたマウスボタンを使って、任意の移動先からターゲットポイントまでマウスをドラッグします、
-
“swipe”、タッチディスプレイを持つデバイス(AndroidやiOSデバイスなど)のためにタイミングを調整したマウスドラッグ、
-
“wheelup”、1つまたは複数のマウスホイールの回転ステップを上向きにする(ホイールがユーザーから離れる方向に回転する)、”
-
“wheeldown”、1つまたは複数のマウスホイールの回転ステップを下向きにする(ホイールがユーザーに向かって回転する)、
-
"pinch"、2本の指がタッチスクリーン上で共有された中心点に向かって移動する1つ以上のピンチイベント("pinch close "とも呼ばれる)。このイベントは特定の環境でのみサポートされています。ios接続タイプ、
-
"zoom"、2本の指がタッチスクリーン上の共有中心点から離れる1つ以上のズームイベント("pinch open "とも呼ばれる)。このイベントは特定の環境でのみサポートされています。ios 接続タイプで接続されている T-Plan Server を実行している Apple iOS デバイスなどでサポートされています。
-
btn
-このパラメータは、クリック、プレス、リリース、またはドラッグするマウスボタンを識別するために使用されます。許可される値は"left"、"middle"、"right "です。
修飾子
-このパラメータは、マウスイベントの修飾子を指定する別の方法を提供します(もう1つの方法は、イベントIDの前に修飾子を置くことです)。値はShift、Alt、Ctrlの任意の組み合わせで、「Ctrl+Alt+Shift」のようにプラス「+」記号で区切って指定します。修飾子がイベント ID と一緒に指定されている場合は、このパラメータが優先されます。
to=[x:<x>][,y:<y>]
-ターゲット座標。
-
-
イベントが "move "の場合、マウスポインタの移動先(ターゲットポイント)を定義します。
-
イベントが "click"、"press"、"release"、"wheelup"、または "wheeldown "の場合、マウスポインタはまずこの位置に移動され、関連するアクションが実行されます。
-
アクションが "drag "または "swipe "の場合、マウスポインタは実際の位置から(またはfromオプションで指定された位置から)このターゲット位置までドラッグされる。
-
座標は'x:<x>,y:<y>' の書式を持ち、各座標はピクセル単位(例えば'x:225')またはパーセント単位(例えば'x:23%')で指定できます。x または y が省略された場合、現在のマウスポインタの位置が不足する座標の決定に使用されます。
from=[x:<x>][,y:<y>]
-開始座標。
-
アクションが
"drag "または"swipe "の場合、マウスポインタはこの位置からtoオプションで指定された座標までドラッグされます。 -
イベントが
"click"、"press"、"release"、"wheelup"、"wheeldown "の場合、このパラメータは無視されます。
座標は'x:<x>,y:<y>' の書式を持ち、各座標はピクセルで指定するか('x:225'など)、パーセンテージで相対的に指定します('x:23.5%'など)。相対座標が整数でない場合は丸められます。x または y が省略された場合、現在のマウスポインタの位置が不足する座標の決定に使用されます。
center=[x:<x>][,y:<y>]
-ピンチ/ズームの中心点(オプション)。ピンチ」および「ズーム」アクションにのみ使用されます。パラメータが省略された場合、アクションのデフォルトは画面中央になります。
座標は'x:<x>,y:<y>'の形式で、ピクセル単位('x:225'など)または相対座標('x:23.5%'など)で指定します。相対座標が整数でない場合は丸められます。x または y が省略された場合、現在のマウスポインタの位置が不足する座標の決定に使用されます。
start=<number> end=<number>
-ピンチ/ズームの開始距離と終了距離。pinch" と "zoom" アクションにのみ使用されます。パラメータは常に一緒に指定する必要があります。省略した場合、アクションは中心点の位置と現在のスクリーンサイズに基づいてデフォルト値を計算します。
距離は、ジェスチャーの開始時("start")と終了時("end")に指が何ピクセル離れているかを指定します。
イベントが "pinch "の場合、指が互いに近づくため、開始時の距離は終了時の距離よりも当然大きくなければなりません。
ズーム "イベントの場合は逆の設定が必要です。距離は、指が互いに近づきすぎないように(最低でも 30 ピクセル)、または画面の境界線に 10 ピクセル以上近づかないように指定する必要があります。
count=<数値>
-マウスイベントを何回実行するか。デフォルト値は1。この値はclick、wheel、pinch、zoomイベントでのみ意味を持ち、他のイベントタイプでは無視されます。
wait=<time>
-イベント送信後の待ち時間。以下のコマンドが'Wait <time>' であった場合と同じ効果を持つ。値はミリ秒数か有効な値でなりません。Time Values.デフォルト値は0(待機しない)です。スクリプトは、"Var _MOUSE_WAIT=1s" のように、_MOUSE_WAIT変数に希望する遅延時間を代入してデフォルト値を設定することができます。
戻り値:
コマンドは成功すると0(ゼロ)を返し、I/Oエラーなどで失敗すると1を返します。
例
Mouse click count=2
-
現在のマウスポインタ座標でマウスをダブルクリックする。
Mouse move to=x:25,y:122
-
マウスポインタを指定された座標に移動する。
Mouse move to=x:{_MOUSE_X}+50
-
マウスポインタを現在の位置から右に50ピクセル移動する。
Mouse drag from=x:10%,y:450 to=x:22.5%,y:450 wait=2s
-
マウスポインタを指定された開始位置から目的位置までドラッグし、2秒間待ちます。
x座標は相対形式で指定します。ディスプレイの解像度が例えば800x600ピクセルの場合、'x:10%'は'x:60'に、'x:22.5%'は'x:135'になります。
Mouse swipe from=x:161,y:124 to=x:161,y:226
-
タッチスクリーンを開始位置から目的位置までスワイプする。
Compareto "icon.png" method=search onfail="Exit 1"
Mouse move to=x:{_SEARCH_X}+10,y:{_SEARCH_Y}+10
Mouse press
Mouse move to=x:{_SEARCH_X}+110 wait=500
Mouse release
{画像比較によって位置が特定されたオブジェクトに適用される「合成ドラッグ」の例。スクリプトはまず、icon.png テンプレートで表されたオブジェクトをデスクトップから探します。見つかったら、マウスポインタをその領域(各方向にプラス10ピクセル)に移動させ、押下、移動、リリースイベントのシーケンスを使ってオブジェクトを右に100ピクセルドラッグします。
Mouse pinch
-
画面をピンチする。現在の接続がピンチをサポートしている場合、現在のアプリケーションがズームアウトされます。
Mouse zoom center=x:220,y:450 start=125 end=180
-
画面を拡大します。現在の接続がピンチに対応している場合、現在のアプリケーションを拡大表示します。このコマンドは、カスタム中心点と開始距離と終了距離を使用します。
3.1.8 Paste
Paste - システムのクリップボードを使ってテキストをペースト(挿入)します。キーボードでテキストを一文字ずつ入力する代わりに、このコマンドはテキストをクリップボードにコピーし、Ctrl+V(Mac OS XではCommand+V)を押してシステムの貼り付けアクションをトリガーすることをシミュレートします。これは、Type/Typelineでキーボードからテキストを入力するよりもはるかに高速です。
このコマンドは、以下のようなクリップボード操作をサポートしている接続を対象としています。local のようなクリップボード操作をサポートしている接続を対象とします。それ以外の接続の場合、コマンドは黙ってTypeコマンドの機能に戻ります。
SYNOPSIS
paste <text>[wait=<time>] [count=<number>]
-
赤は必須パラメータを示します。
オプション
text
-貼り付けるテキスト。テキストにスペースまたは等号「=」が含まれる場合は、二重引用符で囲む必要があります。 「これはスペースを含むテキストです。」テキストに二重引用符文字を含める必要がある場合は、その前にバックスラッシュを置きます。 「これは二重引用符 - \"" です。バックスラッシュの後に二重引用符を表示する必要がある場合は、「\\"」を使用します。 "これはバックスラッシュの後に二重引用符が続きます - \\""。
サポートされているテキスト文字は、デスクトップクライアント(プロトコル)によって制限されます。たとえば、RFB(VNC)プロトコルは、Latin-1(ISO 8859-1)文字セット以外の文字を転送できません。逆に、ネイティブJavaクライアントは、文字セットに関係なく、ローカルのキーボードで生成できる文字だけを転送することができます。詳細については、特定のクライアントのドキュメントをお読みください。
wait=<time>
-テキストが貼り付けられた後の待ち時間。テキストが貼り付けられた後の待機時間。これは、次のコマンドが'Wait <time>と言った場合と同じ効果を持ちます。値はミリ秒数か有効なTime Valuesでなければなりません。.
count=<数値>
-コマンドを何回繰り返すかです。デフォルト値は1 (1回だけ貼り付ける)。
戻り値
コマンドは成功すると0(ゼロ)を返し、I/Oエラーなどで失敗すると1を返します。
例
Paste "hello world!"
-'hello world!' を貼り付ける。
3.1.9 Press
説明
Press - キーをデスクトップに送る。キーボードのキーを押すことに似ています。
SYNOPSIS
press [<modifier_1>+...+<modifier_N>+]<key | modifier> [location=<standard|numpad|left|right>] [release=<true|false>] [count=<number>] [wait=<time>]
-
赤は必須パラメータです
オプション
key
-押すべきキーボードのキーの名前。ほとんどのキー名はキーボードに書かれているものに対応しています。例えば'A'、'Insert'、'Tab'などです。キーは修飾子のみで構成されることもあります。キーの大文字と小文字は区別されず、どのような文字でも指定することができます。
キー名は、java.awt.event.KeyEventクラスで宣言されているVK_キーコード定数から内部的に派生します。例えば、VK_ENTER定数があるので、キー名は "ENTER"、"Enter"、"enter "となります。キー名は実行時にJava Reflection APIを使用してKeyEventクラスから抽出されるため、T-Plan Robotを実行するJavaのバージョンによってサポートされるキーの範囲が異なる場合があります。サポートされるキー名の完全な マップは Supported Keys Windowから取得できます。
キーの前には、プラス「+」記号で区切られたShift、Alt、Ctrl修飾子の任意の組み合わせを付けることができます(例:「Ctrl+Alt+Delete」)。修飾名は大文字と小文字を区別しません。
修飾名は特定の物理キーに対応するものであり、それらが表す文字に対応するものではないことに注意してください。例えば、標準的な「-」マイナスキーを押すと、数字キーとは異なる内部キーコードが生成されます。これらの2つのケースは、「Press -」(標準)と「Press SUBTRACT location=numpad」(numpad)という2つのPressコマンドでも表すことができます。ほとんどの場合、ターゲットシステムはこれらを同じように解釈するが、失敗する場合もあります。例えば、コントロールプラス(「Press Ctrl++」)は、[Press Ctrl, Press '+', Release '+', Release Ctrl]というシーケンスとして生成されます。このようなキーの組み合わせは、標準の'+'ASCII文字(0x2b)を取得するためにShiftキーも押す必要があるUSキーボードでは作成不可能であるため、このシーケンスはデスクトップによって正しく解釈されるかもしれませんし、解釈されないかもしれません。キーが認識されない場合は、代わりにテンキー(「Press Ctrl+ADD location=numpad」)を使ってみてください。特定の数字キーのキー名を取得するには、「Supported Keys」ウィンドウを開き、「Press a key...」テキストフィールドにフォーカスがある状態で押してください。location=numpadパラメータを指定することが推奨されますが、それがなくても動作する場合もあります。
このコマンドは、2.0.3以降、キー名以外にほとんどのASCII文字も受け付けます。”Press * “や”Press @”といったコマンドの使用も可能です。さらに、localion="numpad" パラメータによって、これらの文字を数字キーボードにマッピングすることもできます。例えば、テンキーの "0 "キーを押すには、"Press NUMPAD0 "を呼び出す必要がありましたが、新しいバージョンでは、より直感的な "Press 0 location=numpad "もサポートしています。これは、ADD(プラス'+')、SUBTRACT(マイナス'-')、MULTIPLY(アスタリスク'*')、DIVIDE(スラッシュ'/')、DECIMAL(ピリオド'.')、SEPARATOR(カンマ',')などの他のテンキーにも適用されます。
転送可能なキーとキーの組み合わせは、デスクトップクライアント(プロトコル)によって 適用される制限に従います。例えば、RFB (VNC)プロトコルは、Latin-1 (ISO 8859-1)文字セット以外の文字を転送できず、WinやContextMenuのようなWindowsネイティブキーのサポートは、一部の製品でのみサポートされています。逆に、ネイティブJavaクライアントは、文字セットに関係なく、ローカルのキーボードで生成できる文字だけを転送することができます。詳細は Release Notes や特定のクライアントのドキュメントを読んでください。
location=<standard|numpad|left|right>
-キーの位置。このオプションが意味を持つのは、一般的なキーボードに複数回存在するキーだけです。そのようなキーの例としては、数字キー '0'-'9' (標準の位置とテンキー) や修飾キー (キーボード左右の Ctrl と Alt) があります。サポートされている位置の値は、標準(デフォルト)、テンキー、左、右です。このコマンドは、[key,location]ペアが意味を持つかどうかを検証しないことに注意。例えば、アルファベット文字はほとんどのキーボードに一度だけ存在し、論理的に有効な位置はデフォルトの標準のものだけです。しかし、ほとんどのクライアントは、locationをヒントとしてのみ使用し、適用できないキーでは無視します。
release=<true|false>
-2.3.4からサポート。このパラメータがある場合、コマンドは完全なプレリリースシーケンスの代わりに、キープレス(release=false)またはキーリリース(release=true)だけを実行します。これにより、長いキー押下や、押下とマウスの複合イベントを自動化することができます。このパラメータを使って押下をシミュレートする場合は、キーが不要になったときに適切にキーをリリースするようにしてください。
count=<数値>
-キーを何回送るべきか。。デフォルト値は1。複数の押下アクション間の遅延は、Press Command ユーザー設定の値によって定義されます。
wait=<時間>
-イベント送信後の待機時間。このパラメータは、押されたキー/キーにサーバーが反応するまでに時間が必要な場合に便利です。これは、以下のコマンドが'Wait <time>'.値はミリ秒か有効な値でなりません。Time Values.デフォルト値は0(待機しない)です。スクリプトは、"Var _PRESS_WAIT=1s" のように、_PRESS_WAIT変数に希望する遅延時間を代入することで、デフォルト値を設定することができます。
戻り値
コマンドは成功すると0(ゼロ)を返し、失敗すると1を返します。
例
Press Ctrl+Alt+Del
-
デスクトップで Ctrl+Alt+Del キーを押す。
Press Tab count=5 wait=2s
-
Tabキーを5回押し、2秒間待ってから次のコマンドに進む。
Press Ctrl location=right
-
右のCtrlキーを押す。
Var KEY_TO_PRESS=Alt+F4
<...>
Waitfor update area=x:340,y:220,w:240,h:160 extent=80% timeout=10s ontimeout="Var KEY_TO_PRESS=Right"
Press {KEY_TO_PRESS} wait=2s
-
この例は、不要なポップアップ・ウィンドウを解決する方法を示しています。与えられた座標にウィンドウがポップアップしたら、'
Press {KEY_TO_PRESS}''コマンドはAlt+F4を使って確実に閉じます。ウィンドウが表示されない場合、Altキーが押されますが、通常ウィンドウに害はありません。
3.1.10 Type, Typeline
説明
Type, Typeline - デスクトップ上にテキストを入力します。Typelineコマンドはテキストを入力してEnterを押すだけの便利なコマンドです。これは'Type <text>' と'Press Enter' の組み合わせと同じ効果があります。
SYNOPSIS
type <text> [wait=<time>] [count=<number>]
typeline <text> [wait=<time>] [count=<number>]
-
赤い色は必須パラメーターを示します。
オプション
text
-入力するテキスト。テキストにスペースまたは等号「=」が含まれる場合は、二重引用符で囲む必要があります。 「これはスペースを含むテキストです。」テキストに二重引用符文字を含める必要がある場合は、その前にバックスラッシュを置きます。 「これは二重引用符 - "" です。バックスラッシュの後に二重引用符を表示する必要がある場合は、「\"」を使用します。 "これはバックスラッシュの後に二重引用符が続きます - \""。
サポートされているテキスト文字は、デスクトップクライアント(プロトコル)によって制限されます。たとえば、RFB(VNC)プロトコルは、Latin-1(ISO 8859-1)文字セット以外の文字を転送できません。逆に、ネイティブJavaクライアントは、文字セットに関係なく、ローカルのキーボードで生成できる文字だけを転送することができます。詳細については、特定のクライアントのドキュメントをお読みください。
wait=<time>
-テキスト入力後の待機時間。このパラメータは、押されたキーにサーバーが反応するまでに時間が必要な場合に便利です。次のコマンドが「Wait <time>」であった場合と同じ効果があります。値はミリ秒単位の数値または有効なtime valueで指定する必要があります。デフォルト値は0(待機しない)です。スクリプトは、_TYPE_WAITまたは _TYPELINE_WAIT 変数に希望する遅延時間を設定することで、デフォルト値を設定することができます。
location=<standard|numpad|left|right>
-キーの位置。指定すると、コマンドは入力された文字を指定されたキーボードの位置にマッピングしようとします。サポートされている位置の値は標準(デフォルト)、テンキー、左、右ですが、このオプションが意味を持つのは、コマンドが受け付ける文字を含む唯一のキーボード部分であるテンキーだけです。
このパラメータのサポートは、モバイルデバイスのテストを容易にすることを意図しています。モバイルデバイス(特に携帯電話)の数字キーは多くの場合テンキーにマッピングされており、Pressコマンドで各キー入力を処理するのは不便です。例えば、携帯電話で電話番号+0123456789を入力して電話をかけるには、単に「Typeline +0123456789 location=numpad」と単純に記述できます。。
count=<数字>
-コマンドを何回繰り返すか。デフォルト値は1 (テキストを入力する/行を入力するのは1回だけ)。
戻り値
コマンドは成功すると0(ゼロ)を返し、I/Oエラーなどで失敗すると1を返します。
例
Type hello
-
hello'とタイプする。
Typeline "mkdir /tmp/mydir" wait=2s
-
アクティブな Linux/Unix ターミナルウィンドウでこのコマンドを実行すると、OS コマンド
'mkdir /tmp/mydir'が起動し、次のコマンドに進む前に2秒間待つ。
Type "100*4" location=numpad
-
数字キーボードで数式を入力する。
Typeline "+111222333444" location=numpad
-
数字キーボードに数式を入力し、Enterを押す。テスト対象のシステムが、Symbian OSを搭載したNokia携帯電話など、テンキーにキーボードがマッピングされた携帯端末の場合、指定した番号に電話をかけます。
3.2 管理・実行制御コマンド
3.2.1 Alert
説明
Alert - ローカルマシンにアラートウィンドウをポップアップします。ウィンドウはカスタムボタンや編集可能なフィールドを含むようにカスタマイズすることができます。また、指定されたタイムアウト後に自己消滅させることもできます。
コマンドは以下の変数を入力:
|
変数名 |
変数名 |
|---|---|
|
ALERT_BUTTON |
ユーザーがウィンドウを閉じるために選択したボタンの名前 |
|
ALERT_FIELD_<n> |
n番目の編集可能テキスト・フィールドの値 |
|
_ALERT_FIELD_COUNT |
編集可能なフィールドの数 |
SYNOPSIS
Alert <text> [title=<text>] [buttons=<list>] [fields=<list>] [values=<list>] [timeout=<time_value>] [location=x:<x_coord>,y:<y_coord>] [size=w:<width>,h:<height>]
-
赤色は必須パラメータ
オプション
<text>
-表示するテキスト。<html>で始まる場合はHTMLコードとして扱われます。
title=<text>
-ウィンドウタイトル(オプション)。
buttons=<list>
-ボタンのラベル、またはセミコロンで区切られたボタン名のリスト(オプション)。選択されたボタンの名前は_ALERT_BUTTON変数に返されます。パラメータが指定されない場合、ウィンドウには1つの「OK」ボタンが含まれます。
fields=<list>
-セミコロンで区切られたテキストフィールド名のリスト(オプション)。これにより、ユーザに値または値のセットを入力させるクエリを設計することができます。
values=<list>
-fields "で指定されたテキストフィールドの値をセミコロンで区切ったリスト(オプション)。同じ長さでなければならなりません。
timeout=<time_value>
-ウィンドウ処理のタイムアウト(オプション)。 time valueで指定する必要があります。指定しない場合、ウィンドウはユーザーが閉じるまで表示され続けます。。
location=x:<x_coord>,y:<y_coord>
-例えば "x:100,y:100"。7.0.4以降では、Xおよび/またはY座標は、現在のスクリーンサイズに対するパーセンテージとして指定することもできます。場所が指定されない場合、ウィンドウは画面の中央に配置されます。
size=w:<width>,h:<height>
-w:300,h:350 "のようなウィンドウサイズ(オプション)。例えば "w:300,h:350"。7.0.4以降では、幅や高さを現在のスクリーンサイズに対するパーセンテージで指定することもできます。サイズが指定されない場合、ウィンドウはコンテンツに合うようにサイズ調整されます。
戻り値
コマンドは選択されたボタンの番号を返します。
例
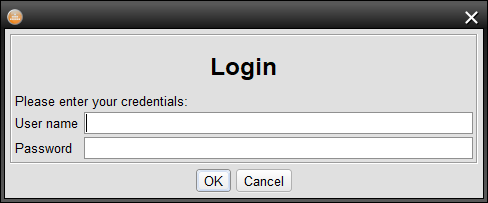
Alert "<html><body><center><h1>Login</h1></center>Please enter your credentials:</body></html>" buttons="OK;Cancel" fields="User name;Password"
if ("{_ALERT_BUTTON}" == "OK") {
   Var user="{_ALERT_FIELD_1}"
   Var password="{_ALERT_FIELD_2}"
   // Login code here
}
-
ログイン・ウィンドウの例。アラートは次のようになります:
3.2.2 Break
説明
Break - 最も内側のforループを終了し、ループを囲む右中括弧 '}' の後の最初のコマンドに進みます。このコマンドをforループの外で使用すると、構文エラーが報告されます。
forコマンドをブレークせずに現在のループをスキップするには Continue コマンドを使用します。
SYNOPSIS
ブレーク
戻り値
このコマンドは終了コードを変更せず、前に実行されたコマンドによって返された値のままにします。
例
# 無限ループ
for(; 0 == 0; ) {

# リモート画面の更新を少なくとも20%待つ。
# 10秒間更新されない場合はループを中断します
 Waitfor update extent=20% timeout="10s" ontimeout="break"
}
-
forとbreakを組み合わせて使う、Waitfor Commandと break を組み合わせて、リモートデスクトップが更新を停止するまで実行を保持します。
3.2.3 Click
説明
ClickはWaitfor matchとMouseコマンドの組み合わせです。コンポーネント画像、ソリッドカラーオブジェクト、またはテキストをデスクトップから探してクリックします。オブジェクトが見つからない場合はスクリプトを終了します。
SYNOPSIS
Click <comparison_method> [timeout=<time>] [cmparea=<[x:<x>][,y:<y>][,w:<width>][,h:<height>]>] [number=<component_number>] [btn=<button>][modifiers=<modifiers>] [count=<number>] [wait=<time>][<method specific options>]
-
赤色は必須パラメーターを示します
comparison_method
-サポートされているメソッドは以下の通り:
-
'image'(画像) - コンポーネントを画像もしくはImage Collectionsメソッドを使ってImage Search V2 メソッドを使用します、
-
'object' - メソッドを使って色でコンポーネントを検索します。Object Search ("object")メソッドを使用します、
-
'ocr' - OCR (tocr メソッド) を使用して画面上のテキストを認識し、指定された文字列またはパターンを見つけます。
共通オプション
timeout=<time>
-コンポーネントが画面に表示されるまでの最大待機時間を指定するタイムアウト。値はミリ秒単位の数値または有効なTime Valuesでなければなりません。デフォルト値は30秒です。
cmparea=[x:<x>],[y:<y>],[w:<width>],[h:<height>]
-比較を制限するデスクトップの矩形領域。このパラメータを省略すると、リモート デスクトップ全体が処理されます。領域の座標は「x:<x>,y:<y>,w:<width>,h:<height>」のフォーマットで、各座標はピクセル単位(例えば「x:225」)またはパーセント単位(「x:23%」)で指定できます。x,y,width,heightのいずれかが省略された場合、T-Plan Robotはフルスクリーンの値を用いて不足するパラメータを決定します(x:0, y:0, w:<screen_width>, h:<screen_height>)。
number=<component_number>
-
クリックを適用する画面上のコンポーネントの番号。画面上のコンポーネント(オブジェクト)は、上から下、左から右の順にソートされます。デフォルト値は1(最初にあるコンポーネントをクリック)です。画面上で見つかったコンポーネントの数が指定した数より少ない場合、コマンドはスクリプトを終了します。
move=[x:<x>],[y:<y>]
-ターゲットオブジェクトの中心からの相対的なクリック位置を指定します(4.2以降)。これにより、オブジェクトそのものではなく、近くの場所をクリックすることができます。比較対象が画像の場合、このパラメータは画像を上書きします。Image Meta Dataを上書きし、画像の中心を基準点として使用します。例えば、"Click image template=button.png move=x:-40 "のコマンドは、ボタンの中心から40ピクセル左をクリックします。
btn=<ボタン>
-クリックするマウスボタン。指定可能な値は "left"、"middle" および "right" です。
modifiers=<修飾子>
-マウスイベント修飾子(オプション)。値はShift、Alt、Ctrlの任意の組み合わせで、「Ctrl+Alt+Shift」のようにプラス「+」記号で区切ります。
count=<数値>
-クリックする回数。デフォルト値は1。
continue=<数字>
-trueを指定すると、オブジェクトが見つからなかった場合にスクリプトを終了しない(4.2以降)。デフォルト値はfalse(失敗時に終了)。リリース4.4.2以降、コマンドは_CLICK_CONNECT変数の値も監視し、デフォルト値として使用します。例えば、スクリプト内のすべてのClickコマンドをデフォルトで終了させないようにするには、最初にこの変数をtrueに設定します("Var _CLICK_CONTINUE=true")。
step=<ステップ名>
-コマンドとのシンプルな統合。Stepコマンドとのシンプルな統合(4.2以降)。指定された場合、指定された名前のテストステップを作成し、結果は合格(オブジェクトが見つかりクリックされた)または不合格(オブジェクトが見つからなかった)です。
wait=<時間>
-クリック後の待ち時間。次のコマンドが「Wait <time_in_ms>」であった場合と同じ効果を持つ。値はミリ秒数か有効な値でなければならない。Time Values.デフォルト値は0(待機しない)である。スクリプトは、"Var _CLICK_WAIT=1s "のように、_CLICK_WAIT変数に希望の遅延を代入することでデフォルト値を設定することができます。
Click image template=<image_collection> [passrate=<pass_rate_in_%>] [<searchv2_specific_params>] [<click_common_params>]
-
赤色は必須パラメーターを示します。
特定のオプション - image
template=<image_collection>
-画像コレクション(Image Collections)- リモートデスクトップ画像と比較する、セミコロン(;)で区切られた1つ以上の画像ファイル名または画像を含むフォルダ。Linux/Unixでは、リストが誤って解析されるため、ファイル名にセミコロンを含めないでください。ファイル名は相対パス(例: img.png)または絶対パス(例: /root/report/img.png)のいずれでも指定可能です。相対パスを使用する場合、画像は_template_dirで定義されたディレクトリ内で検索されます。サポートされる画像形式はJavaのバージョンに依存します。Java 1.6では少なくともPNG、JPG、GIF、BMPがサポートされています。
テンプレート画像は、指定されたリスト順序でリモートデスクトップ画像と比較されます。テンプレートの比較で肯定的な結果(指定されたイベントに応じて、一致または不一致のいずれか)が得られた場合、条件は満たされたとみなされ、コマンドは終了コード0で終了し、リスト内の残りのテンプレートをスキップします。定義済み変数 _COMPARETO_TEMPLATE_INDEX は、マッチするテンプレート画像のインデックスを決定するために使われます。対応する変数の一覧は画像比較固有の変数を参照してください。
passrate=<pass_rate_in%>
-画像比較の通過率。0から100の間の数値を指定し、その後にパーセンテージを指定することもできます(例: "passrate=95 "または "passrate=95%")。このパラメータが省略された場合、デフォルトのsearch2通過率50%が使用されます。
search2_specific_params
-比較メソッドでサポートされるsearch2比較メソッドでサポートされる任意のパラメータ(オプション)。
Click object [<object_specific_options>] [<common_options>]。
特定のオプション - オブジェクト
オブジェクト固有パラメータ
-オブジェクト比較メソッドでサポートされる任意のパラメータ(オプション)。通常、少なくともオブジェクトの色を指定する必要があります。
Click ocr [<ocr_specific_options>] [<common options>]。
特定のオプション - ocr
tocr_specific_options
-比較メソッドでサポートされる Text OCR ("tocr")比較メソッドでサポートされる任意のパラメータ。textまたはpatternオプションを通して、クリックを適用するターゲットテキストを指定する必要がある。
戻り値
このコマンドは成功すると常に0を返し、失敗すると指定された比較メソッドのエラーコードを返してスクリプトを終了します。
例
Click image template="google_button.png"number="2"
-
画面上のgoogle_button.png画像で指定された2番目のボタンをクリックします。ボタンが見つからない場合、または画面上のボタンの数が2つ以下の場合、コマンドはスクリプトに失敗します。
Click object tolerance="10" color="255;0;0" max="w:20"
-
赤色で幅が20ピクセル以下のオブジェクトをクリックします。トレランスは、メソッドがより多くの赤の色合いを見つけることを保証します。
Click ocr text="Cancel" distance="1"
-
OCRを使って画面上のテキストを読み取り、"Cancel "という単語をクリックします。この距離により、OCR エンジンが、たとえば「Cancel」などの 1 文字を省略したり、認識できなかったりしても、単語が確実に検出されます。
3.2.4 Compareto
Compareto - Compareto コマンドは、現在のリモート・デスクトップ・イメージと、指定されたイメージ比較方法を使用した単一のイメージまたはimage collectionの比較を 1 回だけ実行するためのものです。オプションのアクションは、"onfail" と "onpass" パラメータ、または if/else 構造を使用したコマンド終了コードのテストにより、結果に基づいて実行されます。T-Plan Robot 4.4.2Betaには6つの画像比較メソッドがあります。Image Comparison Capabilities章で詳しく説明します:
-
画像検索 v2 (search2v3.0以降)は "search "メソッドの後継で、テンプレート画像(複数可)で表されるオブジェクトをデスクトップ画面から許容範囲内で検索します。
-
画像検索 (searchv2.0以降)は、テンプレート画像(複数可)で表されたオブジェクトを、デスクトップ画面から許容範囲内で検索します。
-
オブジェクト検索 (objectv2.2 以降) は、画面上のオブジェクトを、単一の RGB カラーまたは類似のカラー範囲で検索します。
-
テキストOCR (ocr 2.2 以降) は、選択した OCR エンジンを使用して、デスクトップ画像の光学式文字認識 (OCR) を実行します。
-
画像ベースのテキスト認識 (text 3.0以降) は、事前に保存された文字画像のコレクションを使用して、画面からテキストを抽出します。
-
ヒストグラム・ベースの比較(codedefault v2.0以降)は、デスクトップ画像と指定されたテンプレート画像のヒストグラムを比較するレガシーアルゴリズムです。
メソッド固有の変数の他に、コマンドは以下のようにCOMPARETO接頭辞付き変数のセットを入力します:
|
変数名 |
変数名 |
|---|---|
|
_COMPARETO_TEMPLATE=<file> |
最後の画像比較に使用された画像ファイル(絶対パス)。 |
|
_COMPARETO_RESULT=<number> |
比較結果のパーセンテージ。常に0から100の間の数値です。比較に使われた方法が出力結果をサポートする場合、画像がどれだけ一致したかを示します。 |
|
_COMPARETO_PASS_RATE=<number> |
最後の画像比較で使用された合格率のパーセンテージ。常に0から100の間の数値である。 |
|
_COMPARETO_TIME_IN_MS=<milliseconds> |
画像比較に費やされた時間(ミリ秒)。テンプレートのリストがある場合、値は実行された全ての比較の要約時間を表します。 |
|
_COMPARETO_TEMPLATE_INDEX=<number> |
パス結果を生成したテンプレートリスト内のテンプレートのインデックス。インデックスは0から始まります。 |
|
_COMPARETO_TEMPLATE_WIDTH=<number>
|
比較に成功すると、変数は一致するテンプレート画像の寸法を含みます。2.0.2からサポートされています。 |
|
_COMPARETO_SOURCE_X=<number>
|
最後に比較されたテンプレートのソース座標。これらの変数は、バージョン2.2以降で作成されたテンプレートにのみ設定されます。
|
|
_COMPARETO_CLICK_X=<number>
|
最後に比較したテンプレート画像のクリックポイント。デフォルトの座標は、"search "画像比較アルゴリズムによって位置づけられたコンポーネントの中心、またはカスタム相対位置を指します。
|
このコマンドはさらに、定義されていれば画像コレクションからロードされた画像の処理順序を制御する1つの入力変数をサポートします:
|
変数名 |
変数名 |
|---|---|
|
_COMPARETO_SORT_MODE=<number> |
ディレクトリから読み込まれたテンプレート画像に適用されるソートモード。
|
画像比較をより信頼性の高いものにするために、この章で列挙されている要素を考慮してください。 Image Comparison Recommendations の章を参照してください。画像比較の中央障害点を設定する方法については、 ComparisonFailureFallbackを参照してください。 Fallback Procedures.
コマンドによって生成されたHTMLレポートに比較結果を表示するには Report コマンドによって生成される Screenshot.画面がテンプレート画像と一致するまで待ちたい場合は、'Waitfor match'. Screenshot と 'Waitfor match' の両コマンドは、内部的に Compareto コマンドのメソッドを使用し、同じパラメーターをサポートします。
SYNOPSIS
compareto <image_collection>[passrate=<pass_rate_in_%>] [onpass=<command>] [onfail=<command>] [method=<comparison_method>] [methodparams=<custom_params>] [cmparea=[x:<x>][,y:<y>][,w:<width>][,h:<height>]] [<method_specific_params>]
-
赤色は必須パラメーターを示します
オプション
image_collection
-Image Collections- リモートデスクトップイメージと比較する 1 つ以上のイメージファイル名、またはイメージをセミコロン (';') で区切ったフォルダ。Linux/Unix では、ファイル名にセミコロンが含まれていないことを確認してください。ファイル名には、相対パス(img.png など)または絶対パス(/root/report/img.png など)を指定できます。相対パスを使った場合、画像は_template_dir variable.サポートされる画像フォーマットは、Javaのバージョンに依存します。Java 1.6では、少なくともPNG、JPG、GIF、BMPをサポートしています。
テンプレート画像は、指定されたリスト順序でリモートデスクトップ画像と比較されます。テンプレートの比較で肯定的な結果(指定されたイベントに応じて、一致または不一致のいずれか)が得られた場合、条件は満たされたとみなされ、コマンドは終了コード0で終了し、リスト内の残りのテンプレートをスキップします。定義済み変数 _COMPARETO_TEMPLATE_INDEX は、マッチするテンプレート画像のインデックスを決定するために使われます。対応する変数の一覧はimage comparison variablesを参照してください。
passrate=<pass_rate_in_%>
-画像比較の通過率。これは0から100の間の数値でなければならず、その後にパーセンテージ文字(例えば "passrate=95 "や "passrate=95%")を付けることもできます。このパラメータが省略された場合、メソッドまたはRobot環境設定で定義されたデフォルトの通過率が使用されます(デフォルト値は "default "メソッドで95%、"search "および "search2 "メソッドで100%)。
onpass=<コマンド>
-比較が成功した(選択されたメソッドが成功を報告した)ときに実行されるコマンド。単一のコマンドでなければなりません。一連のコマンドを呼び出して、プロシージャまたは 後続の If/Else Statement コマンドの終了コードをテストします。
onfail=<コマンド>
-比較に失敗した(選択されたメソッドが失敗を報告した)ときに実行されるコマンド。これは1つのコマンドでなければなりません。実行される一連のコマンドを定義する必要がある場合は、プロシージャを使用してください。
method=<comparison_method>
-画像比較に使用するメソッド(アルゴリズム)。の章で説明されているサポートされているメソッド名(コード)のいずれかでなければなりません。(ja) Image Comparison Capabilities章で説明されているサポートされているメソッド名(コード)のいずれか、またはプラグインインターフェイスで有効になっているサードパーティのメソッド名でなければなりません。省略した場合、コマンドはデフォルトのものを使用します。
methodparams=<custom_params>
-画像比較アルゴリズムに渡すカスタムパラメータ。T-Plan Robot 2.0のデフォルトの画像比較アルゴリズムはカスタムパラメータをサポートしていませんので、独自のアルゴリズムを作成しない限り、このパラメータを指定する必要はありません。
cmparea=[x:<x>][,y:<y>][,w:<幅>][,h:<高さ]
-比較を制限するデスクトップの矩形領域。このパラメータを省略すると、リモートデスクトップ全体が処理されます。領域座標の形式は「x:,y:,w:,h:'」で、各座標はピクセル単位(例えば「x:225」)またはパーセント単位(「x:23%」)で指定できます。x,y,width,heightのいずれかが省略された場合、T-Plan Robotはフルスクリーンの値を用いて足りないパラメータを決定します(x:0, y:0, w:, h:)。
メソッド固有のパラメータ
-サポートされるメソッド固有のパラメータのリストについては、個々の comparison methods のドキュメントを参照してください。
戻り値
このコマンドは、比較が成功した場合は0(ゼロ)、失敗した場合は1、テンプレート画像が見つからないか読み込めない場合は2を返します。
例
Compareto netscape.png passrate=95% onfail="exit 1"
-
現在のリモートデスクトップの画像と画像 netscape.png を「デフォルト」の画像比較方法で比較します。95%以上一致しない場合は、Exitコマンドを使用してスクリプトの実行を終了し、終了コード1を返します。
Compareto button1.png;button2.png method=search
if({_EXIT_CODE} == 0) {
 Mouse click to="x:{_SEARCH_X}+5,y:{_SEARCH_Y}+5"
}
-
リモート・デスクトップ画像を検索して、
button1.pngまたはbutton2.png のいずれかに一致するボタンを探します。見つかったらクリックする。このコマンドは、ボタンの真ん中をクリックするように、xとyの座標に5ピクセルを加えます。
compareto "search.png" method="search"
for(i=1; {i}<{_SEARCH_MATCH_COUNT}+1; i={i}+1) {
  # 入れ子の変数は、接尾辞とインデックスの変数名で構成される
  Mouse click to=x:{_SEARCH_X_{i}},y:{_SEARCH_Y_{i}}
}
-
search.pngテンプレート画像で表されるアイコンをリモートデスクトップ画像から検索し、出現したアイコンをクリックします。
Var _TOCR_LINE_COUNT=0
Compareto  method="tocr"cmparea="x:33,y:2,w:200,h:22"
for (i=1; {i}<{_TOCR_LINE_COUNT}+1; i={i}+1) {
  Typeline "{_TOCR_LINE{i}}"
}
-
OCR を使用して指定されたデスクトップ領域からテキストを抽出し、デスクトップにタイプします。
Compareto  method="tocr"cmparea="x:33,y:2,w:200,h:22" pattern="[aA]pplication.*"
if ({_EXIT_CODE} > 0) {
  Exit 1
}
-
Tesseract OCRで認識されたテキストが「Application」または「application」のどちらかで始まらない場合、正規表現を使ってスクリプトを終了します。
Compareto method="object"color="FF0000" draw="true"
-
画面上のすべての赤色のオブジェクト(RGB = (256, 0, 0))を見つけ、GUIでハイライトします。
Compareto circle.pngmethod="object"color="00FF00" tolerance="100" passrate="80%" draw="true" rotations="30"
-
circle.pngの画像と80%以上似ている緑色のオブジェクトをすべて見つけ、GUIでハイライトします。toleranceパラメータは、許容可能な緑色のパレットのサイズを定義します。rotationsパラメータが30に設定されているので、アルゴリズムは12度ステップ(360度÷30)で回転したオブジェクトを画面上で検索します。
3.2.5 Continue
説明
continue - 現在の最も内側のforループの繰り返しをスキップします。このコマンドがforループの外で使用された場合、構文エラーが報告される。4.1.3からサポートされています。
forループ全体をブレーク(終了)するにはBreakコマンドを使用します。
SYNOPSIS
continue
戻り値
このコマンドは終了コードを変更せず、前に実行されたコマンドによって返された値を残します。
例
# ループが偶数になる毎にXをインクリメントする(結果のSUMは5になる)
Var SUM=0
for (i=0; i<10; i={i}+1) {
  if ({i} % 2 == 1) {
    continue
  }
  Eval SUM={SUM}+1
}
3.2.6 Date
説明
Date - 日付の読み取り、書き込み、計算を行います。このコマンドは、現在の日付、または入力された日付を解析し、オプションで時刻の増減を行い、結果を指定されたフォーマットで_DATE変数、または指定されたカスタム変数に保存します。
コマンドはこれらの変数に入力します:
|
変数名 |
変数名 |
|---|---|
|
DATE |
指定されたフォーマットでフォーマットされた出力日付。 |
|
DATE_MS |
1970年1月1日UTCからの経過ミリ秒単位での出力日付。 |
SYNOPSIS
date [date=<date>] [informat=<pattern>] [outformat=<pattern>] [add=<time_value>] [var=<name>] .
オプション
date=<日付>
-
入力日付文字列(オプション)。指定しない場合、コマンドは現在の日付をデフォルト値とします。
informat=<パターン>
-
入力された日付を解析するために使用されるjava.text.SimpleDateFormatに準拠したフォーマット(オプション)。指定されない場合、指定がない場合、コマンドはデフォルトでPreferences ウィンドウのLanguage 画面で指定された _DATE フォーマットを使用します。
outformat=<パターン>
-
出力日付に使用するjava.text.SimpleDateFormatに準拠したフォーマット(オプション)。指定しない場合、コマンドはデフォルトで Preferencesウィンドウの言語 画面で指定された _DATE 形式を使用します。
add=<時間値>
-
入力日付に加算または減算する時間値(オプション)。例えば「-1d」の値は1日を差し引きます。
var=<名前>
-
出力日付を保存する変数名(オプション)。デフォルトは_DATEです。
戻り値
コマンドは、フォーマットが無効であるか入力日付の解析に失敗した場合に1を返し、それ以外の場合は0(成功)を返します。
例
日付 outformat="EEEE d MMMM y" var="TODAY"
-
今日の日付を指定された形式でTODAY変数に保存します。例:「2020年5月13日(水曜日)」
日付 add="-1d" outformat="EEEE" var="YESTERDAY"
-
昨日の曜日名を「YESTERDAY」変数に保存する。例:「火曜日」。。
日付 date="2020-05-08T00:00:00.000Z" informat="yyyy-MM-dd'T'HH:mm:ss.SSS" outformat="d/M/y" var="ISODATE"
-
指定されたISO日付を解析し、単純な日/月/年のフォーマットで "ISODATE "変数に保存します。
3.2.7 Drag
説明
DragはWaitfor matchとMouseコマンドの組み合わせです。イメージ、ソリッドカラー、またはテキストによって ソースコンポーネントをデスクトップから検索し、相対座標で指定された場所、または別のイメージ検索で指定されたターゲットコンポーネントにドラッグします。オブジェクトが見つからない場合はスクリプトを終了します。
コマンドはClickとよく似ています。
SYNOPSIS
Drag <comparison_method>[shift=x:<relativeX>,y:<relativeY>] [template2=<target_component_template>] [number2=<target_component_number>] [timeout=<time>] [cmparea=<[x:<x>][,y:<y>][,w:<width>][,h:<height>]>] [number=<component_number>] [btn=<button>] [modifiers=<modifiers>] [count=<number>] [continue=<true|false>] [step=<step_name>] [wait=<time>] [<method specific options>]
-
赤色は必須パラメーターを示します。
comparison_method
-サポートされているメソッドは以下の通りです:
-
'image' - コンポーネントを画像もしくはImage Collectionsメソッドを使ってsearch2メソッドを使用します、
-
'object' - メソッドを使って色でコンポーネントを検索します。objectメソッドを使用します、
-
'ocr' - OCR(メソッド)を使って画面上のテキストを認識し、指定された文字列またはパターンを検索します。tocrメソッド)を使用して画面上のテキストを認識し、指定された文字列またはパターンを検索します。
コモンオプション
timeout=<時間>
-コンポーネントが画面に表示されるまでの最大待機時間を指定するタイムアウト。値はミリ秒数か有効な値でなければならない。Time Values.デフォルト値は30秒です。
cmparea=[x:<x>][,y:<y>][,w:<width>][,h:<height>]
-比較を制限するデスクトップの矩形領域。このパラメータを省略すると、リモートデスクトップ全体が処理されます。領域の座標は、'x:<x>,y:<y>,w:<width>,h:<height>'のフォーマットで、各座標はピクセル単位(例えば、"x:225")またはパーセント単位("x:23%")で指定できます。x,y,width,heightのいずれかが省略された場合、Robotはフルスクリーンの値を使って足りないパラメータを決定します(x:0, y:0, w:<screen_width>, h:<screen_height>)。
number=<コンポーネント番号>
-
ドラッグを適用するスクリーン上のソースコンポーネントの番号。画面上に配置されたコンポーネント(オブジェクト)は、上から下、左から右の読み順にソートされます。デフォルト値は1(最初に配置されたコンポーネントをドラッグ)です。画面上で見つかったコンポーネントの数が指定された数より少ない場合、コマンドはスクリプトを終了します。
move=[x:<x>][,y:<y>]
-ターゲットオブジェクトの中心からの相対的なマウス押下開始位置を指定します(4.2以降)。これにより、オブジェクトそのものではなく、近くの位置からドラッグを開始することができます。比較対象が画像の場合、このパラメータは画像を上書きしclick pointを上書きし、画像の中心を基点として使用します。例えば、"Drag image template=button.png move=x:-40 shift=x:100,y:100 "のコマンドは、ボタンの中心から左へ40ピクセルの位置からドラッグを開始します。
btn=<ボタン>
-ドラッグするマウスボタン。指定可能な値は "left"、"middle" および "right" です。
modifiers=<修飾子>
-ドラッグ中に保持する修飾子(オプション)。値は Shift、Alt、Ctrl の任意の組み合わせで、プラス「+」記号で区切って指定します (例: "Ctrl+Alt+Shift")。
shift=x:<相対X>,y:<相対Y>
-コンポーネントを現在の位置からドラッグする場所を指定する相対座標。ターゲット(ドロップ)位置はtemplate2で指定することもできます。
template2=<target_component_template>。
-ドロップコンポーネント。指定すると、コマンドはsearch2を使用して指定されたコンポーネントの画像検索を行い、その場所にオブジェクトをドラッグします。画面上に複数のドロップコンポーネントがある場合、number2 パラメータを使用してドロップコンポーネント番号を指定できます。template2 が指定されている場合、shift パラメータは存在してはなりません。
number2=<target_component_number>
-ターゲットコンポーネントの通常の番号。画面上に配置されたコンポーネント(オブジェクト)は、上から下、左から右の読み順にソートされます。デフォルト値は1(最初に配置されたコンポーネントにドロップ)。画面上で見つかったコンポーネントの数が指定された数より少ない場合、コマンドはスクリプトを終了する。template2パラメータと共にのみ使用します。
continue=<番号>
-trueを指定すると、オブジェクトが見つからなかった場合にスクリプトを終了しない(4.2以降)。デフォルト値はfalse(失敗時に終了)です。リリース4.4.2以降、コマンドは_DRAG_CONNECT変数の値も監視し、デフォルト値として使用します。たとえば、スクリプト内のすべての Drag コマンドをデフォルトで終了しないようにするには、最初にこの変数を true に設定します ("Var _DRAG_CONTINUE=true")。
step=<ステップ名>
-コマンドとのシンプルな統合。Step コマンドとのシンプルな統合(4.2以降)。指定された場合、指定された名前のテストステップを作成し、結果は合格(オブジェクトが見つかり、ドラッグされた)または不合格(オブジェクトが見つからなかった)です。
wait=<時間>
-クリック後の待ち時間。次のコマンドが 'Wait <time_in_ms>' である場合と同じ効果があります。値はミリ秒数か有効な値でなければなりません。Time Values.デフォルト値は0(待機しない)である。スクリプトは、"Var _DRAG_WAIT=1s "のように、_DRAG_WAIT変数に希望の遅延を代入することでデフォルト値を設定できます。
Drag image template=<image_collection>[passrate=<pass_rate_in_%>] [<search2_specific_params>] [<common_options>].
-
赤色は必須パラメータ
特定のオプション - image
template=<image_collection>
-テンプレートimage collection- リモートデスクトップのイメージと比較する 1 つ以上のイメージファイル名、またはイメージをセミコロン (';') で区切ったフォルダ。Linux/Unix では、ファイル名にセミコロンが含まれていないと、リストが正しく解析されません。ファイル名には、相対パス(img.png など)または絶対パス(/root/report/img.png など)を指定できます。相対パスを使った場合、画像は_TEMPLATE_DIR variable.サポートされる画像フォーマットは、Javaのバージョンに依存します。Java 1.6では、少なくともPNG、JPG、GIF、BMPをサポートしています。
テンプレート画像は、指定されたリスト順序でリモートデスクトップ画像と比較されます。テンプレートの比較で肯定的な結果(指定されたイベントに応じて、一致または不一致のいずれか)が得られた場合、条件は満たされたとみなされ、コマンドは終了コード0で終了し、リスト内の残りのテンプレートをスキップします。定義済み変数 _COMPARETO_TEMPLATE_INDEX は、マッチするテンプレート画像のインデックスを決定するために使われます。対応する変数の一覧は画像比較固有の変数を参照してください。
passrate=<pass_rate_in%>
-画像比較の通過率。0から100までの数値を指定し、その後にパーセンテージを指定することもできます(例: "passrate=95 "または "passrate=95%")。このパラメータが省略された場合、デフォルトのsearch2の通過率50%が使用されます。
search2_specific_params
-
比較メソッドでサポートされる任意のパラメータ。search2比較メソッドでサポートされる任意のパラメータ (オプション)。
Drag object [<object specific options>] [<common_options>].
特定のオプション - OBJECT
object_specific_params
-
オブジェクト比較メソッドでサポートされる任意のパラメータ(オプション)。通常、少なくともオブジェクトの色を指定する必要があります。
Drag ocr [<tocr_specific_options>] [<common_options>].
特定のオプション - OCR
tocr_specific_options
-比較メソッドでサポートされるtocr比較メソッドでサポートされるパラメータ。textまたはpatternオプションを通して、クリックを適用するターゲットテキストを指定する必要があります。
戻り値
このコマンドは成功すると常に0を返し、失敗すると指定された比較メソッドからのエラーコードを返してスクリプトを終了します。
例
Drag image template="lever.png" shift="x:100"
-
画面上の最初のレバーのコンポーネントを見つけ、右に100ピクセルドラッグします。
Drag image template="column.png" number="2" template2="column.png" number2="3"
-
2つの表の列を入れ替える例。このコマンドは、表の2番目の列のヘッダーを見つけ、それを3番目の列の上にドラッグします。列が見つからなかったり、画面上の列の数が3より少なかったりすると、コマンドはスクリプトに失敗します。
Drag object tolerance="10" color="0;255;0" max="w:20,h:20" shift="x:50,y:-100"
-
20x20ピクセル以下の緑色のオブジェクトを見つけ、右方向に50ピクセル、上方向に100ピクセルドラッグする。トレランスは、このメソッドがより多くの緑の色合いを見つけることを保証します。
Drag ocr text="Flower" shift="y:220"
-
OCRを使って画面上のテキストを読み取り、"Flower "という単語を220ピクセル下にドラッグします。
3.2.8 Eval
Eval - 値が数値式として評価されるスクリプト変数を定義します。詳しくはNumeric Expressionsの章を参照してください。それ以外の動作はVarコマンドと全く同じです。
SYNOPSIS
eval<var_name_1>=<numeric_expression_1>\[<var_name_2>=<numeric_expression_2> ... <var_name_N>=<numeric_expression_N>].
-
赤色は必須パラメータ
オプション
変数名
-
変数の名前。大文字と小文字を区別し、スペースを含んではならない。
numeric_expression
-
数値式、または引数内のすべての変数呼び出しが解決された後に数値式になる文字列。空白を含む場合は、"1 + 1 "のように二重引用符で囲む必要がある。を参照してください。Numeric Expressions式の構文とサポートされている数値演算子の詳細については、このマニュアルの章を参照してください。
戻り値
バージョン2.3.2までのEvalコマンドは常に0(ゼロ)を返す。バージョン2.3.3以降では、数値式が正しく評価された場合は0を返し、式が評価できなかった場合(例えば、存在しない変数の呼び出しが含まれている場合)には0以外の値を返します。このメカニズムにより、値が正しく入力されたかどうかをテストし、_EXIT_CODEをチェックしてコードを分岐させることができます。if/else statementEXIT_CODE変数の値をチェックする。
例
評価 POSITION=2*(10+1)
-
値22の変数POSITIONを作成します。
Eval SUM={SUM}+10
if ({_EXIT_CODE} != 0) {
   Exit 1
}
-
既存の変数SUMを10増やす。変数が存在しない場合、スクリプトは終了コード1で終了します。
Var A=1 B=2C=3
// Varが変数呼び出しを解決し、
// 文字列を  連結するので 、ABC1の値は "123+1 "という文字列になる。
Var  ABC1="{A}{B}{C}+1"
// Evalが変数呼び出しを解決し、結果を評価するとき
// 数値表現として 、ABC2の値は "124 "となる。
Eval ABC2="{A}{B}{C}+1"
-
この例は、VarコマンドとEvalコマンドがどのように変数値を構築するかの違いを示しています。
3.2.9 Exec
説明
Exec - OS のコマンドをローカルシステム(T-Plan Robot が動作するマシン)で実行します。引数は、Unix/Linux の 'ls -l' のような単一のコマンドでなければなりません。JavaとOSの間のインターフェイスの制限により、パイプや出力のリダイレクトはできません。出力をファイルに保存する必要がある場合は、outfileパラメータを使用する。パイプやリダイレクトを使用する必要がある場合は、コマンドをシェルスクリプトやバッチファイルに記述し、代わりに Exec コマンドがそれを呼び出すようにしてください。
コマンドラインインタープリタが提供するWindowsコマンドを実行する必要がある場合は、Execコマンドでインタープリタを指定する必要があります。これは、dir、cd、copy、md、mkdir、rd、rmdir、del、erase などのコマンドに当てはまります。コマンドの完全なリストはWindowsシステムによって異なり、Microsoftのサイトで入手できます。また、WikipediaのCOMMAND.COMのページも参考になる。Windowsで「dir」を実行する例は次のようになります:
Exec "cmd.exe /C dir"
基礎となるオペレーティング・システムを呼び出すにはそれぞれ多少のオーバーヘッドが必要なので、一連のOSコマンドを一度に実行する必要がある場合は、シェル・スクリプト(Linux/Unix)またはバッチファイル(MS Windowsの.bat)を作成する方が効率的です。次の例は、Windowsのスクリプト・ディレクトリにあるバッチファイル「list.bat」の呼び出しを示しています。このバッチファイルはパラメータとしてディレクトリを受け取り、その内容をdir.txtというファイルにリストアップする。スクリプトのパスにはスペースが含まれることがあるので、バッチファイルとパラメータの両方を二重引用符で囲む必要があります。
list.batファイル:
echo off dir %1 > %1dir.txt
Exec 呼び出し:
Exec "\"{_SCRIPT_DIR}\list.bat\"\Exec "{_SCRIPT_DIR}}list.bat" "
環境変数は、_ENV_ 接頭辞付き変数の形でスクリプトに表示されます。環境変数はスクリプトに_ENV_接頭辞付き変数の形で表示されます。 tool panel.
-
リリース 7.2.9 までは、これらは読み込み専用で、変数の変更は Exec によって作成されたプロセスには渡されません。
-
7.2.10 以降では、プロセスに対してこれらの変数を設定することができます。
この例では、MS Windows 上での変数の設定を示します。echo コマンドは、実行ログに記録される変数の値を表示します:
Var _ENV_Hello=Hello!
Exec "cmd /c echo Var Hello value: %Hello%"
Log "{_EXEC_OUTPUT}"
次のプロセスで変更を戻す必要がある場合は、"Varg delete":
Varg delete name="_ENV_Hello"
Exec "cmd /c echo Var Hello value: %Hello%"
Log "{_EXEC_OUTPUT}"
Exec コマンドは、以下のように 4 つの _EXEC 接頭辞付き変数を入力します:
|
変数名 |
変数名 |
|---|---|
|
_EXEC_OUTPUT=<text> |
実行されたコマンドの標準出力(コンソールに出力されるテキスト)。プロセスが終了するまで待機しないようにコマンドが設定されている場合(nowait=true)、この変数は作成されません。 |
|
_EXEC_ERROR=<text> |
実行されたコマンドのエラー出力(コンソールに出力されるエラーメッセージ)。コマンドがプロセスの終了まで待たないように設定されている (nowait=true)場合、この変数は作成されません。 |
|
_EXEC_COMMAND=<command> |
最後に実行されたOSコマンド(Execコマンドの引数)。 |
|
_EXEC_VALUE=<number> |
実行されたOSコマンドの終了コード(整数)。 |
|
_EXEC_PROCESS_ID=<number(s)> |
後で "Exec kill={_EXEC_PROCESS_ID}" でプロセスを終了させるために使うことができる。v3.5.2 以降でサポートされています。 |
SYNOPSIS
Exec <command> \[count=<number>\] \[nowait=<false|true>\] \[onpass=<command>\] \[onfail=<command>\] \[outfile=<file_name>\] \[wait=<time>\] \[kill=<process(es)>\]{_} {_}\[autokill=<false|true>\]
exec kill=<process(es)> \[wait=<time>\]
-
赤色は必須パラメータ
オプション
<command>
-ローカルシステムで実行するOSコマンド。OS固有の詳細についてはcommand descriptionを参照してください。
count=<数値>
-コマンドを何回実行するか。デフォルト値は1(1回実行)。
nowait=<false|true>
-OS コマンドが終了するまで Exec がスクリプトを待機させるかどうかを指定するフラグ (v3.4 以降でサポート)。デフォルト値は false で、待たせます。
値が true に設定されている場合、Exec コマンドは結果を待たず、プロセスが開始された直後にスクリプトが続行されます。EXEC_OUTPUT 変数と _EXEC_ERROR 変数は、Exec コマンドが呼び出したスクリプトに制御を戻すときに出力がわからないため、代入されません。EXEC_ERROR 変数は、基礎となる OS が指定されたコマンドの起動に失敗し、それを直ちに Robot に報告する場合に作成されます。
onpass=<コマンド>
-実行に成功した場合(終了コード0が返された場合)に実行されるT-Planロボットのコマンド。一つのコマンドでなければなりません。実行するコマンドのシーケンスを定義する必要がある場合は、Execコマンドの戻り値を基にしたプロシージャやif/else構文を使用してください。
onfail=<コマンド>
-実行に失敗した場合(ゼロ以外の終了コードが返された場合)に実行されるT-Planロボットのコマンド。一つのコマンドでなければなりません。実行する一連のコマンドを定義する必要がある場合は、Execコマンドの戻り値を基にしたプロシージャやif/else構文を使用してください。
outfile=<ファイル名>
-コマンド出力を保存するファイル名(オプション)。ファイル名だけを指定した場合は、現在の作業ディレクトリ(Robotを起動したディレクトリ)に作成されます。スクリプトの場所やロボットのインストールディレクトリからの相対パスを指定するには _SCRIPT_DIR または _INSTALL_DIR 変数を使います。例えば、出力ファイルをスクリプトフォルダに格納するには outfile="{_SCRIPT_DIR}out.txt" とします。
wait=<時間>
-コマンド実行後の待ち時間(オプション)。デフォルト値は0(待たない)。スクリプトは、"Var _EXEC_WAIT=1s "のように、_EXEC_WAIT変数に希望の遅延時間を代入することで、デフォルト値を設定することができる。
kill=<プロセス>
-指定された通常の番号、またはセミコロンで区切られた番号のリストで識別されるプロセスを kill します。v3.5.2 以降でサポートされています。execコマンドがnowait=trueで実行されるたびに、開始されたプロセスに普通番号を与えます。この番号を使用してプロセスを終了させることができます。nowaitパラメータを指定せずに起動されたプロセスや、nowait=falseで起動されたプロセスには、killは適用できません。このようなプロセスには番号も振られません。
Exec nowait=true "を複数回実行する複雑なスクリプトでは、_EXEC_PROCESS_ID変数からプロセス番号を知ることができます。例
// myapp.exeを起動し、そのIDを保存する。
Exec "myapp.exe" nowait="true"
Var MYAPP_ID="{_EXEC_PROCESS_ID}"
...
Exec kill="{MYAPP_ID}"
注意:Windowsでは、Windows OSが内部的にプロセスを整理してアクセスする方法のため、Exec Killを使って直接の子プロセスをkillすることしかできません。従って、サブ(孫)プロセスを殺すには、CMD taskkill を使ってください:実行 "cmd.exe /C taskkill /f /im <プロセス名>".
autokill=<false|true>
-スクリプト終了後にプロセスを kill するかどうかを指定するフラグ (v3.5.2 以降でサポート)。nowait=trueで起動されたプロセスにのみ適用される。デフォルト値は false (kill しない)。
戻り値
コマンドが正常に実行された場合は 0 (ゼロ) を返し、そうでない場合は OS コマンドの終了コードを返します。
例
Exec "ls -l"
-
カレント・ディレクトリの内容をリストする(Unix/Linux)。このリストは_EXEC_OUTPUT変数で見ることができます。
Exec "date"
Screenshot image.png desc="This screenshot was taken on {_EXEC_OUTPUT}."
-
スクリーンショットの説明にタイムスタンプを挿入するには、
dateOS コマンドを使用します(Unix/Linux)。
Exec "C:\Program Files\Internet Explorer\iexplore.exe http://www.google.com/"
Exec "rundll32 url.dll,FileProtocolHandler http://www.google.com/"
-
どちらのコマンドも、Windows上でInternet Explorerを起動し、Googleサイトを開くはずです。
Report index.html
Exec "mozilla file://{_REPORT_FILE}"
-HTMLレポートを作成し、ローカル・マシンのMozillaブラウザで開く。変数_REPORT_FILEはコマンドによって入力されます。(ja) Reportコマンドによって入力され、レポートファイルのフルパスが格納されます。
// 操作対象のディレクトリ
Var DIR=/tmp

// ディレクトリの内容を表示する(Linux/Unix)。
// Windowsの場合は「ls」コマンドを"cmd.exe /C dir /B"に置き換えてください
Exec "ls {DIR}"

// ディレクトリ一覧を行で分割する
String split "{_EXEC_OUTPUT}" pattern="\r?\n"

for (i=1; {i}<{_STRING_COUNT}+1; i={i}+1) {

  // 浮動小数点数をインデックスから置き換える(2.3.3以降では不要)
  String replace "{i}" pattern="[.].*" replacement=""

  Var f="{_STRING{i}}"

  // ファイルが.pngまたは.jpg画像の場合、3秒間表示する
  if ("{f}" endswith ".png" || "{f}" endswith ".jpg") {
    Connect "file://{DIR}/{f}"
    Wait 3s
  }
}
-
ディレクトリに対して画像のスライドショーを実行します。ここでは Exec コマンドを呼び出してディレクトリの内容をリストアップし、"String split" を使って個々のファイル(1行に1ファイルを想定)にパースします。解析された文字列(ファイル名)は、既知の拡張子を持つ画像かどうかチェックされ、ロボットのデスクトップビューに3秒間表示されます。
3.2.10 Exit
Exit - スクリプト、プロシージャ、または構造化されたコードブロックを終了し、終了コードを返します。スクリプト実行中に 'process' スコープの exit コマンドが呼び出されると、T-Plan Robot は終了し、指定された終了コードをオペレーティングシステムに返します。T-Plan RobotCLI Optionsおよびそのautomatic script execution examplesのドキュメントを参照のこと。
SYNOPSIS
exit <exit_code_number>[scope=<process|file|procedure|block>] [desc=<description>]
*赤は必須パラメータを示します
オプション
exit_code_number
-必須の終了コード。整数値でなければなりません。ゼロ以外の値はエラーまたは予期せぬ結果や動作を示します。スクリプト全体を終了するためにコマンドが呼び出され、そのコマンドによって作成されたレポートファイルがある場合(ja) Reportコマンドによって作成されたレポートファイルでは、終了コード0が "passed/successful "として表示され、その他のコードはすべて失敗として表示されます。この終了コードは、基礎となるオペレーティングシステムにも渡され、サードパーティのフレームワークによってスクリプトが終了した理由を特定するために使用できます。
scope=<process|file|procedure|block>
-終了コマンドのスコープを制御します。デフォルト値はスクリプトの実行を終了するプロセスです。実行が自動化されており、実行中の自動化プロセスがない場合、コマンドはJVM(Java仮想マシン)も終了させ、指定された終了コードを基盤となるオペレーティングシステムに返します。
file値は、現在実行されているファイルを終了します。コマンドを使用して別のスクリプトからスクリプトを実行している場合、呼び出されたスクリプトのみが終了します。Runコマンドを使用して別のスクリプトからスクリプトが実行されている場合は、呼び出されたスクリプトのみが終了し、制御はマスター・スクリプトに戻されます。
procedure 値は、最も内側のプロシージャから終了する。プロシージャが実行されていない場合、Exit コマンドは無視される。
ブロック値は、最も内側の構造化されたコードブロック、つまりfor文のif/elseの1つから抜ける。コマンドがそのようなステートメントから呼び出された場合、それは無視されます。
desc=<説明>
-終了スコープが指定されていないか、プロセスと等しい場合にのみ使用されます。コマンドはその説明を_EXIT_DESC変数の下に保存し、レポートフレームワーク(例えばEnterprise Report Provider)によって取得され表示されます。.
戻り値
コマンドは引数として指定された終了コードを返します。
例
Exit 10
-
実行されたスクリプトを終了し、終了コードとして 10 を返します。
Typeline myapplication
Waitfor update extent=40% timeout=20s ontimeout="Exit 2" cumulative=true
-
これはExitコマンドの典型的な使い方です。ターミナル・ウィンドウからmyapplicationというGUIアプリケーションを起動したときの状況を示しています。myapplicationのウィンドウは、画面サイズの少なくとも40%に等しい固定サイズを持っているとします。GUIが正しく起動すれば、スクリプトは続行されます。そうでなければWaitforコマンドは20秒間待機し、終了コード2でスクリプトを終了します。
3.2.11 Imagedoctor
説明
Imagedoctor - Image Doctorウィザードの動作を制御します。v3.5以降でサポートされています。
SYNOPSIS
Imagedoctor <action>
-
赤い色は必須パラメータを示します
オプション
アクション
-アクションは以下のいずれかでなければなりません
-
"on" - イメージドクターをオンにします、
-
"off" - Image Doctor をオフにします、
-
“skip" - 次の画像比較コマンドの失敗を無視します。これは、コマンドの前に Image Doctor をオフに設定し、コマンドの後に再びオンに設定することと同じです。
戻り値
コマンドは常に0(ゼロ)を返します。
例
Imagedoctor off
-
イメージドクターをオフに設定します。オンに設定し直すまで、画像比較の失敗は処理されません。
Imagedoctor skip
Compareto  method="tocr"cmparea="x:33,y:2,w:200,h:22"
Compareto "search.png" method="search2"
-
Image DoctorウィザードがOCRの失敗を無視するようにします。2番目の "search2 "比較は "skip "アクションの範囲外であり、Image Doctorがオンであれば、失敗した場合でも処理されます。
3.2.12 Include
説明
Include - 他のスクリプトまたはコンパイルされたJavaコードをインクルードします。
引数がこのドキュメントで説明されている言語のTPRスクリプトである場合、このコマンドはスクリプトからONLY手続きと変数を実行コンテキストにロードし、呼び出し元のスクリプトがそれらを利用できるようにします。この原則により、グローバルに使用される変数と手続きでライブラリを構築し、スクリプトにリンクすることができます。
引数がJARファイルやZIPファイル、クラスパス(.classファイルを含むディレクトリ構造)を意味するJavaリソースである場合、コマンドはそれをJavaクラスパスに追加し、そこに含まれるコンパイル済みJavaコードをインスタンス化できるようにします。このメカニズムはv2.2で導入され、コンパイルされたJavaスクリプトの動的ロードをサポートすることを目的としています。Run command.
クラスパスの動的な更新は、Java仮想マシン(JVM)インスタンス全体に影響することに注意してください。複数の自動テスト・プロセスがある場合、そのようなリソースをロードすると、そのクラスがすべての自動テスト・プロセスで即座に利用できるようになります。ファイルまたはパスがすでにクラスパス上に存在する場合、コマンドは何もせず、同じインクルード・コマンドを繰り返し呼び出しても何も害はありません。いったんリソースがロードされると、ファイル・システム内の最終的な変更はJVMと同期されません。つまり、Robotの実行中にリソースコードに変更を加えて再コンパイルすることはできません。
インクルードファイル名またはパスは、変数を通じて動的に指定することも可能です。これにより最終的に、ライブラリ名を外部から`-v`CLI Option経由で渡すことが可能となります。
SYNOPSIS
include <file_or_Java_resource>
-
赤い色は必須パラメータを示します。
オプション
file
-TPRスクリプトファイルまたはJavaリソース(JAR/ZIPファイルまたはクラスパス)を含めます。ファイル名には相対パス (sayHello.tpr など) または絶対パス (/root/scripts/sayHello.tpr など) を指定します。T-Plan Robot はファイルが存在し、読み込めるかどうかを毎回チェックします。script compilationが存在し、読み取れるかどうかをチェックし、読み取れない場合はエラーを報告します。ファイルは変数で指定することもできます (例を参照)。
戻り値
コマンドは常に0(ゼロ)を返します。指定されたファイルが見つからない場合、T-Plan Robot はゼロ以外の戻り値を返すのではなく、構文エラーを報告します。
例
Include sayHello.tpr
-
このコマンドを呼び出しているスクリプトと同じディレクトリにある sayHello.tpr というスクリプトから、すべての変数とプロシージャを読み込みます。
Include /root/scripts/sayHello.tpr
-
このコマンドを呼び出したスクリプトと同じディレクトリにある sayHello.tpr というスクリプトから、すべての変数とプロシージャを読み込みます。
Var PROFILE=profile1.tpr
Include {PROFILE}
-
変数で指定されたスクリプトを含めます。異なる構成のスクリプトがさらにある場合は、CLI から '-v PROFILE=profile2.tpr' を使用して別のスクリプトをインクルードできます。
Include C:\projects\TestLib\testlib.jar
Run mypackage.MyTestScript
-指定された場所から Java ライブラリ(JAR ファイル)をロードし、そこからスクリプト を実行する。この JAR ファイルには、有効な Java スクリプトである MyTestScript というコンパイル済みクラス (DefaultJavaTestScript クラスを継承しているか、少なくともJavaTestScript インターフェイスを実装している) を持つ "mypackage" というパッケージ (ディレクトリ) が含まれているものとします。詳細はRunを参照してください。
3.2.13 MoveTo
説明
Click コマンドと同様に、MoveTo は Waitfor matchとMouse moveコマンドの組み合わせです。コンポーネント画像、ソリッドカラーオブジェクト、またはテキストをデスクトップから探し、マウスポインタをそこに移動させます。オブジェクトが見つからない場合はスクリプトを終了します。
SYNOPSIS
MoveTo <comparison_method> [timeout=<time>] [cmparea=<[x:<x>][,y:<y>][,w:<width>][,h:<height>]>] [number=<component_number>] [modifiers=<modifiers>] [wait=<time>][<メソッ<method specific options>]。
-
赤色は必須パラメーターを示します
comparison_method
-サポートされているメソッドは以下の通り:
-
'image' - コンポーネントを画像もしくはimage collectionsメソッドを使ってsearch2メソッドを使用します、
-
'object' - メソッドを使って色でコンポーネントを検索します。objectメソッドを使用します、
-
'ocr' - OCR(メソッド)を使って画面上のテキストを認識し、指定された文字列またはパターンを検索します。tocrメソッド)を使用して画面上のテキストを認識し、指定された文字列またはパターンを検索します。
共通オプション
timeout=<時間>
-タイムアウトは、コンポーネントが画面に表示されるまでの最大待ち時間を指定します。値は数ミリ秒または有効なTime Valuesでなければなりません。デフォルトは30秒です。
cmparea=[x:<x>][,y:<y>][,w:<width>][,h:<height>]
-比較を制限するためにデスクトップの長方形の領域を制限します。。このパラメータを省略すると、リモート デスクトップ全体が処理されます。領域の座標は「x:<x>,y:<y>,w:<width>,h:<height>」の形式で、各座標はピクセル単位(たとえば「x:225」)またはパーセント単位(「x:23%」)で指定できます。x、y、width、heightのいずれかが省略された場合、アプリはフルスクリーンの値を使用して不足するパラメータを決定します(x:0、y:0、w:<screen_width>、h:<screen_height>)。
number=<コンポーネント番号>
– マウスを移動させる画面上のコンポーネントの番号。画面上のコンポーネント(オブジェクト)は、上から下、左から右の読み順にソートされます。デフォルト値は1(最初にあるコンポーネントをクリック)です。画面上で見つかったコンポーネントの数が指定された数より少ない場合、コマンドはスクリプトを終了します。
move=[x:<x>][,y:<y>]
-ターゲットオブジェクトの中心からの相対的な移動位置を指定します。これにより、オブジェクトそのものではなく、近くの位置にマウスを移動させることができます。比較メソッドがイメージの場合、このパラメータはイメージを上書きし クリックポイントを上書きし、画像の中心を基点として使用します。例えば、"MoveTo image template=button.png move=x:-40 "のコマンドは、ポインタをボタンの中心から左に40ピクセル移動させます。
modifiers=<修飾子>
-マウスイベント修飾子(オプション)。値はShift、Alt、Ctrlの任意の組み合わせで、プラス「+」記号で区切ります。
continue=<数字>
-trueの値では、オブジェクトが見つからなければスクリプトは終了しません。デフォルト値はfalse(失敗時に終了)です。コマンドはまた、_MOVETO_CONNECT変数の値を監視し、それをデフォルト値として使用します。たとえば、スクリプト内のすべてのMoveToコマンドをデフォルトで終了しないようにするには、最初にこの変数をtrueに設定します("Var _MOVETO_CONTINUE=true")。
step=<ステップ名>
-コマンドとのシンプルな統合Stepコマンドとのシンプルな統合。指定されると、指定された名前のテストステップを作成し、結果は合格(オブジェクトが見つかり、マウスポインタがそのオブジェクトに移動した)または不合格(オブジェクトが見つからなかった)です。
wait=<時間>
-移動が完了するまでの待ち時間。これは、次のコマンドが「Wait <time_in_ms>」であった場合と同じ効果を持vちます。値はミリ秒数か有効な値でなければなりません。time value.デフォルト値は0(待機しない)です。スクリプトは、「Var _MOVETO_WAIT=1s」のように、_MOVETO_WAIT変数に希望する遅延を入力してデフォルト値を設定することができます。
Moveto image template=<image_collection> [passrate=<pass_rate_in_%>] [<search2_specific_params>] [<common_options>]。
-
赤色は必須パラメーターを示します
特定のオプション - image
template=<image_collection>
-画像image collections- リモートデスクトップイメージと比較する 1 つ以上のイメージファイル名、またはイメージをセミコロン (';') で区切ったフォルダ。Linux/Unix では、ファイル名にセミコロンが含まれていないと、リストが正しく解析されません。ファイル名には、相対パス(img.png など)または絶対パス(/root/report/img.png など)を指定できます。相対パスを使った場合、画像は_TEMPLATE_DIR_ variable.サポートされる画像フォーマットは、Javaのバージョンに依存します。Java 1.6では、少なくともPNG、JPG、GIF、BMPをサポートしています。
テンプレート画像は、指定されたリストの順序でリモートデスクトップ画像と比較されます。テンプレートの比較で肯定的な結果(指定されたイベントに応じて、一致または不一致のいずれか)が得られた場合、条件は満たされたとみなされ、コマンドは終了コード0で終了し、リスト内の残りのテンプレートをスキップします。定義済み変数 _COMPARETO_TEMPLATE_INDEX は、マッチするテンプレート画像のインデックスを決定するために使われます。対応する変数の一覧は画像比較固有の変数を参照してください。
passrate=<pass_rate_in%>
-画像比較の通過率。0から100の間の数値を指定する必要があり、その後にパーセンテージを指定することもできます(例:"passrate=95 "または "passrate=95%")。このパラメータが省略された場合、デフォルトのsearch2通過率50%が使用されます。
search2_specific_params
-比較メソッドでサポートされる任意のパラメータ。search2 比較メソッドでサポートされる任意のパラメータ(オプション)。
Moveto object [<object_specific_options>] [<common_options>]
特定のオプション - オブジェクト
object_specific_params
-オブジェクト比較メソッドでサポートされるパラメータ(オプション)。通常、少なくともオブジェクトの色を指定する必要があります。
Moveto ocr [<(ja) Text OCR ("tocr")>] [<common_options>].
特定のオプション - ocr
tocr_specific_options
-比較メソッドでサポートされる (ja) Text OCR ("tocr")比較メソッドでサポートされる任意のパラメータ。text またはpattern オプションで移動先のテキストを指定する必要があります。
戻り値
コマンドは、成功すると常に0を返し、失敗すると指定された比較メソッドからのエラーコードを返してスクリプトを終了します。
例
Moveto image template="google_button.png"number="2"
-
画面上のgoogle_button.png画像で指定された2番目のボタンの中央に移動します。ボタンが見つからないか、画面上のボタンの数が2より少ない場合、コマンドはスクリプトを失敗させます。
Moveto object tolerance="10" color="255;0;0" max="w:20"
-
幅が20ピクセル以下の赤いオブジェクトを見つけ、マウス・ポインタをその中心に移動させます。トレランスは、メソッドがより多くの赤の色合いを見つけることを保証します。
Moveto ocr text="Cancel" distance="1"
-
OCRを使って画面上のテキストを読み、"Cancel "の最初の単語に移動します。この距離により、OCRエンジンが1つの文字、たとえば「Cencel」などを省略したり認識できなかったりしても、その単語が確実に見つかります。
3.2.14 Pause
説明
Pause - スクリプトの実行を一時停止します。T-Plan Robot が GUI モードで実行されている場合、Pause ボタン/メニュー項目が選択され、ユーザーはボタンまたはメニュー項目の選択を解除することで実行を再開できます。
スクリプトがCLIモードで実行されている場合は、コンソールにメッセージが出力され、ユーザーはキーを押すことで実行を再開できます。
Pauseコマンドは、暴走が検出された場合などに実行を一時停止するために使用できます。
通常の方法では、エラー終了コード('Exit 1'など)を指定してスクリプトを終了させますが、テスト・スイートによっては、責任者に電子メールを送信して実行を一時停止し、人間の助けを待つことを好む場合もあります。
SYNOPSIS
pause <description>
オプション
説明
-スクリプトが一時停止された理由の説明(オプション)。この説明はレポートに表示され(定義されている場合)、CLIモード実行の場合はコンソールに出力されます。
戻り値
コマンドは常に 0 (ゼロ) を返します。
例
Compareto "application.png"
if({_EXIT_CODE} > 0) {
    # ヘルプのアラート - スクリーンショットをメールで送信して一時停止
    Screenshot runaway.png
  Sendmail to="tester@dummyserver.com" from="robot@dummyserver.com" server="mail.dummyserver.com" subject="Runaway behavior detected - see attached picture. Please help!" attach="{_REPORT_DIR}/runaway.png"
    Pause "Runaway behavior detected"
}
-画像比較に失敗したら、スクリーンショットをテスターにEメールで送り、実行を一時停止します。
3.2.15 Run
Run - 別のスクリプトを実行します:
-
本仕様書に記述された形式のTPR スクリプト(通常は .tpr ファイル)を実行します。T-Plan Robot は、呼び出されたスクリプトに書かれているのと同じようにコマンドを処理します。procedures,Variables,screenshotとreport generator実行されたスクリプトで定義されたコマンドは実行リポジトリに残り、Run コマンドが終了するとアクセスできるようになります。Exitスコープをfileに設定したコマンドを使用すると、Runで実行されたスクリプトからメインスクリプトに戻ることができます。
-
Java ソース・ファイル(.java ファイルでなければなりません。)DefaultJavaTestScript クラスを継承するか、少なくともJavaTestScript インターフェイスを実装した、有効な T-Plan Robot Java スクリプトでなければなりません。Run コマンドはソースコードをコンパイルし、クラスをインスタンス化し、その test() メソッドを実行します。この呼び出しにはJava コンパイラへのアクセスが必要なため、T-Plan Robot はJava Development Kit (JDK) 上で動作するか、2.3.3 以降でサポートされているJDK インストールへのパスが設定されている必要があります。)ツールが Java Runtime Environment (JRE)だけで動作し、JDK が利用できない場合、ツールはエラーを報告する。手順についてはリリースノートを参照してください。
-
Javaクラス名(バージョン2.2からサポート)。DefaultJavaTestScript クラスを継承するか、少なくともJavaTestScript インターフェイスを実装した、有効な T-Plan Robot Java スクリプトに対応する完全修飾 Java クラス名 (パッケージ名+クラス名) でなければなりません。このクラスは、デフォルト(パラメータなし)のコンストラクタを持たなければなりません。Run コマンドは、クラス名を指定してインスタンス化し、その test() メソッドを実行します。このメソッドは Java コードのコンパイルを伴わないため、パフォーマンス・オーバーヘッドが最小で非常に高速であり、実運用シナリオに推奨されます。
コンパイルされたクラスコードは、3つの方法のいずれかで T-Plan Robot のクラスパスに配置する必要があります:-
Include commandを通じてコード(JAR、ZIP、またはclasspath)を読み込みます。この方法により、スクリプトが動的にコードを読み込み、現在のJava/Robotインスタンスに利用可能にできます。
-
リリースノートに記載されているロボットのスタートコマンドの「-classpath」パラメータにJAR、ZIP、またはclasspathを追加します。これにより、そのコードは特定のJava/Robotインスタンスに利用可能になります。
-
Robotを実行するために使うJavaインストールの<java-home>\lib\ext)またはLinux/Unixの<java-home>/lib/extにコード付きのJARファイルを置いてください。これにより、このインストールから開始されたすべてのJavaインスタンス(およびすべてのRobotインスタンス)にコードが利用可能になります。
-
バージョン2.2では、<name>=<value>のペアで指定されたオプションのパラメータもサポートされています。これらのパラメータは、実行されるスクリプトまたはJavaクラス内でのみ有効なローカル変数として、実行されるスクリプトに公開されます。TPRスクリプトでは、パラメータは標準変数として名前で呼び出すことができます。Javaコードの側では、getContext().getVariable()メソッドや、ScriptingContextインターフェイスで定義された便利なメソッドgetVariableAsXXX()のセットを通して、パラメータを取得することができます。
実行コマンドは、コードの一般的なスニペット(ライブラリ)を実装したり、個々のテストケースのテストコードを分離したりするために効果的に使用できます。バージョン2.2で提供されたJavaサポートの強化により、パラメータ化されたJavaルーチンのライブラリを実装し、TPRスクリプトから呼び出すことができるようにななりました。これは、Plugin メカニズムを通さずにスクリプト言語にカスタム機能を追加する効率的な方法です。
概要
実行
run <file_or_class> [<param1>=<value1> ... <paramN>=<valueN>]
* 赤い色は必須パラメータを示す。
オプション
file
-ファイルは以下のいずれかです:
-
TPRスクリプトファイル(.tpr)またはJavaスクリプトファイル(.java)。このファイルは、現在のスクリプトファイルからの相対パス(例えば sayHello.tpr)、または絶対パス(/root/scripts/sayHello.tpr)のいずれかを指定します。 T-Plan Robotは、スクリプトの検証のたびに、このファイルが存在し、読み込めるかどうかをチェックし、読み込めない場合はエラーを報告します。
-
完全修飾された Java スクリプトクラス名 (org.mytests.DoSomething など)。指定されたクラスは、Java クラスパス上になければなりません。詳細についてはcommand description.
<パラメータ>=<値>
– オプションのパラメータとその値のリスト。これらのパラメータは、ローカル変数の形で実行されるファイルで利用できるようになります。
戻り値
Run は常に最後に実行されたコマンドによって返されたコードを返します。指定されたファイルが見つからない場合、T-Plan Robot はゼロ以外の戻り値を返すのではなく、構文エラーを報告します。
例
Run sayHello.tpr
– このコマンドを呼び出しているスクリプトと同じディレクトリにある sayHello.tpr というスクリプトを実行します。
Run /root/scripts/sayHello.tpr
– root/scripts/ディレクトリにあるsayHello.tprというスクリプトを実行します。
Run /root/scripts/MyTest.java
– 指定された Java ソース・コード・ファイルを実行します。これは、com.tplan.robot.scripting.DefaultJavaTestScriptを拡張したクラスか、少なくともcom.tplan.robot.scripting.JavaTestScriptインタフェースを実装したクラスでなければなりません。こ の フ ァ イ ルは、 まず Java Compiler API を用いてバ イ ト コ ー ド 形式に コ ンパ イ ル さ れ、 次いで イ ン ス タ ン シエー ト さ れて実行 さ れます。これは、T-Plan Robot が JDK ディストリビューションの Java 上で実行されるか、JDK インストール (v2.3.3 以降) への有効なパスが設定されている場合にのみ機能します。
Run com.testsuite.MyDummyTestScript server="rfb://localhost:5901" pass="welcome"
– Javaスクリプト・クラスをインスタンス化して実行します。クラスはJavaクラスパス上になければならず、com.tplan.robot.scripting.DefaultJavaTestScriptを拡張するか、少なくともcom.tplan.robot.scripting.JavaTestScriptインタフェースを実装しなければなりません。コマンドラインの2つのパラメータは、変数としてコンテキストに挿入されます。
Var SCRIPT_TO_EXECUTE=sayHello.tpr
Run "{SCRIPT_TO_EXECUTE}"
– 変数で指定されたスクリプトを実行する。
3.2.16 String
String - テキストを処理または解析します。このコマンドは、引数のテキストにテキスト処理関数を適用します。contains"、"startswith"、"endswith"、"matches "といった基本的な文字列の "テスト "操作は、if/else文を通して実行することができます。boolean expressionsによるif/se文で実行することができますが、Stringコマンドはむしろ、1つ以上の操作のシーケンスからなる、より複雑なテキスト処理をターゲットにしています。
引数テキストにvariable callsが含まれている場合、それらはテキストが処理される前に解決(値に置き換え)されます。このコマンドは、_STRING接頭辞を持つ変数のセットを以下のように入力します:
|
変数名 |
説明 |
|---|---|
|
_STRING=<operationResult> |
コマンドで "var "パラメータを使用してカスタム出力変数を定義した場合、デフォルトの_STRING変数は作成されません。 |
|
_STRING_COUNT=<stringCount> |
“String split" 操作の結果得られるトークンの数。 |
|
_STRING<n>=<token> |
「String split」操作から得られるn番目のトークン(substring)です。<n>は1から_STRING_COUNTまでの範囲の値です。コマンドが「var」パラメータを使用してカスタム出力変数のベース名を定義している場合、デフォルトの_STRING<n>変数は作成されません。 |
操作の結果は、デフォルトで_STRING変数またはオプションの'var'パラメータで指定されたカスタム変数に保存されます。操作が複数の値を生成する場合('split'操作など)、各値は _STRING1、_STRING2 などの番号付き変数、または 'var' パラメータで指定された名前から派生した同様の番号付き変数セットに保存されます。その後、値の数が_STRING_COUNT変数に保存されます。
コマンドの基本構造は以下の通りです:
String <操作> "<テキスト>" [<パラメータ>].
サポートされている操作をアルファベット順に以下に示します。これらの名前はほとんどの場合、java.lang.String Javaクラスのメソッド名に由来しています。
-
indexof - string' パラメータで指定された部分文字列が最初に現れるテキスト内のインデックスを返します。v3.5.2以降では、このコマンドはtocr method.インデックスは0から始まります。指定された文字列が見つからない場合、結果は-1です。例えば、'String indexof "Demo text" string=text'は、_STRING変数を5に設定します。この操作は通常、'substring'と組み合わせてテキスト解析に使われます。与えられたテキスト内の部分文字列の存在をテストしたい場合、その位置に興味がない場合は、'contains'.ブール演算子を利用する方が簡単です。
-
length - テキストの長さ(文字数)を返します。例えば、'String length "Demo" ' とすると、_STRING変数に4がセットされます。
-
matches - java.util.regex.Pattern準拠の正規表現にテキストをマッチさせ、その結果をブール値('true' か 'false')で返します。例えば、'String matches "a20" pattern="[a-z][0-9]*" ' は _STRING 変数を 'true' に設定します。 なぜなら、この正規表現は小文字の後に数字が続くシーケンスにマッチするからです。matches'演算は、if/elで使いやすいようにboolean operatorの形でもサポートされています。
-
replace - string' パラメータで指定された値がテキスト中に出現した場合、その値を 'replacement' パラメータで指定された文字列で置き換えた新しいテキストを返します。この操作は、'string'の代わりに'pattern'を指定して、指定したjava.util.regex.Pattern正規表現にマッチするすべての出現回数を置換することもできます。例えば、'String replace "fox" string=f replacement=s'は、_STRING変数を'sox'に設定します。
-
split - 与えられた文字列('string'パラメータ)またはjava.util.regex.Pattern正規表現('pattern')にマッチする文字列の集合にテキストを分割します。例えば、'String split "brown fox" string=" " ' は、_STRING1=brownと_STRING2=foxの2つの値を生成し、_STRING_COUNT変数に2を設定します。
-
substring - 入力'start'または'end'インデックス番号で定義されたテキストの部分文字列を返します。インデックスは0から始まり、0はテキストの先頭(最初の文字)を指す。例えば、'String substring "someone" start=4'は、_STRING変数を'one'に設定します。
-
tostring - 1つ以上のセミコロンで区切られた数値ASCIIまたはUnicode値から新しいテキストを作成します。これは、特殊文字や各国アルファベットの文字を生成するのに使うことができる。例えば、'String tostring "49;43;49" ' は、_STRING変数を'1+1'に設定します。
-
trim - 先頭と末尾の空白文字(スペース、改行文字など)をすべて削除する。例えば、'String trim " apple " は、_STRING変数を'apple'に設定します。
String indexof "<text>" string=<text>[start=<index>] [end=<index>] [distance=<number>] [var=<variable_name>]
-
赤色は必須パラメーターを示す
オプション
text
-処理するテキスト。
string
-テキスト内で検索する文字列。
start
-検索を開始する開始インデックス(オプション)。数値または有効なNumeric Expressions.インデックスは 0 から開始し、0 はテキストの先頭 (最初の文字) を指します。デフォルトの開始インデックスは 0 です。
end
-検索を終了する終了インデックス。数値または有効なNumeric Expressions.デフォルト値はテキストの長さ(テキストの終端)。
distance
-トレラントテキスト検索を実行するために、"string "パラメータと組み合わせて使用されるオプションの距離(3.5.2からサポート)。このパラメータがデフォルト値の0(距離なし)に設定されている場合、コマンドは引数テキストが指定された文字列の最初の出現箇所を検索するプレーンな文字列検索に戻ります。
許容(ファジー)テキスト検索は、距離値が 1 以上の場合に実行されます。テキストは、指定された文字列と十分に類似した文字列の出現を検索します。許容度(類似度)はレーベンシュタイン距離に基づいている。これは、一方の文字列を他方の文字列に変換するのに必要な最小の編集回数として定義され、許容される編集操作は1文字の挿入、削除、置換です。この距離は、サンプル・テキストが等価であるとみなすために、最大で何文字が省略されるか、または正しく認識されないかをおおよそ指定します。
検索の代わりにファジーテキストマッチングを実行するにはstring_matchesコマンドを使用します。
var
-結果のインデックスを格納する変数名(オプション)。このパラメータが指定されない場合、結果はデフォルトの _STRING 変数に格納されます。
戻り値
'String indexof' コマンドは、指定された文字列がテキスト内に見つかった場合は 0 (ゼロ) を返し、そうでない場合は 1 を返します。このコマンドはさらに、_STRING変数(または'var'パラメータで指定したカスタム変数)にインデックス(見つからなければ-1)を格納します。インデックスは0から始まり、0はテキストの先頭(最初の文字)を指します。
例
String indexof "Demo text" string="text" var=result
– Demo text "内の "text "の位置(インデックス)を取得し、"result "変数に5の結果を格納します。
String indexof "Demo text" string="test" var=result distance=1
– 前の例と同じですが、"text "の単語は、指定された "test "の文字列の距離1以内にあります。
String length "<text>" [var=<変数名>].
-
赤色は必須パラメータ
オプション
var
-結果の文字列長を格納する変数名(オプション)。このパラメータが指定されない場合、結果はデフォルトの_STRING変数に格納されます。
戻り値
String length' コマンドは常に 0 (ゼロ) を返し、引数のテキストの長さ (文字数) を _STRING 変数または 'var' パラメータで指定したカスタム変数に格納します。
例
文字列の 長さ "デモテキスト" var=len
-
デモ・テキスト "の長さ(9)を "len "変数に格納します。
String matches "<text>" pattern="<regular_expression>" [var=<variable_name>]
String matches "<text>" string="<text>" [distance=<number>] [var=<variable_name>].
-
赤色は必須パラメーターを示します。
オプション
pattern
-java.util.regex.Patternに準拠した正規表現。. "の正規表現は、デフォルトでは行終端以外のすべての文字にマッチします。この動作はコマンドの環境設定で変更することができます。
正規表現はテキスト全体にマッチしなければならないことに注意してください。このコマンドは、その正規表現にマッチする部分のテキストを検索しません。例えば、"*.test.*"という単語を検索するには、".test. "という表現を使わなければなりません。意味は「'test'という単語で、その前後に(.*)が含まれていてもいなくてもよい」ということです。
string
-テキストを検索する文字列 (3.5.2 以降でサポート)。
distance
-オプションの距離。"string "パラメータと組み合わせて使用し、トレラントテキストマッチングを実行します(3.5.2以降に対応)。このパラメータをデフォルト値の0(距離なし)に設定すると、コマンドはプレーンな文字列比較に戻り、引数テキストが指定された文字列と等しいかどうかがテストされます。
許容(ファジー)テキスト・マッチングは、距離値が1以上の場合に実行されます。テキストが指定された文字列と十分に類似しているかどうかがテストされます。許容度(類似度)はレーベンシュタイン距離に基づいています。これは、一方の文字列を他方の文字列に変換するのに必要な最小の編集回数として定義され、許容される編集操作は1文字の挿入、削除、置換です。この距離は、サンプルテキストを等価とみなすために、最大で何文字が省略されるか、または正しく認識されないかをおおよそ指定します。
指定された文字列は、引数テキスト全体と一致しなければならないことに注意してください。指定された文字列と似た文字列を見つけるためにあいまい検索を行うには、代わりにstring_indexofを使います。
var
-結果のブール値フラグ(true/false)を格納する変数名(オプション)。このパラメータが指定されない場合、結果はデフォルトの _STRING 変数に格納されます。
戻り値
'String matches' コマンドは、テキストが正規表現にマッチする場合は 0 (ゼロ)、マッチしない場合は 1 を返します。コマンドはさらに、結果を 'true' または 'false' として _STRING 変数または'var' パラメータで指定したカスタム変数に格納します。
例
File open file="C:\data.txt"
Var result=-1

for (i=1; {i}<{_FILE_LINE_COUNT}+1; i={i}+1) {
   File read line={i}
   String matches "{_FILE_READ}" pattern="[a-z]*"
   if ({_EXIT_CODE} == 0) {
       Var result={i}
       Break
      }
}
-
データ・ファイルを開き、一行ずつ読み込んで、それぞれを指定された正規表現と照合する。行がマッチしたら、その行番号を変数 "result "に保存して停止する。
// サンプルテキストを作成
Var TEXT= "this is sample text"

// このコマンドは 0 (合格) を返します。指定されたパターンは 「simple」 または
//「sample」 を含む任意のテキストに一致します
String "matches" "{TEXT}" pattern=".*s[ia]mple.*"

// このテキストには「simple」が含まれていないため、0が返されます。
String "matches" "{TEXT}" string="simple"

// これは0を返します。テキストに「sample」が含まれており、「simple」と1文字しか違いがないためです。
String "matches" "{TEXT}" string="simple" distance=1
-
サンプル・テキストを様々な方法でテストします。
String replace "<text>" string="<text>" replacement="<text>" [var=<variable_name>].
String replace "<text>" pattern="<regular_expression>" replacement="<text>"[var=<variable_name>].
-
赤色は必須パラメータ
オプション
replacement
-新しい文字列(置換)。
string
-テキスト内で置き換える)古い文字列。
pattern
-置換する文字列を表すjava.util.regex.Patternに準拠した正規表現です。. "の正規表現は、デフォルトでは行終端を除くすべての文字にマッチします。この動作は、コマンドの環境設定で変更することができます。
var
-結果の新しいテキストを格納する変数名(オプション)。このパラメータが指定されない場合、結果はデフォルトの _STRING 変数に格納されます。
戻り値
文字列の置換'コマンドは、少なくとも1つの置換が行われた場合は0を、置換が行われず、結果のテキストが元のテキストと等しい場合は1を返します。新しいテキストは、それが変更されたかどうかに関係なく、_STRING変数または'var'パラメータで指定されたカスタム変数に格納されます。
例
String replace "bad fat cat" string="b" replacement="s"
-
STRING変数を "sad fat cat "で更新し、文字列が更新されたので0を返します。
String replace "bad fat cat" pattern="[bf]a[td]" replacement="cat"
-
STRING変数を "cat cat cat "で更新し、文字列が更新されたので0を返します。
String split "<text>" string="<text>"[var=<variable_name>]
String split "<text>" pattern="<regular_expression>" [var=<variable_name>]
-
赤色は必須パラメータです。
オプション
string
-分割する区切り文字 (セパレータ)。
pattern
-java.util.regex.Patternに準拠した正規表現で分割します。正規表現 "." は、デフォルトでは行終端以外のすべての文字にマッチします。この動作は、コマンドの環境設定で変更することができます。
var
-結果の文字列を格納する変数のベース名を指定します。このパラメータが指定されない場合、結果はデフォルトの番号 _STRING<number> 変数に格納されます。
戻り値
String split' コマンドは常に 0 (ゼロ) を返します。解析された各値は、_STRING1、_STRING2 などの番号付き変数、または 'var' パラメータで指定された名前から派生した同様の番号付き変数セットに保存されます。その後、値の数が_STRING_COUNT変数に格納されます。
例
String split "bad fat cat" string=" " var="s"
-
テキストをスペースで分割する。s "というカスタム変数のベース名が指定されると、コマンドは3つの変数s1="bad"、s2="fat"、s3="cat "のセットを生成する。STRING_COUNT変数は3に設定されます。
String split "bad, fat cat" pattern="[,]* "
-
テキストをスペースで分割し、その前にカンマを置くこともできます。前の例と同様に、このコマンドは3つの変数_STRING1="bad"、_STRING2="fat"、_STRING3="cat "のセットを生成します。STRING_COUNT変数は3に設定されます。
// 操作対象のディレクトリ
Var DIR=/tmp

// ディレクトリの内容を一覧表示(Linux/Unix)。
// Windowsの場合は「ls」コマンドを「command.com /C dir /B」に置き換える
Exec "ls {DIR}"

// ディレクトリ一覧を行単位で分割
String split "{_EXEC_OUTPUT}" pattern="\r?\n"

for (i=1; {i}<{_STRING_COUNT}+1; i={i}+1) {

  // インデックスの浮動小数点置換(2.3.3以降不要)
  String replace "{i}" pattern="[.].*" replacement=""

  Var f="{_STRING{i}}"

  // ファイルが .png または .jpg 画像の場合、3秒間表示する
  if ("{f}" endswith ".png" || "{f}" endswith ".jpg") {
    Connect "file://{DIR}/{f}"
    Wait 3s
  }
}
-
ディレクトリに対して画像のスライドショーを行います。ここでは、"String split "コマンドを使って、ディレクトリ・リストを個々のファイルに分割する(1行に1ファイルを想定)。解析された文字列(ファイル名)は、既知の画像拡張子かどうかチェックされ、ロボットのデスクトップビューに3秒間表示されます。
String substring "<text>" start=<index> [end=<index>] [var=<variable_name>]
String substring "<text>" end=<index> [start=<index>] [var=<variable_name>]
-
赤色は必須パラメーターを示す
オプション
start
-開始インデックス (数値または有効な数値表現)。インデックスは0から始まり、0はテキストの先頭(最初の文字)を指します。デフォルト値は0です。
end
-終了インデックス (数値または有効な数値表現)。デフォルト値はテキストの長さ(テキストの終端)。
var
-結果の部分文字列を格納する変数のベース名 (オプション)。このパラメータが指定されない場合、結果はデフォルトの _STRING 変数に格納されます。
戻り値
文字列の部分文字列'コマンドは、開始および終了インデックスがテキスト内の有効な位置を指す場合、0 (ゼロ) を返します。開始位置が無効な場合(0より小さいか、テキストの長さ以上であることを意味します)、コマンドは開始インデックスを0に設定し、1を返します。そうでない場合、終了位置が無効(開始位置より小さいか、テキスト長より大きいことを意味する)なら、コマンドは終了インデックスをテキスト長のデフォルト値に設定し、2を返す。返される値にかかわらず、_STRING変数(または'var'パラメータを通して渡されるカスタム変数)は、常に開始位置と終了位置の間の新しい部分文字列で満たされます。
例
String substring "bad fat cat" start="4" var="s"
-
最初の4文字を削除し、変数 "s "に "fat cat "をセットします。
String length "bad fat cat" var="len"
String substring "bad fat cat" start="{len}-3" end="{len}-2"
-
最後の3文字目("c")を _STRING 変数にカットします。
String tostring "<text>" unicode=<index> [var=<variable_name>]
-
赤は必須パラメータを示します。
オプション
unicode
-文字列に変換する Unicode/ASCII コードを数値で1つ、またはセミコロンで区切られたコードのリストを指定します。リスト内の各コードはjava.lang.Integer.decode()メソッドで解析されるため、10進数、16進数(先頭が'0x'または'#'、例えば'0xF0'または'#F0')、または8進数である可能性があります。例えば、'@'文字は'64'(10進数)、'0xF0'、'#F0'(16進数)、'0100'(8進数)で指定することができる。文字コードの一覧は Wikipedia のASCII とUnicode の表を参照してください。
var
-結果の文字列を格納する変数のベース名をオプションで指定します。このパラメータが指定されない場合、結果はデフォルトの _STRING 変数に格納されます。
戻り値
String tostring' コマンドは、成功すると 0 (ゼロ) を返し、1 つ以上のコードが有効な ASCII/Unicode 文字に対応しない場合は 1 を返します。成功した場合、コマンドは_STRING変数(または'var'パラメータを通して渡されたカスタム変数)に変換された文字列を格納します。
例
String tostring "104;101;108;108;111" var="s"
-
s" 変数に "hello" を代入します。
String tostring "0xF1" var="s"
Var tomorrow="ma{s}ana"
-
変数 "tomorrow "に "mañana "を設定します。
String trim "<text>" [var=<variable_name>]
-
赤色は必須パラメータです。
オプション
var
-結果の文字列を格納する変数のベース名(オプション)。このパラメータが指定されない場合、結果はデフォルトの _STRING 変数に格納されます。
戻り値
String trim' コマンドは常に 0 (ゼロ) を返します。コマンドが成功すると、_STRING 変数 (または 'var' パラメータで渡されたカスタム変数) にトリムされた文字列が格納されます。
例
String trim " Hello! " var="s"
-
s" 変数を "Hello!" に設定します。
3.2.17 Var
説明
Var - スクリプト変数を定義します。スクリプト変数のサポートに関する一般的な説明は Variables の章を参照してください。
書式付きテキスト(複数行、タブ、...)の作成には Varf コマンドを使用してください。数値式の値を評価(計算)して変数に格納するには Eval コマンドを使います。
アンダースコア ('_') で始まる変数は、いわゆる定義済み変数です。これらは通常、T-Plan RobotまたはT-Plan Robotのコマンドによって提供され、実行コンテキストや操作結果に関する情報を提供する有用な値が格納されています。 以下に、最も重要なものを網羅的でない表で示します。
|
誰がいつ創作するのか |
変数名 |
説明 |
|---|---|---|
|
クライアントがデスクトップサーバーからクリップボードの変更を受信したときのロボット |
_SERVER_CLIPBOARD_CONTENT=<text> |
リモートデスクトップのクリップボードの内容。通常、リモートデスクトップ上でコピーアクション(Ctrl+C)が実行されるなどして、サーバーのクリップボードが変更された後に入力されます。この仕組みは「サーバーからクライアントへの転送」と呼ばれます。 バージョン3.4以降では、双方向のクリップボード更新がサポートされています。スクリプトは、Var またはEvalコマンドを使用して変数を設定し、サーバーのクリップボードの内容を変更することができます。このメカニズムは「クライアントからサーバーへの転送」と呼ばれます。 クリップボードとの間でテキストを転送できるかどうかは、接続タイプとサーバーベンダーに依存します。 接続タイプVNC connectionTightVNC は UltraVNC または RealVNC の双方向転送をサポートしています。TightVNC はクライアントからサーバへの転送をサポートしていません。追加のユーティリティ他のサーバも利用可能です。 またLocal Desktop接続は双方向のデータ転送をサポートしています。ローカルのクリップボードは 200ms ごとにポーリングメカニズムを使ってチェックされるため、変数に正しく入力されるように、Ctrl+C を押した後、スクリプトを少なくとも 200ms 待たせる必要があります。また、クリップボードの内容はType, TypelineまたはPressの呼び出し後にもクリップボードの内容が変更されることがあります。 その他の接続タイプはクリップボード転送をサポートしていません。クリップボード関連の機能についてはwaitfor clipboardコマンドを参照してください。 |
|
クライアントがデスクトップ・サーバーからクリップボードの変更を受信したときのロボット |
_SERVER_CLIPBOARD_CONTENT_TEXT=<text> |
この変数は、2つの例外を除いて、上記の_SERVER_CLIPBOARD_CONTENTと同じ規則に従います。クリップボードがHTMLドキュメントまたはHTMLコードの塊を含んでいる場合、この変数には、HTMLから抽出されたプレーンテキストの内容が入ります。そうでない場合は、2つの変数の内容は等しくなります。この変数を設定してもサーバーのクリップボードは更新されません。 4.1.1からサポートされています。 |
|
スクリプトの実行が開始されたとき、またはスクリプトがコンパイルされたときのロボット。 |
_DATE=<yyyyMMdd> |
実行開始日を "yyyyMMdd "形式で指定します。 例えば、2005年5月8日は "20050508 "と定義されます。このフォーマットは(ja) preferences.現在の日付を取得するにはcurtime変数を参照してください。 |
|
_TIME=<HHmmss> |
実行の開始時刻を "HHmmss "の24時間フォーマットで指定します。 例えば、午後3時10分33秒は "151033 "と定義されます。このフォーマットはuser preferences.ミリ秒単位で現在時刻を取得するには、以下の変数を参照してください。_CURTIME 変数を参照してください。ミリ秒単位の現在時刻を取得するには、以下の変数を参照してください。_CURDATE を使います。 |
|
|
_FILE=<file> |
実行されたスクリプトの絶対パス、例えば"/root/test.txt"。 |
|
|
_FILENAME=<filename> |
スクリプト・ファイル名。例:"test.txt"。 |
|
|
_REPORT_DIR=<path> |
スクリーンショットとレポートの保存先ディレクトリ。絶対パスで指定しない限り、すべてのスクリーンショットとレポートはこのディレクトリに保存されます。スクリプト内でこの変数を明示的に設定すると、以下のように定義されるデフォルトのパスが上書きされます:
パスはpathsコンポーネントで設定できます。 |
|
|
_REPORT_FILE=<file> |
レポートへの絶対パス(スクリプトによってレポートが作成される場合)。v4.0からサポートされています。 |
|
|
_REPORT_FILE_RELATIVE=<file> |
REPORT_DIRで指定されたレポート・フォルダへのレポート・ファイルの相対パス。 v4.1.3からサポートされています。 |
|
|
_LOG_FILENAME=<filename> |
実行ログファイルのファイル名。デフォルトはlog.html。7.2.6からサポート。 |
|
|
_TEMPLATE_DIR=<path> |
画像比較用のテンプレート画像を含むソースディレクトリ。画像比較を使用するコマンドは、相対パスで指定された全てのテンプレートについてこのディレクトリを検索します。スクリプト内のこの変数の明示的な設定は、以下のように定義されるデフォルトのパスを上書きします:
パスはpathsコンポーネントで設定できます。 |
|
|
_SCRIPT_DIR=<path> |
現在実行されているスクリプトがあるディレクトリ(絶対パス)。 |
|
|
_WARNING_COUNT=<number> |
スクリプト実行中にコマンドによって生成された警告の数。Warning コマンドによって生成された警告の数。 |
|
|
_CURDATE_FORMAT=<format> |
動的変数_CURDATE動的変数の日付/時刻フォーマットです。java.text.SimpleDateFormatの仕様に従った文字列でなければなりません。 例えば、この変数を "yyyy "に設定すると、後で_CURDATEを使用した場合、"2010"(4桁の現在の年)を生成します。この変数に空の文字列を設定すると、書式はデフォルト値に戻ります。 |
|
|
_RANDOM_MIN=<integer_number>
|
動的変数に使用される乱数値生成器の最小値と最大値_RANDOM.デフォルト値は1と100000です。 |
|
|
_RGB_X=<x_coordinate>
|
デスクトップ画像からRGBを取得するための座標。動的変数を通してピクセルの色を取得するために、この2つの変数を希望の座標に設定することをお勧めします。_RGB 動的変数を通してピクセルの色を取得します。 |
|
|
_INSTALL_DIR=<installation_path> |
インストール・ディレクトリ。robot.jarファイルの場所と同じです。ディレクトリは絶対パスで、ファイルセパレータで終わらない。v2.3からサポート。 |
|
|
_ENV_<variable_name>=<value> |
環境変数。これらはホスティングしているオペレーティング・システムによって提供されるOS固有の変数です。ウィンドウのスクリプト->言語パネルで、このようなオプションが選択されている場合、これらの変数は入力されないかもしれません。Preferencesウィンドウでこのようなオプションが選択されている場合は、これらの変数に値が入力されないことがある。v2.3以降でサポートされています。 |
|
|
_EXECUTION_SPEED_FACTOR=<float_number> |
すべての'wait'および'timeout'スクリプト時間に乗じる係数。これにより、スクリプトの実行を速くしたり遅くしたりすることができる。この変数は環境設定->実行パネルで指定された値に初期化されます。デフォルト値は 1 で、'100%' を意味します。 例えば、スクリプトの実行を遅くし、すべての待ち時間を50%長くするには、値を'1.5'に設定します。3.2以降でサポートされています。 |
|
|
_FS=<local_OS_file_separator> _FPS=<local_OS_file_path_separator> |
ローカルOSのファイル・セパレータ(Windowsではバックスラッシュ'˶'、 Linux/Unixではスラッシュ'/')とファイル・パス・セパレータ(Windowsではセミコロン';'、 Linux/Unixではコロン':')を指定します。 セパレータを使用することで、OSに依存しない相対パスやパスリストを構築することができ、どのシステムからでもスクリプトを実行できるようになります。 例えば、Windows の相対パス".. \data" を"..{_FS}data" と指定すると、スクリプトは Unix/Linux システム上でも正しく動作します。 |
|
|
_STEP_SUMMARY_FORMAT=<format> |
動的変数_STEP_SUMMARY 動的変数によって生成されるステップ・サマリーのフォーマットです。フォーマットは、1つのステップ結果をサマリーに追加する方法を定義する任意の文字列とすることができる。規則: - ここで、<param>は有効な小文字のパラメータ名である。Stepパラメータ名(name, expected, actual, instruct, notes)、またはキーワードの結果は、対応するステップ属性に置き換えられる。 - <param>文字列が大文字の場合(例えば{RESULT})、大文字の属性値に置き換えられます。 - の文字列は改行文字に置き換えられます。 デフォルトのフォーマット JavaScript
のような要約が生成されます:
|
|
|
変数が使用されるときはいつでもロボット。これらの変数の値は変数呼び出し時に作成されるため、「動的変数」と呼ばれます。 |
_CURTIME=<time_in_milliseconds> |
この変数が使われるたびに、1970年1月1日午前0時(UTC)からのミリ秒単位の現在のシステム時間に動的に置き換えられます。この変数を使用して、コマンドやコマンド・ブロックの実行にかかった時間を計算したり、リモート・システムのパフォーマンスを測定したりすることができます。 |
|
_CURDATE=<formatted_time_and_date> |
読み取り可能な現在時刻や日付を生成します。書式はスクリプトの中でcurdate_format変数で指定することができます。この変数が設定されていない場合、書式のデフォルトはユーザー設定の値です(ユーザー設定の言語パネルを参照してください)。どちらの環境設定も設定されていない場合、書式のデフォルトは、 |
|
|
_CURRENT_FILE=<script_file> |
現在実行中のコードを含むスクリプトファイル。スクリプトは、ロギングや追跡の目的でこの変数を使用することができます。6.2.1からサポートされています。 |
|
|
_CURRENT_FILENAME=<script_file_name> |
現在のスクリプトファイル名。6.2.1からサポート。 |
|
|
_MOUSE_X=<X_coordinate>
|
現在のマウスポインタのX,Y座標を返します。ツールがデスクトップに接続されていないか、接続後まだマウスイベントが登録されていない場合、座標は[0, 0]を返します。 |
|
|
_RANDOM=<random_integer> |
この変数が使用されると、常にランダムな整数値を生成します。 デフォルトでは[1, 100000]に設定されていますが、変数で変更することができます。_RANDOM_MIN and _RANDOM_MAX変数で変更できます(上記参照)。 |
|
|
_RGB=<RGB_color> |
この変数を使うと、変数で指定された座標が指すデスクトップ画像のピクセルの現在の色を取得します。_RGB_X and _RGB_Y 変数で指定された座標が指すデスクトップ画像のピクセルの現在の色を取得します。これは、画面上の場所が特定の色を含んでいるかどうかをテストするために使用することができます。ユーザーは、_RGB_X変数と_RGB_Y変数をターゲット座標に設定し、_RGB変数を呼び出して色を取得することをお勧めします。 ピクセルの値はHTML形式の文字列で返され、長さは6文字で、R、G、Bの各成分は小文字の16進数値(各成分につき2文字)で指定されます。 例えば、RGB(255, 255, 255)の白色は "fffff "と表示され、RGB(0, 255, 0)の緑色は "00ff00 "と表示されます。 典型的な例は、[234,128]のピクセルが緑であるかどうかをテストします: JavaScript
メカニズムは、単純な正確なカラーマッチングにのみ適しています。特定の色や色の濃淡のオブジェクトについて、より一般的な画面領域のテストについてはObject Searchが採用しているアルゴリズムを参照のこと。Compareto, Screenshotと'Waitfor'コマンドで採用されているアルゴリズムを参照のこと。 |
|
|
_STEP_SUMMARY=<step_summary> |
これまでにスクリプト内で記録されたステップ結果のプレーン・テキスト・サマリー(1ステップにつき1行)。例: JavaScript
上記のコードの実行 後 _SUMMARY変数には以下の内容が格納される
要約の書式は、変数を通してスクリプトのスコープでカスタマイズすることができます。_STEP_SUMMARY_FORMAT 変数を使ってスクリプトスコープで、またはステップコマンド環境設定を使ってグローバルにカスタマイズできます。両方の方法が使用される場合、変数の方が優先されます。3.5.1からサポート。 |
|
|
_IOS_DEVICES=<list> |
この変数は、Mac OS XのローカルUSBポートに接続されているモバイルデバイスの名前をセミコロンで区切ったリストに展開する。5.0.6以降でサポートされています。 この変数が呼び出されるたびに、追加の変数が生成されます: _IOS_DEVICE_COUNT=<数字>。
|
|
|
スクリプト実行開始時のロボット。によっても更新されます。 ConnectとDisconnectコマンドでも更新されます。 |
_MACHINE=<servername> |
Robotが接続されているデスクトップサーバマシン名です。 接続がない場合は空です。 |
|
_PORT=<portnumber> |
デスクトップサーバーのポート番号。接続されているデスクトップがTCP/IP接続を使用していない場合(ローカルディスプレイに直接接続されているドライバなど)、この変数は空です。 |
|
|
_PROTOCOL=<protocolname> |
例えば、"RFB"、"ADB"、"JAVA "など。 |
|
|
_URL=<desktop_url> |
プロトコル、マシン(ホスト)名、およびオプションでポート番号を含むデスクトップURL。 |
|
|
_DESKTOP_WIDTH=<width_in_pixels> |
現在接続しているリモートデスクトップの幅 (ピクセル単位)。 |
|
|
_DESKTOP_HEIGHT=<width_in_pixels> |
現在接続されているリモートデスクトップの高さ (ピクセル単位)。 |
|
|
_DISPLAY_COUNT=<number_of_displays> |
接続によって管理されるディスプレイ(スクリーン)の数。4.3.1以降でサポートされています。このリリースでは、マルチディスプレイが可能な接続はLocal Desktopです。他のすべての接続では、カウントは 1 (one) と表示されます。 |
|
|
_DISPLAY_X_<n>=<number_in_pixels>
|
n番目のディスプレイの座標(x、y、幅、高さ)。番号は1から始まり、ローカルのOSに従います。 マルチディスプレイをサポートしない接続では、XとY座標はゼロに設定され、幅と高さはデスクトップのものに設定される。4.3.1以降でサポートされています。 |
|
|
RFB(VNC)クライアント接続時または切断時 |
_DISPLAY=<servername>:[<display#>] |
Unix/Linuxシステムでの表示リダイレクトに便利な表示変数。 これは"server:port"のフォーマットで、例えば "mymachine:2 "はポート5902でVNCサーバーを実行している'mymachine'というマシンを定義します。 VNC接続がない場合、変数は空です。 |
|
Waitfor command与えられた条件に従った更新イベントが発生した場合 |
_X=<number_in_pixels> |
条件を満たした最後の更新イベントの'x'座標。 |
|
_Y=<number_in_pixels> |
条件を満たした最後の更新イベントの「y」座標。 |
|
|
_W=<number_in_pixels> |
条件を満たした最後の更新イベントの「幅」座標。 |
|
|
_H=<number_in_pixels> |
条件を満たした最後の更新イベントの「高さ」座標。 |
|
|
Waitfor commandすべての実行後 |
_TIMEOUT=<true|false> |
タイムアウトが定義され、それに達した場合 Waitfor コマンドはこの変数を'true'に設定し、そうでなければ'false'に設定します。 |
|
Report commandレポートが生成されるたびに |
_REPORT_FILE=<file> |
レポート・ファイル(絶対パス)、例えば'/root/report.html'。 |
|
_REPORT_FILENAME=<filename> |
レポート・ファイル名(例:'report.html')。 |
|
|
_REPORT_FILE_RELATIVE=<file> |
レポート(出力)ディレクトリからの相対レポート・ファイル・パス、例えば'MyTestScript.tpr.2a12fd2/report.xml'。 |
|
|
画面上のコンポーネントやテキストを検索するコマンド。 Compareto, Screenshot, Waitfor match/mismatch, Clickそして Drag |
_COMPARETO_TEMPLATE=<file> |
最後の画像比較に使用された画像ファイル(絶対パス)。 |
|
_COMPARETO_RESULT=<number> |
比較結果のパーセンテージ。常に0から100の間の数値です。画像がどれだけ一致したかを示します。 |
|
|
_COMPARETO_PASS_RATE=<number> |
最後の画像比較で使用された合格率のパーセンテージ。常に0から100の間の数値です。 |
|
|
_COMPARETO_TIME_IN_MS=<milliseconds> |
画像比較に費やされた時間(ミリ秒)。テンプレートのリストがある場合、値は実行された全ての比較の要約時間を表します。 |
|
|
_COMPARETO_TEMPLATE_INDEX=<number> |
パス結果を生成したテンプレートリスト内のテンプレートのインデックス。インデックスは0から始まります。 |
|
|
_COMPARETO_TEMPLATE_WIDTH=<number>
|
マッチするテンプレート画像の寸法。v4.4以降、比較に失敗した場合、変数には最後に使用されたテンプレート画像が入力されます。 |
|
|
_COMPARETO_SOURCE_X=<number>
|
最後に比較されたテンプレートのソース座標。これらの変数は、バージョン2.2以降で作成されたテンプレートにのみ設定されます。 詳細はImage Meta Dataの章を参照してください。 |
|
|
_COMPARETO_CLICK_X=<number>
|
最後に比較したテンプレート画像のクリックポイント。デフォルトの座標は、"search "画像比較アルゴリズムによって位置づけられたコンポーネントの中心、またはカスタム相対位置を指します。 詳細はImage Meta Dataの章を参照してください。 |
|
|
_COMPARETO_CLICK_X_<n>=<number>
|
<n>番目のマッチの最後に比較されたテンプレート画像のクリックポイント。 デフォルトの座標は、"search "画像比較アルゴリズムによって位置づけられたコンポーネントの中心を指すか、テンプレート画像作成時にクリックポイントによって定義されたカスタムの相対位置を指します。 詳細は、この章を参照してください。Image Meta Dataの章を参照してください。 |
|
|
_COMPARETO_DISPLAY_NO=<display_number>
|
最上位またはn番目の試合が行われたディスプレイの番号。 番号は1から始まり、ローカルOSに従う。4.3.1以降でサポートされている。このリリースでは、マルチディスプレイ接続が可能なのはLocal Desktopである。それ以外の接続では、番号は常に1(one)で表示されます。 |
|
|
ユーザー(カスタマイズ可能) |
_COMPARETO_SORT_MODE=<number> |
ディレクトリからロードされたテンプレート画像に適用されるソートモード。詳細はImage Collections の章を参照してください。 |
|
_DESKTOP_SIZE=w:<width>;h:<height> |
この変数を設定したVarコマンドが実行されるたびに、ミラーリングされた画面のサイズが変更され、特定の画面サイズに対して作成されたテンプレート画像の画像比較が正しく動作するようになります。詳細は iOS Mirror 接続ドキュメントをお読みください。 |
|
|
Comparetoコマンドを参照してください、 Screenshot比較と'Waitfor match'呼び出しが "search" 比較メソッドが使用されている場合 |
_SEARCH_MATCH_COUNT=<number> |
Image Searchで見つかったマッチの数。常に0以上である整数です。 |
|
_SEARCH_X=<number> |
最初のマッチの'x'座標。テンプレート画像が見つからなかった場合、値は-1です。 |
|
|
_SEARCH_Y=<number> |
最初にマッチした画像の'y'座標。テンプレート画像が見つからなかった場合、値は-1です。 |
|
|
_SEARCH_X_<n>=<number>
|
n番目のマッチの'x'座標と'y'座標(nは1から_SEARCH_MATCH_COUNTの値の間)。 |
|
|
Comparetoコマンドで指定します、 Screenshot比較と'Waitfor match'呼び出しの場合"object"比較メソッドが使用される場合 |
_OBJECT_COUNT=<number> |
"object" 画像比較法で特定された物体の数。 |
|
_OBJECT_X_<n>=<number>
|
n番目のオブジェクトの'x'と'y'座標、幅と高さ(nは1から_OBJECT_COUNTの値まで)。 |
|
|
Exec 実行後のコマンド |
_EXEC_OUTPUT=<text> |
実行されたコマンドの標準出力、すなわちコンソールに出力されるメッセージ。 |
|
_EXEC_ERROR=<text> |
実行されたコマンドのエラー出力、すなわちコンソールに出力されるエラーメッセージ。 |
|
|
_EXEC_COMMAND=<command> |
最後に実行されたOSコマンド、すなわちExec引数。 |
|
|
_EXEC_VALUE=<number> |
実行されたOSコマンドの終了コード。 |
|
|
画像比較コマンドCompareto, Screenshot, Waitfor match/mismatch, Click および Drag |
_LAST_CMP_COMMAND=<command> |
最後に実行された画像比較コマンドのテキスト。v4.4.2からサポートされています。 |
|
実行中のスクリプト |
_TPR_LAST_COMMAND_1=<command>
|
すべての変数呼び出しが解決され置換された、最後に実行された3つのコマンドのテキスト。6.1からサポート。 |
|
実行開始時のスクリプトは Log コマンド |
_LOG_WARNING_COUNT=<number>
|
スクリプト実行中に生成されるWARNINGおよびSEVEREレベルのログの数。6.3.1からサポートされています。 |
この Variable Browser ウィンドウを使用して、現在の実行リポジトリに存在する変数のリストを表示することができます。
SYNOPSIS
var <var_name_1>=<value_1> [<var_name_2>=<value_2> ... <var_name_N>=<value_N>]
-
赤色は必須パラメータ
オプション
var_name
-
変数の名前。大文字と小文字を区別し、スペースを含んではいけません。
value
-
変数の値。値にスペースが含まれる場合は、ダブルクォートで囲む必要がある。変数値にダブルクォート文字を含める必要がある場合は、その前にバックス ラッシュを付けてください。例:"This is a backslash followed by a double quote - \""。バックスラッシュの後にダブルクォートを含める必要がある場合、'˶'を使用します。
戻り値
Varコマンドは常に0(ゼロ)を返します。
例
Var PATH=/tmp path=/tmp DESCRIPTION="Path to change to" EMPTY=
-
与えられた値で4つの変数PATH、path、DESCRIPTION、EMPTYを作成します。
Compareto "search.png" method="search"
for (i=1; {i}<{_SEARCH_MATCH_COUNT}+1; i={i}+1) {
  # ネストされた変数は、接尾辞とインデックスの変数名で構成される
  Mouse click to=x:{_SEARCH_X_{i}},y:{_SEARCH_Y_{i}}
}
-
ネストされた変数参照の例では、リモートデスクトップ画像を検索して、テンプレート画像search.png で表されるアイコンを探し、出現したアイコンをクリックします。
3.2.19 Varg
説明
Varg - 指定された可視性スコープを持つ変数を定義 ("Varg set") または削除 ("Varg delete") します。v6.3からサポートされています。
このコマンドは Varコマンドの拡張です:
-
Varは 、ローカル(コードブロック内)またはスクリプトの可視性を持つ変数のみを作成/設定できます。Varg は、スクリプトまたはワークアイテムがデータを共有できるようにするセッション(グローバル)変数のサポートを追加します。
-
Var は、コンテキストから可視性スコープを決定します。構造化されたコードブロック(if/else、for、procedure)の内部で定義された変数はローカル変数になりますが、メインスクリプト本体で定義された変数はスクリプトの可視性を持ちます。一方、Vargは明示的なスコープで動作します。このアプローチは、例えば構造化ブロックの中にスクリプト変数を作成することができるため、より柔軟です。
-
Vargには変数を削除する機能がある。これは、スクリプトが変数の存在によって分岐する必要がある場合に便利です('exists' boolean operator).スクリプトのXMLレポートには変数が格納されているので、機密データを削除するためにも使用できます。
自動化開始時にセッション変数を作成するためのCLIオプション --variable-sessionがあります。
概要
Varg set name=<variableName> [value=<variableValue>] [scope=<visibilityScope> ].
-
赤い色は必須パラメーターを示します
オプション
name==<変数名>
-
変数名。大文字と小文字を区別し、スペースや等号 ('=') を含めることはできません。
value=<変数値>
– 変数値。
scope=<変数スコープ>
- 視認範囲は以下のいずれかです:
-
local- 変数は宣言されたコードブロック内でのみ、 例えばFor Statement, If/Else Statementまたは Proceduresでのみ表示されます。
-
script- 単一のスクリプト内で表示され、すべてのスクリプトがそこから呼び出されます。
-
session- 同じセッション内のすべてのスクリプトに使用可能。変数は、アプリケーションが終了するまで存在します。
低いスコープほど優先順位が高くなります。たとえば、ローカル変数は同じ名前のセッション変数を上書きします。スコープが省略された場合、デフォルトは 'script' のものになります。
Varg delete name=<variableName> [scope=<visibilityScope> ]
-
赤色は必須パラメータです
オプション
name=<変数名>
-
削除する変数名。大文字と小文字は区別され、空白や等号 ('=') を含むことはできません。
scope=<変数のスコープ>
- 可視性のスコープで、「local」、「script」、「session」のいずれかを指定します。スコープが省略された場合、コマンドはすべてのスコープにわたって指定された名前の変数をすべて削除します。
戻り値
Varg コマンドは常に 0 (ゼロ) を返します。
例
Varg set name="S" value="Hello" scope="session"
-
S'というセッション変数を作成または設定する。
Varg delete name="S" scope="session"
-
前の例で作成したセッション変数を削除します。ローカルまたはスクリプト・スコープに存在する同名の他の変数はすべてそのままにしてください。
3.2.18 Varf
説明
Varf - 1つ以上の変数を定義し、その値にJavaエスケープシーケンスを含めることで、改行やタブ、特殊なUnicode文字を挿入することができます。v3.5.1 以降でサポートされています。
SYNOPSIS
varf <var_name_1>=<value_1>[<var_name_2>=<value_2> ... <var_name_N>=<value_N>].
-
赤色は必須パラメータ
オプション
変数名
– 変数の名前。大文字と小文字を区別し、スペースは使用できません。
値
– 変数の値。値にスペースが含まれる場合は、二重引用符で囲む必要がある。エスケープシーケンスは以下のように変換されます:
    \b    /* \u0008: バックスペース BS */
    \t    /* \u0009: 水平タブ HT */
    \n    /* \u000a: 改行 LF */
    \f    /* \u000c: フォームフィード FF */
    \r    /* \u000d: キャリッジリターン CR */
    \"    /* \u0022: 二重引用符 " */
    \'    /* \u0027: 一重引用符 ' */
    \\    /* \u005c: バックスラッシュ \ */
    \uNNNN NNNNが有効なUnicode文字の16進値である限り、適切なUnicode文字に変換されます。
戻り値
Varf コマンドは常に 0(ゼロ)を返します。
例
Varf MULTILINE="Line #1nLine #2"
-
MULTILINE変数に2行のテキストを入力します('˶n'シーケンスは改行に変換される)。
Varf MULTILINE="行#1u000a行#2"
-
上記と同じ例で、改行文字をエスケープされたユニコードで指定します(改行は ASCII 10, 0x0a)。
3.2.20 Wait
説明
Wait - 指定された時間だけ待つ。このコマンドを使用すると、スクリプトの実行を指定した時間だけ一時停止することができます。
SYNOPSIS
wait <time>
-
赤い色は必須パラメータを示します。
オプション
time
-次のコマンドに進むまでの待ち時間。0以上の数値でなければなりません。プレーンな数値はデフォルトでミリ秒として解釈されます。時間形式の指定についてはsyntax of time valuesを参照して下さい。
戻り値
コマンドは常に0(ゼロ)を返します。
例
Wait 30000
Wait 30s
Wait 0.5m
-この3つのコマンドはすべて等価で、次のコマンドに進む前にスクリプトを30秒(30,000ミリ秒または半分)待たせます。
3.2.21 Waitfor
説明
Waitfor - スクリプトの実行を一時停止し、RFB イベントやリモートデスクトップイメージの状態を待ちます。現在サポートされているイベントは、画面更新、ベル(デスクトップサーバーが ASCII 文字 0x07 を印字してビープ音を発した)、リモートシステム上にコピーされたテキストの配信(デスクトップサーバーのクリップボードの変更)、一致/不一致(正負の画像比較結果を待つ)です。
特定のイベントのサポートは、プロトコルの能力によって異なります。T-Plan Robotはオープンで柔軟なアーキテクチャを採用しており、リモートデスクトップ技術で一般的に提供されている機能のサブセットだけをクライアントにプラグインすることができます。Waitforイベントが選択したデスクトッププロトコルでサポートされていない場合、スクリプトはエラーを報告します。以下の表は、サポートされている2つのプロトコルの機能の一覧です:
|
Waitfor イベント |
RFB クライアント(”rfb”) |
静止画像 ("file") |
|---|---|---|
|
"update"(画面更新) |
はい |
はい(画像ファイル変更の検出による) |
|
"bell"(ビープ音) |
あり |
なし |
|
"clipboard" (クリップボードの変更) |
はい(VNCサーバーの機能による) |
いいえ |
|
"match" (正画像比較結果) |
はい |
はい |
|
“mismatch"(負の画像比較結果) |
はい |
はい |
全てのWaitforコマンドは以下の変数に値を入れます:
|
変数名 |
変数名 |
|---|---|
|
_TIMEOUT=<true|false> |
タイムアウトが定義され、それに達した場合、Waitforコマンドはこの変数を'true'に設定し、そうでなければ'false'に設定します。 |
Waitforupdateコマンドは、追加の変数を設定する:
|
変数名 |
変数名 |
|---|---|
|
_X=<X-coordinate>
|
条件を満たした最後の更新イベントのX、Y座標と幅と高さ。これらの変数は、Waitfor 更新のためだけに設定されます。 |
Waitfor matchコマンドとmismatchコマンドは、。Compareto commandとの結果の互換性を維持し、さらに2つの変数グループに値を割り当てます。:
-
で指定された _COMPARETO 接頭辞の付いたすべての変数が、Waitfor update で入力されます。 Compareto Command,
-
で指定されたすべての _COMPARETO 接頭辞付き変数。Image Comparison method.
Waitforクリップボードには_SERVER_CLIPBOARD_CONTENT変数が記述されていますが、これはWaitforコマンドによって作成されたものではなく、どのコマンドからも独立してコアフレームワークによって入力されています。
SYNOPSIS
Waitfor <event_id>[<event specific options>][timeout=<time>] [ontimeout=<command>] [onpass=<command>][count=<number>] [wait=<time>]
*赤色は必須パラメータを示します。
<イベントID>
-サポートされるイベントIDは、'bell'、'update'、'match'、'mismatch'、'clipboard'です。
-
bell event は、サーバーがビープ音を鳴らしたこと、つまりアプリケーションがベル文字(ASCII 0x07)を出力したことを示します。
-
Waitfor Command は、ウィンドウがポップアップするなど、リモートデスクトップイメージの更新を待つことを意味します。期待したイベントが受信されると、Waitfor コマンドはスクリプトの実行を再開し、更新座標を表す変数で実行コンテキストを更新します (Waitfor predefined variables).
-
match イベントは、選択された比較方法が肯定的な結果を生成するまでコマンドを待機させます(デスクトップが一致するまで待機します)。この mismatch イベントは、メソッドが肯定的な結果を生成する限り、コマンドを待たせます(デスクトップがマッチしなくなるまで待ちます)。
-
clipboard は、リモートサーバのクリップボードコンテンツの配信を待ちます。リモートデスクトップ上でテキストが選択され、コピーアクションが呼び出されると(Ctrl+Cなど)、一部のデスクトップサーバーはテキストをクライアントに送信します。メッセージを受信すると、_SERVER_CLIPBOARD_CONTENT変数を通して、リモートのクリップボードの内容が利用できるようになります(_SERVER_CLIPBOARD_CONTENTのコマンドも参照してください)。Var コマンドも参照)。
一般的な選択肢
timeout=<時間>
-最大待機時間を指定するタイムアウト。値はミリ秒数または有効なTime Values.デフォルト値は設定されておらず、タイムアウト値が指定されない場合、コマンドは無期限に待機します。
ontimeout=<コマンド>
-タイムアウト時に実行されるコマンド。単一のコマンドでなければならなりません。実行するコマンドのシーケンスを定義する必要がある場合は、プロシージャを使用してください。
onpass=<コマンド>
-条件が満たされたとき(予想されたイベントを受信したとき、または画像比較が予想された結果を返さなかったとき)に実行されるコマンド。単一のコマンドでなければなりません。一連のコマンドを呼び出すには、プロシージャまたは後続のIf/Else Statementコマンドの終了コードをテストします。
count=<数字>
-待機するイベントの数。デフォルト値は1。このパラメータは画像比較イベント(Waitfor match/mismatch)では無視されます。
wait=<時間>
-Waitfor条件が満たされた後の待ち時間。これは、次のコマンドが「Wait <time_in_ms>」であった場合と同じ効果を持つ。timeoutパラメータで定義されたタイムアウトに達した場合、このパラメータは無視される。値はミリ秒数か、有効なTime Values.デフォルト値は0(待機しない)です。スクリプトは、"Var _WAITFOR_WAIT=1s "のように、_WAITFOR_WAIT変数に希望する遅延を代入してデフォルト値を設定できます。
Waitfor bell [<common_options>]
特定のオプション - bell
なし。
Waitfor update [area=[x:<x>][,y:<y>][,w:<width>][,h:<height>]] [extent=<number>[%]] [cumulative=<false|true>] [<common_options>]
特定のオプション - update
area=[x:<x>][,y:<y>][,w:<幅>][,h:<高さ]
-更新を待機する画面領域。このパラメータはupdate イベントにのみ適用され、ユーザーがカスタムエリアを定義して更新を監視することができます。領域の座標は'x:<x>,y:<y>,w:<width>,h:<height>'のフォーマットを持ち、各座標はピクセル(例えば'x:225')またはパーセント(例えば'x:23%')で指定できます。x,y,width,heightのいずれかが省略された場合、Robotはフルスクリーンの値を用いて足りないパラメータを決定します。ステータスバーを使って更新領域を定義することもできます。 update coordinates機能を使うこともできます。
extent=<number>[%] を指定します。
-画面更新の範囲(スコープ)。このパラメータはupdateイベントのみに適用され、画面更新の大きさを定義します。値は、更新ピクセル数(例:'extent=400')またはパーセンテージ(例:'extent=22%')です。area パラメータでカスタム領域が定義されている場合、パーセント/ピクセル値はこの領域に対して計算されます。
cumulative=<false|true>を指定します。
-累積更新のオン/オフを切り替えます。もしデスクトップサーバが漸進的な画面更新を好み、予想される大きな画像の断片ではなく、小さな画像の断片を多数送信するのであれば、この機能をオンにすると、Robotは定義された範囲内の部分的な更新を要約します。デフォルトはfalseです。
WindowsのVNCサーバは画面を少しずつ更新することが知られているので、このモードをtrueに設定することをお勧めします。
Waitfor match | mismatch [template=<image_collection>][passrate=<pass_rate>%] [interval=<comparison_interval>] [method=<comparison_method>] [methodparams=<custom_params>] [cmparea=[x:<x>][,y:<y>][,w:<width>][,h:<height>][<waitfor_common>] [<(ja) Compareto Command>]
-
画像収集は、選択された画像比較アルゴリズム(パラメータ "method")によって必要とされる場合にのみ必須です。詳細は Compareto Command 仕様を参照してください。
特定のオプション - match と mismatch
template=<画像コレクション>
-画像コレクション|#imgcol] - リモートデスクトップイメージと比較する1つ以上の画像ファイル名、またはセミコロン(';')で区切られた画像を含むフォルダ。Linux/Unix では、ファイル名にセミコロンが含まれていないことを確認してください。ファイル名には、相対パス(img.png など)または絶対パス(/root/report/img.png など)を指定できます。相対パスを使った場合、画像は[_TEMPLATE_DIR変数|#_template_dir]で定義されたディレクトリで検索されます。サポートされる画像フォーマットは、Javaのバージョンとインストールされている拡張機能(Java Advanced Imaging library, JAIなど)に依存します。Java 1.6では、少なくともPNG、JPG、GIF、BMPをサポートしています。
テンプレート画像は、指定されたリスト順序でリモートデスクトップ画像と比較されます。テンプレート比較が肯定的な結果(指定されたイベントに応じて、一致または不一致のいずれか)を生成した場合、条件は満たされたとみなされ、コマンドは終了コード0で終了します。事前定義された変数_COMPARETO_TEMPLATE_INDEXは、リスト内の一致するテンプレートのインデックスを決定するために使用することができます。詳細は[画像比較固有の変数|#compareto_vars]を参照してください。
画像比較はJPEGのような非可逆圧縮の画像に対して実行すべきではありません。代わりにPNGまたはBMPを使用してください。これらは画像情報を100%保持し、信頼できる安定した比較結果を保証します。画像比較については、[Comparetoコマンド仕様|#compareto]で説明しています。
interval=<時間>
-このパラメータは画像比較の時間間隔を定義します。デフォルト値は3秒で、これはデスクトップ画像が3秒ごとに指定されたテンプレート画像と比較されることを意味します。プレーンな数値はデフォルトではミリ秒として解析されます。詳細は Time Values パラグラフを参照してください。デフォルト値は設定ウィンドウ Preferences ウィンドウの「待機設定パネル」で設定できます 。
passrate=<パスレート>%
-画像比較のパスレート。0から100の間の数値を指定し、その後にパーセンテージ文字(例えば "passrate=95 "または "passrate=95%")を付けることができます。このパラメータが省略された場合、メソッドまたはRobot環境設定で定義されたデフォルトの通過率が使用されます(デフォルト値は "default "メソッドで95%、"search"および "search2"メソッドで100%)。
method=<比較メソッド>
-- 画像比較に使用するメソッド(アルゴリズム)。の章で説明されているサポートされているメソッド名(コード)のいずれかでなければなりません。 (ja) Image Comparison Capabilities 章で説明されているサポートされているメソッド名(コード)のいずれか、またはプラグインインターフェイスで有効になっているサードパーティのメソッド名でなければなりません。省略した場合、コマンドはデフォルトのものを使用します。
methodparams=<custom_params>
-画像比較アルゴリズムに渡すカスタムパラメータ。T-Plan Robot 2.0のデフォルトの画像比較アルゴリズムはカスタムパラメータをサポートしていないので、独自のアルゴリズムを作成しない限り、このパラメータを指定する必要はありません。
cmparea=[x:<x>][,y:<y>][,w:<width>][,h:<height>]
-比較を制限するデスクトップの矩形領域。このパラメータを省略すると、リモートデスクトップ全体が使用されます。領域の座標は、'x:,y:,w:,h:'の形式で、各座標はピクセル単位(例えば、"x:225")またはパーセンテージ("x:23%")で指定できます。x,y,width,heightのいずれかが省略された場合、T-Plan Robotはフルスクリーンの値を用いて足りないパラメータを決定します(x:0, y:0, w:, h:)。
Waitfor clipboard [<waitfor_common>]
特定のオプション - clipboard
なし。
戻り値
コマンドは通常、条件(イベント)が満たされると0(ゼロ)を返します。タイムアウトに達すると0以外の値(通常は1)が返されます。Waitfor match' と'Waitfor mismatch' はComparetoコマンドの動作を模倣し、比較が成功すると0(ゼロ)、失敗すると1、テンプレート画像が見つからないか読み込めない場合は2を返します。
例
Typeline "export MYDOC=`find / -name mydoc.txt`; sleep 1; echo -e '\007\007'"
Waitfor bell count=2
Typeline "gnome-text-editor $MYDOC"
-これは、Unix/Linuxシステムでbellイベントを使う典型的な例です。ハードディスク上のファイルを見つけて編集する必要があるとしよう。最初のコマンドはターミナル・ウィンドウで検索を実行し、Waitforコマンドに進む。検索が終わると、echo OSコマンドを使ってベルが2文字表示され、マシンがビープ音を2回鳴らす。これによってWaitforコマンドが実行され、Gnomeテキストエディタでドキュメントを開く3番目のコマンドが実行されます。
行目の'sleep 1'コマンドに注意してください。デスクトップサーバーが非常に高速で、T-Plan Robotが動作しているマシンが多少遅い場合、T-Plan RobotがWaitforコマンドに進む前に文書検索が終わってしまうことがあります。sleep 1'を指定すると、サーバーは1秒待ってから2文字のベルを表示するので、この問題を防ぐことができます。
procedure terminate {
    Screenshot error.jpg
    Report report.html
    Exit {1}
}
Typeline myapplication
Waitfor update extent=40% timeout=20s ontimeout="terminate 2"
-
これは「Waitfor update」コマンドの典型的な使い方です。ターミナル・ウィンドウからmyapplicationというGUIアプリケーションを起動しているときの状況を示しています。アプリケーション・ウィンドウは、画面サイズの少なくとも40%に等しい固定サイズを持っているとします。GUIが正しく起動すれば、スクリプトは続行される。そうでなければ、Waitforコマンドは20秒間待機し、与えられた終了コードで終了手続きを実行します。
Waitfor match template=application.png;application2.png passrate=95% interval=5s timeout=5m ontimeout="exit 1"
-
リモートデスクトップ画像と画像application.pngおよびapplication2.pngを、少なくとも95%一致するまで5秒ごとに比較します。この条件が5分以内に満たされない場合は、Exitコマンドを使用してスクリプトの実行を終了し、終了コード1を返します。
Press Ctrl+C

Waitfor clipboard timeout=5s
if ({_EXIT_CODE} == 0) {
  Screenshot copied_text.jpg desc="Received text copied on the remote desktop: {_SERVER_CLIPBOARD_CONTENT}"
}
-
リモートデスクトップでCtrl+Cを押すと、選択したテキストがリモートシステムのクリップボードにコピーされます。このテキストをクライアントに送信できるデスクトップサーバーもあります。Robotはこのようなメッセージをデコードし、_SERVER_CLIPBOARD_CONTENT変数という形でスクリプトにテキストを渡すことができます。上の例では、Waitforクリップボードを通してコピーされたテキストの受信を確認する方法と、スクリーンショットの説明などに使用する方法を示しています。
3.3 Reporting Commands
3.3.1 Log
DESCRIPTION
Log - Log a message to the script execution log file. For details see the Execution Log help topic.
Release 4.4.2 delivered execution history logging. It logs steps performed by the script in details and saves screenshots to document the progress of I/O operations. It is useful for tracking of script failures. To avoid the production of large amounts of data the logger stores just a configurable number of the most recent logs and prints them to the execution log (log.html) after the script execution finishes. For instant dump of the history logs, use the history parameter, for example when your script detects a recoverable failure.
Release 4.4.3 enhanced the history log with the option to print out the history logs to the console/terminal. The messages are printed out on the fly as they are generated without any limits. This is useful for integration with 3rd party frameworks which observe the output.
The history logging and console output are off by default. To enable them to navigate to the Log command preferences. The console output may be also controlled from a script by setting of the _LOG_HISTORY_TO_TERMINAL variable to true as follows:
Var_LOG_HISTORY_TO_TERMINAL=true
The variable overrides the console output preference setting. It works only when the main history logging flag in preferences is enabled.
Starting with 7.2.6 the default log file name of "log.html" may be customized. To do so set this variable at the beginning of your script:
Var_LOG_FILENAME=mylog.html
SYNOPSIS
log "<text>" [level=<logLevel>] [terminal=<true|false>] [history=<true|false>]
* Red colour indicates obligatory parameters
OPTIONS
text
- The log text. As the execution log file is generated in the HTML format it may contain HTML markup.
level=<logLevel>
- Optional log level, one of "SEVERE", "WARNING", "INFO", "CONFIG", "FINE", "FINER" and "FINEST". The default value is "INFO" or the custom value specified in the Log command preferences.
Levels allow filtering the log file by the message priority. The default filter level (also called "minimum level") is "INFO" which means that the log will record only messages of this or higher level. This allows building scripts with detailed logging with an option to set off part of the logs later on through a simple change of one of the corresponding preference.
terminal=<true|false>
- The value of true will make the command copy the message to the terminal (command prompt). The default value is 'false'. Supported since v4.1.3.
history=<true|false>
- The value of true will make the command record the most recent script history into the log file. This includes the most recent detailed logs and debug screenshots. Use it to track what had happened before the script produced an error. If the script history recording feature is disabled in the Log command preferences the parameter is ignored. The default value is 'false'. Supported since v4.4.2.
RETURNS
The command always returns 0 (zero).
EXAMPLES
Log "Suspicious image search coordinates: _SEARCH_X={_SEARCH_X}, _SEARCH_Y={_SEARCH_Y}" level="WARNING"
- Create a warning log.
3.3.2 Report
説明
Report- 実行されたスクリプトのレポート プロバイダを作成し、開始します。これは、結果、スクリーンショット、警告などのスクリプト実行データからレポートを作成するオブジェクトです。レポート プロバイダーはカスタマイズ可能なプラグインで、その機能、ライフ サイクル、出力形式は実装によって異なります。レポートのカスタマイズ方法の詳細については、プラグインAPIを参照してください。コマンドによって開始されるデフォルトのプロバイダーはレポート環境設定で設定可能で、デフォルトは「enterprise」です。
このコマンドは_REPORT_DIR変数設定を使用して、レポート・ファイルを保存するターゲット・フォルダを定義します。以下の変数を作成し、入力します:
|
変数名 |
説明 |
|---|---|
|
_REPORT_FILE=<ファイル> |
最初に指定されたレポート・ファイルへの絶対パス(スクリプトによってレポートが作成される場合)。v4.0からサポートされています。 |
|
_REPORT_FILE<n>=<ファイル> |
N番目のレポートファイルへの絶対パス。v4.1.3からサポート。 |
|
_REPORT_FILE<エクステンション<ファイル> |
大文字で指定された拡張子を持つレポート・ファイルへの絶対パス。例えば、レポート・ファイルを "results.xml;results.html "と指定した場合、_REPORT_FILE_XMLと_REPORT_FILE_HTMLの変数が存在します。 |
|
_REPORT_FILE_RELATIVE=<ファイル> |
プロジェクトレポートフォルダへの相対的な最初のレポートファイルのパス。デフォルトでは、レポートはプロジェクトレポートディレクトリの下の一意のフォルダに保存されます (_REPORT_DIR)この変数は、動的に作成されるフォルダーの名前を取り込むことができます。 例えば、"Report report.xml "というコマンドを含むMyTestScript.tprというスクリプトは、変数を "MyTestScript.tpr.2a12fd2/report.xml "のようなパスに設定します。 相対プロジェクトパスは、Web上で公開されるレポートへのリンクを簡素化することを目的としています。プロジェクトのレポートフォルダをWebサーバーのドキュメントルートに配置する場合、この変数を利用してレポートURLを構築できます。使用例についてはSendmail コマンドの例を参照してください。v4.1.3以降でサポートされています。 |
|
_REPORT_FILE_RELATIVE<n>=<ファイル> |
N番目のレポートファイルの相対パス。上記の説明を参照。v4.1.3からサポート。 |
|
_REPORT_FILE_RELATIVE<extension>=<ファイル> |
指定された拡張子を持つレポート・ファイルの相対パス。上記の説明を参照してください。v4.1.3からサポートされています。 |
|
_REPORT_FILENAME=<ファイル> |
最初に指定されたレポートファイルの名前。 |
|
_REPORT_FILENAME<n>=<ファイル |
N番目のレポートファイル名。上記の説明を参照。v4.1.3からサポート。 |
|
_REPORT_FILENAME<extension>=<ファイル> |
指定された拡張子のレポートファイル名。上記の説明を参照してください。v4.1.3からサポートされています。 |
エンタープライズ・レポート・プロバイダー
このプロバイダーは、HTML、XML、ZIP形式の両方をサポートしています。そのコードは「エンタープライズ」です。デフォルト・プロバイダの動作をそのままコピーし(スコープ・パラメータを除く)、設定パラメータもすべて再利用します。しかし違いは、テスト出力をどのように処理して結果のレポートファイルを生成するかにあります。デフォルトのプロバイダとは異なり、このプロバイダはScript, Step そして Timer テスト結果は、スクリプトの実行ログと緊密に統合されています。
出力形式がXMLに設定されている場合(コマンド引数に.xmlファイルが指定されている場合)、プロバイダはすべてのテスト出力を含む単純なXMLファイルを生成します。そのフォーマットはプロバイダのJava API ドキュメント.XMLレポートはXMLスタイルシート(XSL)でリンクされているため、ウェブブラウザで表示することができ、デフォルトのプロバイダで生成されたHTMLファイルとまったく同じレポートビューを提供します。HTMLビューへのXMLデータの解釈はウェブブラウザ側で行われるため、XML出力は高速で効率的です。XMLファイルはさらに、サードパーティ製アプリケーションへの試験結果のエクスポートにも再利用できます。
このツールは、デフォルトのXSLファイルをカスタムのものに置き換えるメカニズムをユーザー設定に提供します。これにより、ウェブブラウザがXMLデータを表示する方法をカスタマイズできます。プロバイダは、主にパフォーマンスに影響する追加設定可能なオプションを提供し、レポート生成の頻度をカスタマイズすることができます。
出力がHTMLに設定されている場合、プロバイダは実際にはまずXML出力を生成し、次にXSL変換を使用してHTMLファイルを生成すします。この操作は非効率的で、通常は非常に時間がかかります。この場合、プロバイダーはデフォルトのものと同じHTMLコンテンツを作成するので、XSLファイルにカスタム変更が適用されていない限り、代わりにデフォルトのものを使用することをお勧めします。
4.1.3以降、プロバイダは複数のレポートファイル(セミコロン区切り)を受け付けるようになった。これは、HTMLとXMLの両方のレポートを作成するために使用できます。また、レポート・フォルダの内容を含むZIPファイルを作成することもできます。
デフォルトのレポートプロバイダー
デフォルトのプロバイダは単純な HTML レポートを作成するレガシーレポートジェネレータです。これは以前のVNCRobot 1.xバージョンとT-Plan Robotバージョン2と互換性があります。プロバイダコードは "default "です。ライフサイクルは以下の通りです:
-
-
Reportコマンドを実行するたびに、レポート・プロバイダの新しいインスタンスが作成され、開始されます。定義済みのスクリプト変数とスクリーンショットと警告の内部リストを使用して、最初のHTMLレポートが直ちに生成されます。また、いくつかの特定の変数を報告するを実行コンテキストに追加する。
-
ステータスデーモンが作成され、起動する。あらかじめ定義された時間(通常は10秒)が経過すると定期的に起動し、リモートデスクトップのスクリーンショットを撮影する。この画像へのリンクがHTMLレポートに提供され、ユーザーはデスクトップの最近の状態を見ることができます。
-
次にプロバイダは、出力オブジェクトの内部リストに変更通知を登録する。新しいスクリーンショットが撮影されたり、警告が作成されたりするたびに、プロバイダは起動し、新しいオブジェクトを含むようにレポートを再構築します。
-
スクリプトの実行が終了すると、ステータス・デーモンが起動し、終了状態を反映するためにステータス画像を更新する。その後、プロバイダが最後にウェイクアップし、終了コードに基づいて実行結果を反映するようにレポートを再構築します (Exit command).
-
デフォルトのレポートプロバイダは、スクリプト実行中に撮影されたすべての画像と警告を常に処理します。つまり、スクリプトの一番最後にReportコマンドを呼び出しても、Reportコマンドが実行される前に撮影されたものも含めて、HTMLレポートはすべてのスクリーンショットと警告を一覧表示します。現在、画像のリストは、画像のオリジンによってのみ制限することができます(以下のscopeパラメータを参照してください)。
HTMLレポートには、実行された画像比較の結果の表が含まれることもあります。この機能は、T-Planロボットの環境設定ウィンドウで設定することができ、スクリーンショットコマンドで実行された比較結果のすべて、または失敗した比較結果のみを表示することができます。
ComparetoコマンドやWaitforコマンドによる一致/不一致の画像比較は、決して一覧表示されないことに注意してください。その理由は、表の機能的なリンクを提供するためには、いずれにせよスクリーンショットを作成しなければならないからです。例については、上記のリンクにあるサンプル・レポートを参照してください。
デフォルトのプロバイダは、HTMLレポートの最後に特定の値を挿入します。これらはHTMLコメントに埋め込まれ、ブラウザには表示されません。これらの値は、レポートの状態、実行時間、失敗した画像比較の数などに関する情報を提供します。これらの値は、レポートの状態や結果を解釈するために、サードパーティのアプリケーションで解析することができます。提供される変数のリストとサンプル値を以下に示します:
|
<!-- version=1.3-20061210 --> |
このレポートを生成するために使用された T-Plan Robot のバージョンとビルドを示します。 |
|
|
<!-- running=false --> |
スクリプトの実行が現在進行中か、既に終了したかを示します。 |
|
|
<!-- stopped=false --> |
値が「true」の場合、スクリプトの実行がユーザーによって手動で停止されたことを示します。GUIモードでは「停止」ボタン、CLIではCtrl+Cキーによって停止されます。 |
|
|
<!-- paused=false --> |
値'true'は、スクリプトの実行が手動またはプログラ ムで行われたことを示します。Pause コマンド)を一時停止されたことを示します。 |
|
|
<!-- exitCode=0 --> |
終了コード。ゼロは成功を表し、それ以外の正の数は失敗と解釈されます。 Exit コマンドを参照のこと。 |
|
|
<!-- imageCount=3 --> |
レポートに含まれる画像の数。 |
|
|
<!-- failedComparisons=0 --> |
画像比較に失敗した回数。 |
|
|
<!-- warningCount=0 --> |
Warning コマンドによって追加された警告の数。 |
|
|
<!-- executionTimeInSec=44 --> |
スクリプトの実行時間(秒単位)。 |
|
SYNOPSIS
Report <file(s)> [provider=<provider_name>] [desc=<description>] [scope=<scope_id>] [onexit=<true|false>]
-
赤色は必須パラメータです
オプション
file(s)
-レポートを保存するファイル名。T-Plan Robot Enterprise は、そのパスとファイルが作成できるかどうかをチェックし、作成できない場合はエラーを報告します。ファイルの拡張子は、プロバイダが宣言したサポートされるフォーマットのリストと照合され、不一致の場合は構文エラーが発生します。
-
このコマンドは、単一サポートファイル(「results.xml」)またはセミコロン区切りのファイルリスト (「results.xml ; results.html;archive.zip」)を採用し、複数の境界を直接作成します。ZIPファイルがリストされている場合、レポートディレクトリの内容(サブフォルダを含む)をアーカイブします。パフォーマンス上の理由から、アーカイブはマクロ終了後に一度だけ作成されます。ZIP および複数の入力ファイルのサポートは 4.1.3 で導入されました。
-
「デフォルト」プロバイダーは、.htmと.htmlの拡張子をサポートしています。単一のファイルのみを受け付けます。
ファイル名は相対パス(例: report.xml)または絶対パス(例: /root/report/report.xml)で指定できます。パスが存在しない場合、通常は作成されます(一応)。ただし、この動作は任意によって異なる場合があります。相対パスを使用する場合、レポートファイルおよび関連するすべての出力は、_REPORT_DIR 変数.で定義されたディレクトリに保存される必要があります。
provider=<プロバイダー名>
-レポートプロバイダー名(オプション)。プロバイダーには「エンタープライズ」 (現在開発中でデフォルトで選択されている)と「デフォルト」(旧式/廃止)の2種類があります。最終的には独自の名前で新しいプロバイダーを作成し、プラグインフレームワークを介してRobotにプラグインすることもできます。
desc=<説明>
-レポートの説明。これはレポートのヘッダーに表示されます。デフォルトのプロバイダを使用する場合、テキストには任意のHTMLタグを含めることができます。
scope=<scope_id>
-scopeパラメータは、スクリーンショット作成者に基づいてレポートにどの画像を含めるかを定義する方法を提供します。このパラメータはデフォルトのレポートプロバイダーによってのみサポートされており 、Enterprise パラメータでは無視されます。。
許可される値は二つあります::
-
all - この値はデフォルトです。スクリプト実行中に撮影されたすべての画像がレポートに含まれます。
-
file - 現在のスクリプト内およびこのスクリプトによって呼び出されたプロシージャ内で撮影された画像のみを含めます。マスター スクリプト(つまり、このスクリプトを呼び出す上付きスクリプト)および Run 実行 は除外されます。この方法は、1つの上付き添え字を使って小さなスクリプトをいくつも実行し、大きなレポートではなく短いレポートをいくつか用意したい場合に適しています。
onexit=<true|false>
-trueを指定すると、レポートはその場で更新されず、メソッドが呼び出されたときとスクリプトが終了したときの2回だけ作成されます。このモードは、複数のレポート対象オブジェクトを作成する大規模なスクリプトで、レポートが頻繁に更新されるとパフォーマンスが低下する可能性がある場合にお勧めします。デフォルト値はfalseです。v4.1.3からサポートされています。
戻り値
Reportコマンドは、レポート・プロバイダが開始され、最初のレポートが正常に作成・保存された場合、0(ゼロ)を返します。レポート・ファイルを作成できないなど、何らかのエラーが発生した場合、コマンドは1を返します。
使用例
Report results.xml desc="これは私のXMLレポートです。"
-
レポート・ジェネレータを作成し、XMLレポートの生成を開始します。相対ファイルが提供されると、レポートは_REPORT_DIR変数の値で定義されたディレクトリに保存される。提供された説明は、レポート・ヘッダーに表示されます。
Report results.xml;results.html;results.zip desc="これは私のXMLとHTMLのレポートとZIPアーカイブです。"
-
レポートジェネレータを作成し、XMLおよびHTMLレポートの生成を開始します。完了したら、レポート・フォルダーのZIPファイルを作成します。
Var _REPORT_DIR=/var/apache/htdocs/robot
Report index.html scope=file
Screenshot start_state.jpg desc="{_MACHINE}デスクトップの初期状態。FILE}スクリプトの実行開始..."
-
これは report コマンドの典型的な使用例です。最初のコマンドはレポートファイルとスクリーンショットの出力パスを定義します。これは、ユーザがウェブブラウザを通してオンラインでレポートを見ることができるので非常に便利です。report コマンドとスクリーンショットコマンドは出力に相対パスを使うので、 出力ディレクトリにすべてが保存されます。
3.3.3 Screenshot
DESCRIPTION
Screenshot - Take a screenshot of the current remote desktop and save it to a file.
The Screenshot command has been closely integrated with the Compareto command. Comparison is performed when a corresponding template image is found in the template directory (see the _TEMPLATE_DIR variable) and at least one of the following conditions is met:
-
-
The Screenshot command contains at least one parameter originating from the Compareto command - 'template', 'passrate','onpass','onfail'.
-
The option 'Perform auto comparison when the template is available' in the Screenshot command preferences is switched on.
-
Unless you specify a template image explicitly through the 'template' parameter, the command will search the template directory for a template with matching name and extension PNG, GIF, BMP and JPG (in this order). You can switch this feature off in the Screenshot preferences to force the command to search for templates with exactly the same file name as the screenshot images.
If the command performs image comparison it populates the image comparison specific variables.
SYNOPSIS
screenshot <file> [desc=<description>] [area=[x:<x>][,y:<y>][,w:<width>][,h:<height>]][attach=<list_of_files>] [template=<image_collection>] [passrate=<pass_rate>%] [onpass=<command>] [onfail=<command>] [method=<comparison_method>] [methodparams=<custom_params>] [cmparea=[x:<x>][,y:<y>][,w:<width>][,h:<height>]] [drawresults=<true|false>] [drawdiff=<true|false>] [<method_specific_params>]
* Red colour indicates obligatory parameters
OPTIONS
file
- File name to save the image to. It MUST have a supported extension, for example "png" or "jpg". Supported image formats are subject to the Java version. Java 1.6 supports at least PNG, JPG, GIF and BMP. File name can be either relative (e.g. img.jpg) or absolute (e.g. /root/report/img.jpg). If the path doesn't exist, it is created. If you use relative path or just a file name, the image will be saved to a directory defined by the [_REPORT_DIR variable|#_report_dir].
desc=<description>
- Image description. It will be displayed in the report.
area=[x:<x>][,y:<y>][,w:<width>][,h:<height>]
- This parameter can be used to specify which part (sub image) of the remote desktop will be saved. If you omit this parameter the whole remote desktop will be processed. The area coordinates have format of 'x:,y:,w:,h:', where each coordinate can be specified in pixels (e.g. 'x:225') or as a percentage (e.g. 'x:23%'). If any of x, y, width or height is omitted, T-Plan Robot will use the full screen values to determine the missing parameters, i.e. 'x:0, y:0, w:, h:'. You may also define the comparison area using the Screenshot window.
attach=<list_of_files>
- A file or a list of semicolon (';') separated files to be attached to a report. It provides a way to link for example log files and documents to the screenshot entry in the report. The report generator will list the attachments in the screenshot title in the HTML report and creates a hyperlink for each attached file. Please note that you have to copy the files to the target location on your own as T-Plan Robot neither copies the attached files to the report directory nor validates whether they exist there.
This parameter is obsoleted as it maintained compatibility with the previous versions. It is not supported in the Java script API.
template=<image_collection>
- An image collection - one or more image file names or folders with images separated by a semicolon (';') to be compared to the remote desktop image. On Linux/Unix make sure the file name doesn't contain semicolon because the list would be incorrectly parsed. File names can be either relative (e.g. img.png) or absolute (e.g. /root/report/img.png). If you use a relative path, the image will be searched in the directory defined by the _TEMPLATE_DIR variable. Supported image formats are subject to the Java version and installed extensions (such as the Java Advanced Imaging library, JAI). Java 1.6 supports at least PNG, JPG, GIF and BMP.
Template images will be compared with the remote desktop image in the specified list order. If a template comparison produces a positive result (either match or mismatch depending on the specified event), the condition is considered to be met and the command finishes with an exit code of 0. The predefined variable _COMPARETO_TEMPLATE_INDEX may be used to determine the index of the matching template in the list. See image comparison specific variables for more.
Image comparison should not be performed against images with lossy compression such as JPEG. Use PNG or BMP instead. They preserve 100% of the image information and guarantee reliable and stable comparison results. Image comparison is discussed in the Compareto command specification.
passrate=<pass_rate>[%]
- The pass rate for image comparison. It must be a number between 0 and 100 which may optionally be followed by the percentage character (for example "passrate=95" or "passrate=95%"). If this parameter is omitted, the default pass rate defined by the method or in the Robot preferences will be used (default values are 95% for the "default" and 100% for the "search" and "search2" methods).
method=<comparison_method>
- - The method (algorithm) to be used for image comparison. It must be one of the supported method names (codes) described in the Image Comparison Capabilities chapter or the name of a third party method enabled through the plugin interface. If omitted the command will use the default one.
methodparams=<custom_params>
- Custom parameters to be passed to the image comparison algorithm. As T-Plan Robot 2.0 default image comparison algorithms don't support any custom parameters, you don't need to specify this parameter unless you write your own algorithm.
cmparea=[x:<x>][,y:<y>][,w:<width>][,h:<height>]
- The rectangular area of the desktop to be limit the comparison to. If you omit this parameter the whole remote desktop will be used. The area coordinates have the format of 'x:,y:,w:,h:', where each coordinate can be specified in pixels (for example. "x:225") or as a percentage ("x:23%"). If any of x, y, width or height are omitted, T-Plan Robot will use the full-screen values to determine the missing parameters (x:0, y:0, w:, h:).
onfail=<command>
- A command to be executed when the image comparison fails. It must be one single command. If you need to define a sequence of command to be executed, use a procedure.
onpass=<command>
- A command to be executed when the image comparison succeeds. It must be a single command. To call a sequence of commands, use either a procedure or a subsequent if/else construction testing the command exit code.
drawresults=<true|false>
- This flag controls whether results of image comparison should be painted into the captured screenshot. The default value is false (meaning "do not paint any results"). If the command doesn't employ image comparison or the specified comparison method doesn't support result painting the parameter is ignored. In the default T-Plan Robot configuration, the "default" image comparison method doesn't support result painting because it doesn't make sense with regard to the algorithm nature. The "search" method does support result painting and draws rectangles corresponding to the match locations in the colour specified in command configuration.
drawdiff=<true|false>
- This flag controls whether the pixels differing from the template image should be painted in the configured colour (green by default). The parameter was introduced in v3.4 to support image difference tracking in reports. The default value is false (meaning "do not paint the difference"). If the command doesn't employ image comparison or the specified comparison method doesn't support pixel difference tracking the parameter is ignored. This feature is supported only by the "search" and "search2" algorithms.
method_specific_params
- See the documentation of individual image comparison methods for the list of supported specific parameters.
RETURNS
The command returns 0 (zero) if the screenshot is successfully saved and eventual image comparison passes. If image comparison takes place and fails, a value of 1 is returned. If the screenshot cannot be saved (e.g. not enough space), the command returns 2.
EXAMPLES
Screenshot image.jpg
- Take a screenshot of the current remote desktop and save it as a JPEG image into a file called image.jpg in a directory defined by the value of the _REPORT_DIR variable.
Screenshot /root/images/image2.png desc="This image shows what happened after I had clicked the Start button."
- Take a screenshot of the current remote desktop and save it as a PNG image into a file called image.png to the /root/images/ directory. If the executed script generates a report, the provided description will be displayed there.
3.3.4 Script
DESCRIPTION
Script - Define start or end of a script (test case). The command it can be used in a generic way to define the script structure as is common in the QA industry. Script mappings are recognized by the Enterprise report provider and may be used to map the output XML data (or HTML report) onto QA documentation (such as test case specification).
A script in T-Plan terminology, in this case, is equal to a test case. Scripts in general consist of test steps, which represent a set of test instructions describing how to execute the test case. Steps may be specified in T-Plan Robot scripts through the Step command.
The command is intended to be used in pairs [Script <id> start, Script <id> end] to define a block of code which executes a test case. Any output objects generated inside such a block (such as screenshots or warnings) are then associated with the script (test case) ID and this relationship is reflected in the test result data. As a script block validity ends automatically with the file end or with declaration of another "Script start" command, declaration of the script end is optional and may be omitted.
SYNOPSIS
script <id> [start|end] [name=<displayable_name>]
*red indicates required parameters
OPTIONS
id
- A unique script ID. It may be a number or text.
start|end
- Indicates whether the script block starts or ends. It may be also specified as action=\[start|end\]. If the parameter is omitted, the command defaults to start.
name
- An optional displayable name for the script.
RETURNS
The Script command always returns 0 (zero).
EXAMPLES
Script 1 start name="Display http://www.t-plan.com"
Press Windows+R wait=3s
Typeline "http://www.t-plan.com"
Waitfor match template="tplanlogo.png" method=search timeout=20s
if ({_EXIT_CODE} == 0) {
  Step "Open http://www.t-plan.com in web browser" pass
} else {
  Step "Open http://www.t-plan.com in web browser" fail
  Exit 1
}
Script 1 end
- An example of script number 1 which opens the T-Plan web site in the default web browser on Windows. The script uses image search to verify that the page was displayed successfully. If the T-Plan logo is detected on the desktop the script records a passed step result. Otherwise, a failed step is recorded and the script exits with a code of 1 to indicate failure.
3.3.5 Sendmail
DESCRIPTION
Sendmail - Send an E-mail. The command acts as an SMTP client and sends E-mails with eventual attachments through an SMTP server. To receive email use the Mail command.
Supported authentication schemes are no security (public/anonymous mail servers), plain user/password authentication or OAuth2 authentication to Google or Microsoft IMAP servers (since 6.2.3). The communication may be either unencrypted or encrypted with STARTTLS (since 4.1.3). Version 4.4.3 introduced support of SSL secured SMTP (typically port 465). The connection type is picked up automatically based on the port and doesn't have to be specified by the command. If the server is using a custom port you may have to set the security type manually in the command preferences.
Optional attachments are sent in the Base64 encoding.
If default values of from, to, server, user and passwd are provided in the Sendmail preferences they may be omitted in the command.
SYNOPSIS
sendmail [from=<sender_address>] [to=<recipient_address>] [server=<server[:port]>] [cc=<recipient_address>] [bcc=<recipient_address>] [subject=<subject>] [text=<mail_body>] [attach=<attachments>] [user=<userId>] [security=<none|password|google|microsoft>] [passwd=<password>] [delayed=<true|false>] [debug=<true|false>]
* Parameters are obligatory unless valid default values are provided through Sendmail preferences
OPTIONS
from=<sender_address>
- The sender E-mail address or a comma separated list of addresses, for example john.doe@company.com.
to=<recipient_address(es)>
- The recipient E-mail address, for example jane.doe@company.com.
cc=<recipient_address(es)>
- The Carbon Copy (CC) E-mail address or a comma separated list of addresses (since 5.0.3).
bcc=<recipient_address(es)>
- The Blind Carbon Copy (BCC) E-mail address or a comma separated list of addresses (since 5.0.3).
server=<server[:port]>
- The SMTP server to send the mail message through. If just a hostname without a port number is used, the command attempts to connect the server on the standard SMTP port of 25.
security=<none|password|google|microsoft>
- The security type (since 6.2.3), one of:
-
-
"none" - anonymous access.
-
"password" - plain password authentication. The password may be specified through the password parameter.
-
"google" - OAuth2 authentication to the GMail SMTP server.
-
"microsoft" - OAuth2 authentication to the MS Outlook SMTP server.
-
To enable either of the OAuth2 schemes you have to download the authentication token through the Tools→OAuth Token Manager window. Tokens are long lived but may be invalidated on the user side (password change, revocation through the Google Dev Console or MS Azure account, ...) or after they are not used for a long time (typically 6 months). Downloaded tokens are encrypted and stored in the Robot configuration file.
If the security parameter is omitted the command defaults to either "none" or "password" security depending on whether the password is specified.
passwd=<password>
- The password to authenticate to the SMTP server. It is used only when the security is set to "password".
subject=<subject>
- The mail subject (title).
text=<mail_body>
- The mail body. If the text starts with "<html>" the content type is set to HTML. Otherwise, the content is sent as plain text. To indicate a line break use '\n'. If you need to use '\n' in the normal text, double the backslash character ('\\n').
attach=<attachments>
- List of attachments i.e. files to attach to the E-mail. File names must be separated by a semicolon (';'). On Linux/Unix make sure the file name doesn't contain semicolon because the list would be incorrectly parsed. If an attachment is not found, it is ignored and the mail is sent without it. It is recommended to provide the files with an absolute path.
user=<username>
- The user ID to authenticate to the SMTP server with. This option should be used together with the passwd parameter when the SMTP server specified by the server parameter requires plain password authentication.
delayed=<true|false>
- When set true the email will be delayed until after the script finishes (supported since 4.1.3). This is useful for example when the script needs to send the test results (report) by email and doing so without a delay would show the status of "Running" in the data. The default value is false (send immediately).
debug=<true|false>
- Debug flag. Use debug=true to switch on the JavaMail debugging console output. This is useful if you need to find out why the E-mail feature doesn't work.
RETURNS
The command returns 0 (zero) on success or 1 if the E-mail cannot be sent.
EXAMPLES
Screenshot scr.png
Sendmail to="tester@dummyserver.com" from="robot@dummyserver.com" server="mail.dummyserver.com" subject="Screenshot of the remote desktop" text="Please check the attached screenshot."attach="{_REPORT_DIR}/scr.png"
- Take a screenshot of the current remote desktop and send it by E-mail to user tester@dummyserver.com.
Sendmail subject="Hello" text="This is a multiline E-mail.\nSecond line.\nThird line."
- Example of a multiline E-mail. This command will only work if you have set correct default values of the 'from','to' and 'server' parameters in the Sendmail command preferences.
Sendmail subject="HTML Example" text="<html><body><h1>Hi there!</h1>How are you?</body></html>"
- Example of an HTML E-mail. This command will only work if you have set correct default values of the 'from','to' and 'server' parameters in the Sendmail command preferences.
Sendmail delayed="true" subject="Script finished" text="<html><body>Script <i>{_FILENAME}</i> finished with the exit code of {_EXIT_CODE}. See the results <a href=\"http://myserver.mydomain.com/reports/{_REPORT_FILE_RELATIVE}\">here</a>.</body></html>"
- Example of an email notifying the recipient that the script has finished. As the 'delayed' parameter is set to true the mail will be sent after the script gets finished. We presume that the report directory is linked to the reports/ folder under the document root of a web server on host myserver.mydomain.com. For simplicity we also presume that you have set correct default values of the 'from', 'to' and 'server' parameters in the Sendmail command preferences.
3.3.6 Step
DESCRIPTION
Step - Define the result of a test step. A step represents one atomic instruction of a test case (script). Steps should be located inside a script block.
SYNOPSIS
step <name> [pass|fail|nt|na] [instruct=<instructions>] [expected=<expected_result_desc>] [actual=<actual_result_desc>] [notes=<notes>]
* Red colour indicates obligatory parameters
OPTIONS
name
- A displayable step name, for example, "Logon", "Open Browser" etc. It doesn't have to be unique.
pass|fail|nt|na
- Step result. It must be one of pass (passed, successful), fail (failed, unsuccessful), nt (not yet tested) or na (not available).
instruct=<instructions>
- Step instructions (optional). It is usually a brief description of what was performed to accomplish the step.
expected=<expected_result_desc>
- Description of the expected step result (optional).
actual=<actual_result_desc>
- Description of the actual step result (optional). It is typically used with failed steps to indicate the difference from the expected result.
notes=<notes>
- Additional step information (optional).
RETURNS
The Step command always returns 0 (zero).
EXAMPLES
Compareto template= "application.png"
if ({_EXIT_CODE} == 0) {
Step "Start application" pass expected="The application GUI opens."
} else {
Step "Start application" fail expected="The application GUI opens." actual="The application failed to start."
Exit 1
}
- A typical example of Step usage. The snippet employs image comparison to test whether the desktop matches the application.png template or not and produces a Step pass or fail result accordingly.
3.3.7 Timer
DESCRIPTION
Timer - Manage timers and timer groups. A timer allows measuring the time elapsed by a command, block of commands or a script, usually for performance testing purposes.
A typical task for a timer is to measure the time taken by an automated task or a piece of script code. This requires to create a timer and start it before the task begins and stop it at the end of the task. Timers are typically used together with the Report command which stores test results including the time data into an XML file:
Report perftesting.xml
Timer t1 start desc="My task #1 duration"
<task code>
Timer t1 stop
If the resulting XML file is viewed in a web browser, it displays a summary of script timers in the form of a simple table. For example, the script above will create:
Table of timers
|
Number |
Timer Name |
Description |
Value |
|---|---|---|---|
|
1. |
t1 |
My task #1 duration |
25.009 sec (25009ms) |
The XML result file can be also reused as a source of reference data. In a typical scenario, one would execute the script above to get an XML with base timer data recorded against the application which hasn't been optimized. To verify performance improvements in later automated executions modify the script as follows:
Report perftesting2.xml
Timer load="perftesting.xml"
Timer t1 start desc="My task #1 duration"
<task code>
Timer t1 stop
The "Timer load" command parses the input XML file and records the reference data for timers defined by the script (matching is based on timer names). Reference values may be alternatively also defined through the refvalue parameter; this allows to populate the reference data from another source, for example from an MS Excel sheet (see Excel) or a plain text or CSV file (see File). When the reference data is defined, the resulting XML will display actual timers with a comparison to the reference values as follows:
Table of timers
|
Number |
Timer Name |
Description |
Value |
Reference Value |
Change |
|---|---|---|---|---|---|
|
1. |
t1 |
My task #1 duration |
24.984 sec (24984ms) |
25.009 sec (25009ms) |
0.1% |
Important timer and timer group features:
-
There's no explicit "create" command to create a timer or a timer group. Each object is created automatically when it is first specified.
-
Timer and timer group names are case sensitive. For example "T1" and "t1" are two different names.
-
The command accepts a single timer/group name or a comma-separated list of timers and/or groups. An object name, therefore, may not contain a comma.
-
All timers and timer groups are also always global and they exist from the moment of creation until the end of script execution regardless of the place they were created at (main body, procedure, another script...).
-
Timers can be started, stopped and restarted in any sequence. Restarting of a timer does not reset its value and it is treated as cumulative. To reset the timer value call the command with the "value=0" parameter.
-
All running timers are stopped automatically when the script finishes.
-
As the execution of scripts in GUI mode adds performance overhead (typically a few ms per measured command spent on rendering of GUI components), it is recommended to run the live scripts in CLI mode for better accuracy or timer data.
Each timer exposes its time value in milliseconds to the script in the form of a "TIMER<timerName>" variable. In the example above there will be the TIMER_t1 variable and the script may retrieve the current timer value through a variable call such as "{_TIMER_t1}". If the called variable starts with the reserved prefix of "_TIMER" but the name after it doesn't correspond to any existing timer name, it returns -1. This value may be used to test the existence of a timer.
Though timer variables can be modified through the Var or Eval commands, it has no effect on the timers themselves because their values are stored in an internal data structure. The variable is rather just a read-only copy of the internal value. To set the timer to a particular value using the value parameter.
Note that setting of a value of a running timer will stop it and to resume from the specified value the command must contain the "start" action.
For example, to make the t1 timer start from 1 second (1000ms) rather than from zero use:
Timer t1 start desc="My task duration" value="1000"
Another example shows how to create a new timer t2 with the value of timer t1 plus 1 second:
Timer t2 value="{_TIMER_t1}+1000"
As the value parameter also accepts a timer name, to create a plain copy of the t1 timer simply call:
Timer t2 value="t1"
The Timer command accepts either a single object (timer or timer group) or a comma separated list of timers (groups). To start the two timers defined above one may use:
Timer t1,t2 start
Timers may be optionally associated into groups. Grouping allows to organize timers in a logical way and perform bulk operations with them. A group should be understood as a plain list of timers equivalent to a comma-separated timer list; it has no status and it doesn't affect the appearance of test results. Grouping and ungrouping are achieved through the group and ungroup parameters which create and update groups. The following example creates two timers t1 and t2, associates them into a group called tgroup and starts/stops both timers using the group name:
Timer t1,t2 group=tgroup
Timer tgroup start
<task code>
Timer tgroup stop
To copy tgroup into a new group called tgroup2 call:
Timer tgroup group=tgroup2
One timer may be a member of multiple groups. Timers may be freely grouped or ungrouped at any time. To remove the t1 timer from both tgroup and tgroup2 use:
Timer t1 ungroup=tgroup,tgroup2
Alternatively to remove the timer from all groups use the ungroup parameter with an empty value:
Timer t1 ungroup=
To cancel a group and remove all timers from it use the following command which should be understood as a request like "take all timers listed in group tgroup and remove them from tgroup".
Timer tgroup ungroup=tgroup
When a group name is used in the Timer command argument, it expands into a list of timers and all other operations specified by the command (start, stop, value/description setting...) are applied to each timer. The following example will create and group the two timers, set their value to 1 second (1000ms), set their description to "Performance test" and start them:
Timer t1,t2 group=tgroup
Timer tgroup start value=1000 desc="Performance test"
As you may have noticed, a single command may specify one or more operations. They are performed in the following order:
-
Resolve the argument into a list of timers and create those which do not exist yet
-
Set the value or any other attributes (such as description),
-
Ungroup if the ungroup parameter is present,
-
Group if the group parameter is present,
-
Load the reference data if the load parameter is present,
-
Start or stop the timers identified in the first step if the start or stop parameter is present.
This order allows fitting the example above into a single line of code. In terms of processing orders the command should be understood as a request like "create timers t1 and t2, set their value and description, group them into a group called tgroup and start them":
Timer t1,t2 start value=1000 desc="Performance test" group="tgroup"
SYNOPSIS
timer <name(s)> [start|stop] [desc=<description>] [value=<time_millis>] [refvalue=<time_millis>] [load=<XML_file>] [group=<name(s)>] [ungroup=<name(s)]
timer load=<XML_file>
* Red colour indicates obligatory parameters
OPTIONS
name(s)
- Timer or group name or a comma-separated list of names to apply the command to. A mixture of groups and timers is also allowed. If any of the specified names contains a space, the whole list must be enclosed in double-quotes. A unique name (or names) will create a new timer (timers). If the name corresponds to a group previously created by a command called with the group parameter, it is expanded into a list of timers currently present in that group.
start|stop
- Start or stop the specified timer(s) (optional). Starting of an already started timer or stopping of a stopped one has no effect and reports no error.
desc=<description>
- Optional timer description.
value=<time_millis>
- Initial timer value in milliseconds (optional). The value may refer to the name of an existing timer. The default value is zero. The setting of a value of a started timer will stop it and it is necessary to restart it.
refvalue=<time>
- Reference time value in milliseconds. Since T-Plan Robot version 3.1.2 the value may be any time value. The parameter plays no role during the script execution and it is used exclusively for reporting purposes. When the reference value is specified, the timer entry in the resulting XML file created by the Report command will contain the reference value as well as the relative difference (percentage) from the reference data. This functionality allows tracking performance changes across the testing of two application versions.
load=<XML_file>
- The parameter loads reference data from an XML file previously generated through the Report command. If the file is relative, it is resolved in the same way as the Report file (meaning against the output path specified by the _REPORT_DIR variable). The XML is parsed for timer data and if any of the timer names corresponds to a timer created in the current script, the XML timer value is set as a reference time of the current timer. Reference times as well the difference from the actually measured values are then written into the newly generated XML. See also the refvalue parameter above. Note that loading of reference data from XML has a priority over the refvalue parameter and it will overwrite its settings.
If the load operation is called from a Timer command operating over a set of timers (the first command form as is specified in the Synopsis above), it is applied just to the specified set and all other data from XML are discarded. To load reference data of all timers at once use the second command form of "Timer load=<XML_file>". As this command stores the reference data internally, and updates all already existing as well as the to-be-created timers, the global load operation may be called anywhere in the script (not necessarily at the script beginning).
group=<group(s)>
- A group or a comma-separated list of group names to associate the timer(s) with. If any of the specified group names contains a space, the whole list must be enclosed in double-quotes. A unique name (or names) will create a new group (groups). A group name may not be the same as name of an already existing timer.
ungroup=<group(s)>
- A group or a comma-separated list of group names to remove the timer(s) from. If any of the specified group names contains a space, the whole list must be enclosed in double-quotes. If the specified timer(s) is a member of the specified group or groups, it is removed from there.
RETURNS
If the command employs the load parameter to read reference data from an XML file, it returns 0 (zero) when the XML is valid and contains at least one timer value. When the XML does not contain any timer data but the format is correct, the command returns 1 (one). If the file cannot be read or is not a valid XML file, the command returns the value of 2 (two).
Timer commands without the load parameter always return 0 (zero).
EXAMPLES
See the text above for examples.
3.3.8 Warning
DESCRIPTION
Warning - Insert a warning into the report. A warning can be associated with a specific screenshot through the image parameter. Such a warning will be displayed below the image description in the report. If there's no associated image, the warning will be displayed in the report as a single component.
When a script is being executed and there's a running report provider (i.e. the script contains a Report command), an execution of a Warning command will trigger a refresh of the report. If there's no active report provider, a warning is created in the internal tables but it is not reported in any way.
SYNOPSIS
warning <description> [image=<screenshot_name>]
* Red colour indicates obligatory parameters
OPTIONS
description
- Text of the warning to be displayed in the report.
image=<screenshot_name>
- A screenshot to be associated with the warning. The screenshot name should correspond to an image created by the Screenshot command.
RETURNS
The Warning command always returns 0 (zero).
EXAMPLES
Report index.html
Exec "mozilla file://{_REPORT_FILE}"
if ({_EXIT_CODE} > 0) {
Warning "Mozilla failed to start. Error output: {_EXEC_ERROR}"
}
- Try to open the HTML report in a Mozilla browser using the Exec command and add a warning if it fails.
Screenshot image.jpg template=template1.png onfail="Warning \"The image image.jpg doesn't seem to display what is expected.\" image=image.jpg"
- Take a screenshot and compare it to a template called template1.png. If the comparison fails, add a warning to the image description.
3.4 I/O Commands
3.4.1 Excel
DESCRIPTION
Excel - Read from and/or write to Microsoft Excel (.xls) and (.xlsx). The command also supports files with macros (.xlsm) since 6.2.2. Macros can't be updated but they are preserved on file save.
The command allows to navigate through XLS and XLSX documents, read, write and search for cell values and deal with a subset of Excel supported formats. The command takes advantage of the Apache POI 4.0.1 framework and as such, it is subject to its limitations. The POI libraries are placed in the <installDir>/libs/poi folder and may be upgraded to a custom version eventually.
The command defines this set of actions:
-
Open - opens an existing Excel document in read/write mode.
-
Create - create a new Excel document and/or create a sheet.
-
Select - select a sheet and/or select a cell and retrieve its value and format.
-
Find - search the selected sheet for a cell by its value or a regular expression.
-
Set - set sheet name or cell value (format).
-
Copy - mark cells for copying.
-
Paste - paste cells marked with Copy into an Excel document.
-
Close - close and save the Excel document.
A typical workflow consists of the following logical steps:
-
Open an existing Excel document ("Excel open") or create a new one ("Excel create"). If the script works with multiple documents at a time, each file must be tagged by an ID and all subsequent Excel commands must reference it. This step populates variables with the file name, path and structure.
-
Select (open) or create a spreadsheet. Opening of an Excel document through "Excel open" automatically selects the first spreadsheet in the workbook unless the sheet is explicitly specified by the parameter. Creating a new document through "Excel create" automatically creates and selects one default spreadsheet with the default "Sheet1" name unless another name is explicitly specified. To change the spreadsheet selection later on call "Excel select". To create and select a new spreadsheet use "Excel create". Each change in spreadsheet selection populates the Sheet variable group describing the number of spreadsheets available and the name and number of the currently selected one.
-
To read a cell called "Excel select" or search for a cell value using "Excel find". If the cell is found successfully, its value, type and format are provided in the form of script variables. If the cell contains a formula you may retrieve either its text or the resulting value depending on the "evaluate" parameter. Like sheets, the cell reference is cached and a sequence of commands operating over a single cell doesn't have to specify the coordinates (either row/cell number or reference) in each command instance.
-
To modify a cell using the "Excel set" command. If the format is not explicitly specified, the command checks for the number or Boolean values and eventually defaults to string. If the coordinates point to a cell which doesn't exist, it is created.
-
To select cells and paste them into an Excel document (the same or another one) use a sequence of "Excel copy" and "Excel paste" commands.
-
To close a document and save or discard changes call the "Excel close" command. This step is optional and all documents are closed and eventually saved automatically when the script finishes.
Excel documents can be read from or written to shared network drives. A special attention should be paid to permissions. For example, to create a file in a shared folder called "data" on a network drive called "macbook.local" use:
Excel create file="\\\\macbook.local\\data\\myfile.xls"
A typical example showing both read and write operations follows. It opens an existing file Excel 2007 file, selects the second sheet and reads a value from the first cell and writes it to the second one for every row.
// Open the Excel file. Exit on any I/O error.
Excel open file="C:\data\test.xlsx"
if ({_EXIT_CODE} > 0) {
  Exit {_EXIT_CODE} desc="{_EXCEL_ERROR}"
}

// Select the second sheet
Excel select sheet=1

// Iterate over all data lines
for (index=1; {index}<{_EXCEL_SHEET_ROWS}+1;index={index}+1) {

  # Read value from the first cell
  Excel select row={index} column="1"

  # Set value of the second cell
  Excel set row={index} column="2" value="{_EXCEL_CELL_VALUE}"
}
The Excel command populates these variables:
|
Who Creates and When |
Variable Name |
Description |
|---|---|---|
|
Excel open,
|
_EXCEL_FILE |
Document file path (full/absolute). |
|
_EXCEL_FILENAME |
Document file name. |
|
|
_EXCEL_OUTFILE |
Output file path (full/absolute) if it was explicitly specified. |
|
|
_EXCEL_OUTFILENAME |
Output file name if it was explicitly specified. |
|
|
_EXCEL_SHEET_COUNT |
Number of spreadsheets available in the document. |
|
|
Excel open
|
_EXCEL_SHEET_NAME |
Name of the currently selected sheet. |
|
_EXCEL_SHEET_NUMBER |
Number of the currently selected sheet. |
|
|
_EXCEL_SHEET_ROWS |
Number of rows available in the currently selected sheet. |
|
|
Excel set
|
_EXCEL_CELL_COLUMN |
Ordinary column number of the selected/found/modified cell. |
|
_EXCEL_CELL_ROW |
Ordinary row number of the cell. |
|
|
_EXCEL_CELL_TYPE |
Cell type; one of [BLANK, BOOLEAN, ERROR, FORMULA, NUMERIC or STRING] |
|
|
_EXCEL_CELL_VALUE |
Cell value (as a string). Since 4.1.3 the value is formatted if the cell is configured
|
|
|
_EXCEL_CELL_VALUE_RAW |
Raw cell value (unformatted). Supported since 4.1.3. |
|
|
_EXCEL_CELL_REF |
Excel compatible cell reference, for example, "A1" or "J10". |
|
|
_EXCEL_CELL_FORMAT |
Cell number or date format string (since 6.2.3). |
|
|
_EXCEL_CELL_WIDTH |
Cell (column) width as a number of visible characters. The resulting pixel value is subject
|
|
|
_EXCEL_CELL_HEIGHT |
Cell (row) height in points (since 6.3.3). The resulting pixel value is subject
|
|
|
_EXCEL_CELL_FOREGROUND
|
Cell font (foreground) and fill (background) colors in the HTML format (since 6.3.3). For example,
|
|
|
All Excel commands |
_EXCEL_ERROR |
Text of the error thrown by the last Excel command execution or compilation.
|
The command in general returns 0 on success or one of the following exit codes:
|
Exit Code |
Pseudocode |
Description |
|---|---|---|
|
0 |
SUCCESS |
Successful completion. |
|
1 |
FAILED_TO_OPEN |
Failed to open the input file. Returned just by "Excel open". |
|
2 |
FAILED_TO_SAVE |
Failed to save to the file. Returned just by "Excel close". |
|
3 |
FAILED_TO_CREATE |
Failed to create a new document or sheet. Returned just by "Excel create". |
|
4 |
SHEET_NOT_FOUND |
The row and/or column parameters do not point to an existing cell. Returned by all cell-reading commands supporting "row" and "column". |
|
5 |
CELL_NOT_FOUND |
Failed to find a cell with the given coordinates or with the specified value ("Excel find"). |
Syntax and parameters of each action are described in details below.
SYNOPSIS
Excel open
Excel open [file=<input_Excel _file>] [outfile=<output_Excel_file>] [id=<identifier>] [sheet=<sheet_name_or_index>] [password=<password>]
* Red colour indicates obligatory parameters
OPTIONS
file=<Excel_file>
- The Excel file to open. The relative path is resolved against the script directory (meaning the folder containing the calling script).
outfile=<output_Excel_file>
- Optional output file to save the Excel data to (regardless of whether it has been changed or not). When this parameter is specified, the input file specified by file is opened in read-only mode, its data is loaded into the memory and saved to outfile unless the file is closed in the discard mode (Excel close save=false). The input and output files must be of the same format (both must be either XLS or XLSX).
id=<identifier>
- An identifier (name) for the Excel document. This parameter doesn't have to be specified if the script opens/creates just one Excel document at a time. If multiple documents are being opened the identifier identifies the document in the subsequent Excel read/write commands.
sheet=<sheet_name_or_index>
- The spreadsheet to select. It may be specified either by its name or ordinary number starting from 1. This parameter is optional and if it is not present, the command selects (opens) the first spreadsheet by default.
password=<password>
- The password to unlock and/or lock the file (since 6.1). If the file is not protected and the password is specified it will become protected after on save.
RETURNS
The open command returns either 0 (SUCCESS) or 1 (FAILED_TO_OPEN). On success, it populates variables from the File and Sheet variable group.
EXAMPLES
Excel open file="data.xls"
- Open an MS Excel document located in the same directory as the script in read/write mode.
Excel open file="data.xls" outfile="newdata.xls"
- Open an MS Excel document located in the specified directory in the read-only mode. When the document is closed, save the content and eventually all changes into the specified output file in the script directory. If the output file exists it will be overwritten.
Excel create
Excel create file=<Excel _file> [id=<identifier>] [sheet=<sheet_name>] [password=<password>]
Excel create sheet=<sheet_name> [id=<identifier>]
* Red colour indicates obligatory parameters
OPTIONS
file=<Excel_file>
- The Excel file to create. The relative path is resolved against the script directory (meaning the folder containing the calling script). If the file exists, it is overwritten.
id=<identifier>
- An identifier (name) for the created document. This parameter doesn't have to be specified if the script opens/creates just one Excel document at a time. If multiple documents are being opened the identifier identifies the document in the subsequent Excel read/write commands.
sheet=<sheet_name>
- Name of the spreadsheet to create. If the command is called with the file parameter specified to create a new file, the sheet parameter is optional. If it is not present, the command behaves the same way as MS Excel and creates a default spreadsheet called "Sheet1" in the newly created file.
password=<password>
- The password to lock the file on save.
RETURNS
The open command returns either 0 (SUCCESS) or 3 (FAILED_TO_CREATE) on failure, for example when a sheet of the specified name already exists. The command populates variables from the File and Sheet variable groups.
EXAMPLES
Excel create file="C:\Data\log.xls"
- Create a new Excel document in the memory and associate it with the specified file for output. The command will also create a sheet called "Sheet1" and select it.
Excel create file="C:\Data\log.xls" sheet="Data"
- Same as the previous example but the sheet will be named "Data".
Excel create sheet="Data"
- Create a new sheet named "Data" in the currently opened document.
Excel select
Excel select [sheet=<sheet_name_or_index>] [id=<identifier>]
Excel select [row=<row_number>] [column=<column_number_or_id>] [sheet=<sheet_name_or_index>] [id=<identifier>]
Excel select [ref=<cell_id>] [sheet=<sheet_name_or_index>] [id=<identifier>]
* Red colour indicates obligatory parameters
OPTIONS
row=<row_number>
column=<column_number_or_id>
- Row and column ordinary numbers identifying the cell to select. Numbering starts at 1. The column may be in addition referenced by alphabetical ID used in MS Excel ("A"-"ZZ"). For example, "column=C" is equal to "column=3". The "row" and "column" parameters must be always present together. The parameters are mandatory in the first cell operation to specify the "current" cell. The reference is then cached and sequences of commands operating over a single cell do not have to repeat the "column"/"row" or "ref" coordinates.
ref=<cell_id>
- Cell ID compatible with MS Excel referencing, for example "A1" or "J10". It is provided as an alternative way of cell referencing. The parameter should not be used together with the row/column parameter pair.
sheet=<sheet_name_or_index>
- The spreadsheet to select (open). It may be specified either by its name or ordinary number starting from 1. If the command is being used just to select a sheet (the first form in the list above), this parameter is mandatory. Other command forms targeting a particular cell do not require it and if it is not present, the command will operate over the last selected sheet.
evaluate=<true|false>
- A flag controlling how FORMULA cells are handled. If it is "true" the cell value will be the calculated formula result. Otherwise, the cell value stored under the _EXCEL_CELL_VALUE will contain the formula text. If the targeted cell is not a FORMULA one, this parameter is ignored. The default value is "false".
id=<identifier_or_name>
- The document identifier to apply the operation to. This parameter doesn't have to be specified if the script opens/creates just one Excel document and no ID was specified in the open/create command.
RETURNS
The open command returns either 0 (SUCCESS), 4 (SHEET_NOT_FOUND) or 5 (CELL_NOT_FOUND). The command populates variables from the Sheet and Cell variable groups.
EXAMPLES
Excel select sheet="2"
- Select second sheet in the document and store its properties into the Sheet variables.
Excel select sheet="Data"
- Select sheet called "Data" in the document.
Excel select row="2" column="4"
- Select cell on the specified position in the current sheet and retrieve its properties into the Cell variables.
Excel select sheet="Results" ref="A5"
- Select the "Results" sheet and then select the cell on the specified position (fifth row, first column). Both the Sheet and Cell variable groups will be updated with the sheet/cell properties.
Excel find
Excel find [value=<value>] [type=<type>] [sheet=<sheet_name_or_index>] [evaluate=<true|false>] [id=<identifier>]
Excel find [pattern=<regular_expression>] [type=<type>] [sheet=<sheet_name_or_index>] [evaluate=<true|false>] [id=<identifier>]
* Red colour indicates obligatory parameters
OPTIONS
value=<value>
- The string representation of the value to search for. The current sheet will be searched row by row for a cell having the specified value and the first matching one will be selected.
pattern=<regularExpression>
- Search for a cell value which matches a regular expression. The expression must comply with the Java Pattern specification.
type=<type>
- Type of cell to limit the search to. It must be one of \[BLANK, BOOLEAN, ERROR, FORMULA, NUMERIC, STRING\]. If the parameter is not specified all cell types are searched.
sheet=<sheet_name_or_index>
- The spreadsheet to select (open). It may be specified either by its name or ordinary number starting from 1. This parameter is optional and if it is not present the command will operate over the last selected sheet.
evaluate=<true|false>
- Flag controlling how FORMULA cells are handled. If it is "true" the cell value will be the calculated formula result. Otherwise the specified value will be compared to the formula text. The default value is "false".
id=<identifier_or_name>
- The document identifier to search. This parameter doesn't have to be specified if the script opens/creates just one Excel document and no ID was specified in the open/create command.
RETURNS
The open command returns either 0 (SUCCESS), 4 (SHEET_NOT_FOUND) or 5 (CELL_NOT_FOUND). If the cell is located successfully the command populates variables from the Sheet and Cell variable groups.
EXAMPLES
Excel find value="Test data"
if ({_EXIT_CODE} > 0) {
  Warning "The \"Test data\" cell was not found."
  Exit 1
}

Excel select row={_EXCEL_CELL_ROW}+1 column={_EXCEL_CELL_COLUMN}
- Search the current spreadsheet for a cell containing the text "Test data". If successful select the cell below the found one. If the search fails, record a warning and exit the script with the exit code of 1.
Excel find value="2" evaluate="true"
- Search the current sheet for any numeric cell containing the number of 2 or any text cell containing "2". As the evaluate flag is on, each cell of the FORMULA type will be calculated (evaluated) and compared to the value of 2.
Excel find sheet="Data" pattern="boo.*"
- Select sheet called "Data" in the document and search it for the first value starting with "boo".
Excel find type=FORMULA pattern="SUM\(.*\)"
- Search the current sheet for the first cell of FORMULA type containing the summary formula and retrieve its properties into the Cell variables. As the "evaluate" flag is not specified and defaults to false, the _EXCEL_CELL_VALUE will be populated with the formula text.
Excel find type=FORMULA pattern="SUM\(.*\)" evaluate="true"
- Same as the previous example. The _EXCEL_CELL_VALUE will, however, contain the result of the formula, i.e. a number equal to the sum of the cells specified in the formula text.
Excel set
Excel set [row=<row_number>] [column=<column_number_or_id>] [sheet=<sheet_name_or_index>] [id=<identifier>] [type=<type>] [value=<value>] [informat=<javaFormat>] [format=<excelFormat>]
Excel set [ref=<cell_id>] [sheet=<sheet_name_or_index>] [id=<identifier>] [type=<type>] [value=<value>] [informat=<javaFormat>] [format=<excelFormat>] [width=<columnWidth>] [height=<rowHeight>] [fg=<htmlColor>] [bg=<htmlColor>]
* Red colour indicates obligatory parameters
OPTIONS
row=<row_number>
column=<column_number_or_id>
- Row and column ordinary numbers identifying the cell to select. Numbering starts at 1. The column may be in addition referenced by alphabetical ID used in MS Excel ("A"-"ZZ"). For example, "column=C" is equal to "column=3". The "row" and "column" parameters must be always present together. The parameters are mandatory in the first cell operation to specify the "current" cell. The reference is then cached and sequences of commands operating over a single cell do not have to repeat the "column"/"row" or "ref" coordinates.
ref=<cell_id>
- The cell ID compatible with MS Excel, for example, "A1" or "J10". It is provided as an alternative way of cell referencing. The parameter should not been used together with the row/column parameter pair.
sheet=<sheet_name_or_index>
- The spreadsheet to select (open). It may be specified either by its name or ordinary number starting from 1. If the command is being used just to select a sheet (the first command syntax form in the list above), this parameter is mandatory. Other command forms targeting a particular cell do not require it and if it is not present, the command will operate over the last selected sheet.
type=<type>
- Type of cell to set. It must be one of [BLANK, BOOLEAN, ERROR, FORMULA, NUMERIC, STRING]. If the parameter is not specified, the type defaults to STRING.
value=<value>
- Cell value to set. It must be aligned with the cell type. For example, when the cell type is NUMERIC, the value should be a valid number. If the "type" parameter is not specified, the command guesses whether it is a number, a Boolean value or a string and sets the cell type accordingly. To override this behaviour specify the type explicitly.
The value may contain a numeric expression but the type must be explicitly set to NUMERIC to tell the compiler that numeric evaluation is needed. To create and populate a cell of the FORMULA type use the type="FORMULA" parameter and specify the formula with or without the leading equals character as the value. For example, both "SUM(A1:A4)" and "=SUM(A1:A4)" are valid formulas.
informat=<javaFormat>
- Input Java date format to parse the value with (since 6.2.3). This parameter indicates that the value parameter contains a date and/or time and should be parsed appropriately.
MS Excel stores date values to NUMERIC cells as the number of days elapsed since 1 January 1900. To populate a date cell you may calculate the number on your own and specify it in the value parameter. An easier approach is use a combination of value and informat to populate the date from a human readable date string. For example, the parameters of value="21 Jan 1900" and informat="dd MMM yyyy" will populate the cell with the number of 21.
To make MS Excel display the cell as a formatted number or a date/time use the format parameter.
format=<excelFormat>
- The cell number format as specified by the MS Excel documentation (since 6.2.3) It allows to change the appearance of numbers, including dates and times, without changing the actual number. The format does not affect the cell value that Excel uses to perform calculations.
width=<columnWidth>
- The target column width as a number of visible characters (since 6.3.3). The resulting pixel size on the screen is then subject to the font and eventual cell margins. The default Excel applied column width is set to 8.43 characters.
height=<rowHeight>
- The target row height in points (since 6.3.3).
fg=<htmlColor>
- The cell font (foreground) color to be set (since 6.3.3). The value may be an HTML-style 6-character RGB hexadecimal format with or without the leading hash character (white is '000000' of '#000000', black is 'ffffff' of '#ffffff') or a semicolon separated list of decimal RGB components ('0;0;0' for white, '255;255;255' for black).
bg=<htmlColor>
- The cell fill (background) color to be set (since 6.3.3). The value may be an HTML-style 6-character RGB hexadecimal format with or without the leading hash character (white is '000000' of '#000000', black is 'ffffff' of '#ffffff') or a semicolon separated list of decimal RGB components ('0;0;0' for white, '255;255;255' for black). Setting of a background color also resets the cell pattern to a solid color.
id=<identifier_or_name>
- The document identifier to apply the set operation to. This parameter doesn't have to be specified if the script opens/creates just one Excel document and no ID was specified in the open/create command.
RETURNS
The open command returns either 0 (SUCCESS), 4 (SHEET_NOT_FOUND) or 5 (CELL_NOT_FOUND). If the cell is located successfully the command sets the value and/or cell type and populates variables from the Sheet and Cell variable groups.
EXAMPLES
Excel set ref=A5 value="Test data"
- Set value of the A5 cell in the current sheet to "Test data". The cell type will be STRING.
Excel set row=A5 column="A" value="2" sheet="Results"
- Select the "Results" sheet and set value of the A1 cell to 2. As the value is apparently a numeric one the cell type will be automatically set to NUMERIC.
# Declare the variable as numeric to supress compiler error
Var _EXCEL_CELL_VALUE=1
Excel set row=1 column=A value="2"
Excel set value={_EXCEL_CELL_VALUE}+1 type=NUMERIC
- Set the A2 cell value to 2 and then increment it to 3. Declaration of the _EXCEL_CELL_VALUE is needed only to suppress the compiler error when trying to evaluate the value.
Excel set row=5 column=1 type=FORMULA value="SUM(A1:A4)"
Excel select evaluate=true
- Set value of the cell at A5 to the summary formula of the A1-A4 cells and get the result.
Excel copy
Excel copy [rows=<row(s)>] [columns=<column(s)>] [sheet=<sheet_name_or_index>] [id=<identifier>]
* Red colour indicates obligatory parameters
OPTIONS
rows=<row(s)>
columns=<column(s)>
- The row(s) and column(s) identifying the cells to be selected for the subsequent Excel paste operation. Rows can be specified as a single number ("1"), a range ("1-5") or a comma or semicolon separated list of numbers and/or ranges ("1;3;5-6"). Columns support the same syntax where letters may be used instead of numbers ("A;C;E-F"). Numbering starts from 1.
The "rows" and "columns" parameters must be always present together. The command selects all cells at the specified rows and columns. For example, the parameters of "rows=1-2" and "columns=A-C" will select 6 cells at A1, A2, B1, B2, C1 and C2. As empty positions are ignored the specified ranges may exceed the actual sheet size.
The command does not make any internal copy of the data from the selected cells. It merely saves a reference to the selection. If the selected cells get changed between the copy and paste operations the updated data will be copied.
sheet=<sheet_name_or_index>
- The spreadsheet to select the cells from. It may be specified either by its name or ordinary number starting from 1. If it is not specified the command will fall back to the last selected (active) sheet.
id=<identifier_or_name>
- An identifier of the document to copy from. This parameter doesn't have to be specified if the script opens/creates just one Excel document and no ID was specified in the open/create command.
RETURNS
The copy command returns either 0 (SUCCESS) or throws a syntax error when the operation can not be completed for a runtime error.
EXAMPLES
Excel open file="source.xls" id="source"
Excel copy rows=1-3 columns=A id="source"
Excel open file="target.xls" id="target"
Excel paste ref=B1 id="target"
- Copy cells A1, A2 and A3 from the source.xls file into the B1, B2 and B3 cells of the target.xls file.
Excel paste
Excel paste [row=<row_number>] [column=<column_number_or_id>] [sheet=<sheet_name_or_index>] [id=<identifier>]
Excel paste [ref=<cell_id>] [sheet=<sheet_name_or_index>] [id=<identifier>]
* Red colour indicates obligatory parameters
OPTIONS
row=<row_number>
column=<column_number_or_id>
- Target position to paste the cells previously selected with Excel copy to. Numbering starts from 1. For example, if cells A1 and A2 were copied and the target position is set to "row=2" and "column=3" the data will be pasted to the C2 and C3.
If a pasted cell contains a formula its references are shifted with regards to the target location. For example, if you copy a column of numbers starting at A1 and their sum ("=SUM(A1:A5)") and paste it into the B2 cell the formula gets updated to "=SUM(B2:B6)". Note that the command doesn't make any effort to recognize external references to other sheets or cells outside of the selected data which will lead to broken references. To copy such cells use the Excel set command.
ref=<cell_id>
- The target cell ID compatible with MS Excel to paste to, for example, "A1" or "J10". It is provided as an alternative way of cell referencing. The parameter should not be used together with the row/column parameter pair.
sheet=<sheet_name_or_index>
- The spreadsheet to paste to It may be specified either by its name or ordinary number starting from 1. If it is not specified the command will fall back to the last selected (active) sheet.
id=<identifier_or_name>
- An identifier of the document to copy from. This parameter doesn't have to be specified if the script opens/creates just one Excel document and no ID was specified in the open/create command.
RETURNS
The paste command returns either 0 (SUCCESS) or throws a syntax error when the operation can not be completed for a runtime problem.
EXAMPLES
See the Excel copy command for an example.
Excel close
Excel close [id=<identifier>] [save=<true|false>]
* Red colour indicates obligatory parameters
OPTIONS
id=<identifier_or_name>
- The identifier of the document which is to be closed. This parameter doesn't have to be specified if the script opens/creates just one Excel document and no ID was specified in the open/create command.
save=<true|false>
- True saves the document to the file system, false discards any changes. The default value is "true" and the file will be saved automatically after the script execution finishes provided that there were any changes.
RETURNS
The open command returns either 0 (SUCCESS) or 2 (FAILED_TO_SAVE) on an I/O error. It also clears up all Excel specific variables from the context.
EXAMPLES
Excel open file=test.xls
...
Excel close
- Close the file. If the content has been modified, save the changes to the test.xls file.
Excel open file=test.xls outfile=test2.xls
...
Excel close
- Close the file. The content loaded from test.xls will be written to test2.xls regardless of whether it has been modified or not.
Excel open file=test.xls id="testfile"
...
Excel close id="testfile" save=false
- Close the file and discard any eventual changes. As the "testfile" ID was assigned to the file in "Excel open", it must be specified in the "Excel close" one as well as in any other Excel call between these two commands.
3.4.2 File
DESCRIPTION
File - Read from and/or write to text files. The command allows to open or create plain text files, read/write text, search strings/regular expressions and parse values from individual text lines using either the Comma Separated Values (CSV) format or regular expressions.
Files are by default opened and saved in UTF-8 encoding. The file content is read using the Java character streams line by line and stored into a string buffer in the memory. All subsequent I/O operations are performed on the buffer and the content is written to the file (or output file) only when the file either gets explicitly closed or when the script finishes in a standard way (meaning not through unexpected or abnormal program termination). With regard to the used technology, the command is suitable to process smaller files (up to tens of kB) and its performance significantly degrades with large data files.
Since v6.1 the File command can read MS Word (*.doc, *.docx) and PDF files (*.pdf). The content is converted to plain text and then processed as if the input file was a text one. It is not possible to modify the files and save them in the original format. The content can be only saved in form of a plain text file.
Since v6.2.3 the command improves handling of BOM characters. If an existing file with BOM is opened, modified and saved in the UTF-8 encoding the command inserts the appropriate BOM character into the file. No effort is made to insert the BOM character to newly created files.
The command defines this set of actions:
-
Open - open an existing text file in read/write mode.
-
Create - create a new file in memory.
-
Append - append text to the end of the file.
-
Insert - insert text to a position in the file.
-
Find - search the file for a text value.
-
Read - read text from a position in the file.
-
Parse - parse values from a line using CSV format or regular expression.
-
Delete - delete text and/or line.
-
Close - close and save the file.
A typical workflow consists of the following logical steps:
-
Open an existing file ("File open") or create a new one ("File create"). This step populates variables with the file name, path and structure. If the script works with multiple files at a time, each file must be tagged by an ID and all subsequent File commands must reference it.
-
To read a value from a known position in the file using "File read". If the position is unknown, "File find" may be used to identify the position of a text value. If the file contains data in a particular format, parse them through "File parse". This command supports reading of values in the CSV format or parsing of values based on a custom regular expression.
-
To write to the file using either "File append" or "File insert". The append action adds the text to the end of the file. The insert one allows inserting the text into a particular position in the file.
-
To close a document and save or discard changes call the "File close" command. This step is optional and all documents are closed and eventually saved automatically when the script finishes.
Navigation through the file and retrieval of parsed text is enabled through variables:
|
Who Creates, Group Name |
Variable Name |
Description |
|---|---|---|
|
File open,
|
_FILE_FILE |
File path (full/absolute). |
|
_FILE_FILENAME |
Filename. |
|
|
_FILE_OUTFILE |
Output file path (full/absolute) if it was explicitly specified. |
|
|
_FILE_OUTFILENAME |
Output file name if it was explicitly specified. |
|
|
File open
|
_FILE_LENGTH |
File length in characters including the new line ones. Note that it doesn't have to match the file size because some UTF-8 characters may be encoded in multiple bytes. |
|
_FILE_LINE_COUNT |
Number of text lines in the file. |
|
|
File find
|
_FILE_LINE_NUMBER |
Number of the currently processed line. Lines are numbered from 1 (one). |
|
_FILE_LINE_LENGTH |
Length of the current line in characters excluding the new line character. |
|
|
_FILE_LINE_TEXT |
Text of the current line (full length without the new line character). |
|
|
_FILE_LINE_COLUMN |
Column (character) number on the line. Column numbering starts from 1 (one) which represents the beginning of the line. This variable is populated by the "find" action to indicate the position of the searched text on the line.
|
|
|
File read |
_FILE_READ |
Text read by the "File read"command. |
|
File delete |
_FILE_DELETED |
Text deleted by the "File delete" command. |
|
File parse
|
_FILE_PARSE_COUNT |
Number of values parsed by "File parse". |
|
_FILE_PARSE_VALUE<N> |
N-th value parsed from the text line where <N> is between 1 and _FILE_PARSE_COUNT. |
The command in general returns 0 on success or one of the following exit codes:
|
Exit Code |
Pseudocode |
Description |
|---|---|---|
|
0 |
SUCCESS |
Successful completion. |
|
1 |
FAILED_TO_OPEN |
Failed to open the input file. Returned just by "File open". |
|
2 |
FAILED_TO_SAVE |
Failed to save to the file. Returned just by "File close". |
|
3 |
FAILED_TO_FIND |
Failed to find a value. Returned just by "File find" to indicate failed text search. |
|
4 |
INVALID_POSITION |
The line and/or column parameters do not point to an existing position in the file. Returned by all commands supporting "line" and "column". |
Syntax and parameters of each action are described in details below.
SYNOPSIS
File open
File open [file=<file>] [outfile=<output_file>] [id=<identifier>]
File create [file=<file>] [id=<identifier>]
* Red colour indicates obligatory parameters
OPTIONS
file=<file>
- The file to open or create. A relative path is resolved against the calling script location (meaning the folder containing the calling script). If the file being opened is a MS Word (*.doc or *.docx) or a PDF (*.pdf) one the content is converted to plain text. Be aware that PDF files often wrap images of text (screen shots, scanned documents) which can not be extracted.
outfile=<output_file>
- Optional output file. When specified the command creates a copy of the file and applies all changes to it rather than to the source file. A relative path is resolved against the calling script location (meaning the folder containing the calling script). If the parameter is omitted the file is opened in read/write mode. If the file already exists it will be overwritten.
id=<identifier>
- An identifier (name) for the file. This parameter can be omitted if the script opens/creates just one file at a time. If multiple files are being opened, the identifier is mandatory and identifies the file in the subsequent File commands.
RETURNS
The open command returns either 0 (SUCCESS) or 1 (FAILED_TO_OPEN). The create command always returns 0 because it creates the file just in memory. If the command exits with 0 it populates variables from the File and Counter variable groups.
EXAMPLES
File open file="data.csv"
- Open a CSV file located in the same directory as the script in read/write mode.
File open file="C:\Data\data.csv" outfile="newdata.csv"
- Open a CSV file located in the specified directory in the read-only mode. When the file is closed, save the content and eventually all changes into the specified output file in the script directory. If the output file exists it will be overwritten.
File create file="C:\Data\log.txt"
- Create a new file content buffer in the memory and associate it with the specified file for output.
File append
File append [text=<text>] [id=<identifier>]
* Red colour indicates obligatory parameters
OPTIONS
text=<text>
- Text to append to the end of the file. It may contain any UTF-8 characters. To indicate a line break use "\n". If you need to use the "\n" sequence in the normal text, double the backslash character ("
n").
id=<identifier>
- Identifier of the file to append the text to. It must be equal to the ID specified in the File open or create command. The parameter doesn't have to be specified if the script opens/creates just one file and no ID is specified in the open/create command.
RETURNS
The command always returns 0 (success). As it changes file size and eventually the number of lines, the command updates variables from the Counter group.
EXAMPLES
File append text="This is one line\nwhile this is another one"
- Append two lines of text, "This is one line" and "while this is another one" to the end of the file.
File append text="screws\\nails"
- Append one line of text, "screws\nails". The backslash character must be in this case doubled because it would be otherwise interpreted as a newline character.
File insert
File insert [text=<text>] [line=<line_number>] [column=<column_number>] [id=<identifier>]
* Red colour indicates obligatory parameters
OPTIONS
text=<text>
- Text to insert into the file. It may contain any UTF-8 characters. To indicate a line break use "\n". If you need to use the "\n" sequence in the normal text, double the backslash character ("\\n").
line=<line_number>
- The line number to insert the text to. Numbering starts at 1. If the line number is out of the range the command fails with the exit code of 4 (INVALID_POSITION).
column=<column_number>
- The column (character number) to insert the text into. Numbering starts at 1. If not specified the command inserts by default to the line beginning (column=1). If the column is greater than the number of characters on the line the command fails with the exit code of 4 (INVALID_POSITION).
id=<identifier>
- Identifier of the file to insert the text into. It must be equal to the ID specified in the File open or create command. The parameter doesn't have to be specified if the script opens/creates just one file and no ID is specified in the open/create command.
RETURNS
The command returns 0 (SUCCESS) or 4 (INVALID_POSITION) if the line and column parameters do not point to an existing position in the file. As it changes file size and eventually the number of lines, the command updates variables from the Counter group. The command also updates the Line variable group to provide information about the line pointed to by the [line, column] coordinates.
EXAMPLES
File read line=2
File insert text=" and potatoes" line=2 column={_FILE_LINE_LENGTH}+1
- Append " and potatoes" to the end of the second line. The "File read" command is called to get the line length (the _FILE_LINE_LENGTH variable).
File find text="bananas"
File insert text=" and potatoes" line={_FILE_LINE_NUMBER} column={_FILE_LINE_COLUMN}+7
- Search for "bananas" and insert the text to create "bananas and potatoes". Note that the example doesn't test whether the find command succeeds.
File find
File find [text=<text>] [line=<line_number>] [column=<column_number>] [direction=<forward|backward>] [scope=<line|file>] [id=<identifier>]
* Red colour indicates obligatory parameters
OPTIONS
text=<text>
- The text to search for. It may contain any UTF-8 characters. To indicate a line break use "\n". If you need to use the "\n" sequence as normal text, double the backslash character ("\\n").
line=<line_number>
- The line number to start the search from. Numbering starts at 1. If the line number is out of the range the command fails with exit code of 4 (INVALID_POSITION).
column=<column_number>
- The column (character number) to start the search from (to be used together with "line"). Numbering starts at 1. If not specified the command searches by default from the line beginning (column=1). If the column is greater than the number of characters on the line the command fails with exit code of 4 (INVALID_POSITION).
direction=<forward|backward>
- The search mode. The default one is forward and searches from the position specified by \[line, column\] towards the end of file or line. The backward mode searches in the opposite direction from the given position.
scope=<file|line>
- The search scope. The default one is file and searches the whole file or its part. The line scope allows to search just the specified line or its part and the searched text should not contain the new line character.
id=<identifier>
- Identifier of the file which is to be searched. It must be equal to the ID specified in the File open or create command. The parameter doesn't have to be specified if the script opens/creates just one file and no ID is specified in the open/create command.
RETURNS
The command returns 0 (SUCCESS) if the text is found, 3 (NOT_FOUND) if the text is not found or 4 (INVALID_POSITION) if the line and column parameters do not point to a valid position in the file. If the search succeeds, the Line variable group is updated to provide the target \[line, column\] coordinates.
EXAMPLES
File find text="bananas"
if ({_EXIT_CODE} == 3) {
  Exit 3
}
File insert text=" and potatoes" line={_FILE_LINE_NUMBER} column={_FILE_LINE_COLUMN}+7
- Search the file forwards for "bananas" and insert the text to create "bananas and potatoes". If the word is not found the script will be terminated with the exit code of 3.
File read
File read [line=<line_number>] [column=<column_number>] [length=<length_in_chars>] [id=<identifier>]
* Red colour indicates obligatory parameters
OPTIONS
line=<line_number>
- The number of the line to read from. Numbering starts at 1. If the line number is out of the range the command fails with exit code of 4 (INVALID_POSITION).
column=<column_number>
- The column (character number) to read from. Numbering starts at 1. If not specified the command reads from the line beginning (column=1). If the column is greater than the number of characters on the line the command fails with exit code of 4 (INVALID_POSITION).
length=<length_in_chars>
- Optional length specifying how many characters should be read. The range may not exceed the text line bounds. If the length parameter is not specified the command reads to the end of the specified line (excluding the new line character).
id=<identifier>
- Identifier of the file to read from. It must be equal to the ID specified in the File open or create command. The parameter doesn't have to be specified if the script opens/creates just one file and no ID is specified in the open/create command.
RETURNS
The command returns 0 (SUCCESS) if the text is located and read successfully or 4 (INVALID_POSITION) if the line and column parameters do not point to a valid position in the file. If successful the extracted text is stored into the _FILE_READ variable. The command also updates the Line variable group to provide information about the line pointed to by the [line, column] coordinates.
EXAMPLES
File find text="bananas" line=2 scope=line
File read line=2 length={_FILE_LINE_COLUMN}
Type "{_FILE_READ}"
- Find the "bananas" word on the second line, read the text before the word and type it.
File parse
File parse [line=<line_number>] [delimeter=<delimeter_char>] [separator=<separator_char>] [trim=<true|false>] [id=<identifier>]
File parse [line=<line_number>] [pattern=<regular_expression>] [trim=<true|false>] [id=<identifier>]
* Red colour indicates obligatory parameters
The command by default reads values from the specified line according to the Comma Separated Values (CSV) specification. The command is compatible with rules specified in the Comma-Separated Values article at Wikipedia and supports multi line values. The parsing mechanism may be in addition customized with optional custom text delimiter, value separator and trimming mode.
When the "pattern" parameter is specified, the command parses the line based on the provided Java-compatible regular expression. This approach takes advantage of the java.lang.String.split() method and it is fundamentally different from the CSV mechanism. For example, to parse individual words separated by a space use regular expression "\s". This mode may not be mixed with CVS parsing and "pattern" cannot be specified at the same time as "delimiter" and/or "separator".
The parsed values are made available through a set of numbered variables (_FILE_PARSE_VALUE1, _FILE_PARSE_VALUE2 ...) and a counter (_FILE_PARSE_COUNT) and may be retrieved in the script through a "for" loop with nested variable names (see the examples section). The command also modifies the line variables and sets the line number to the last processed line. This is an important feature allowing to iterate correctly over lines which may contain multiline values.
OPTIONS
line=<line_number>
- The number of the line to parse. Numbering starts from 1. If the line number is out of the range the command fails with exit code of 4 (INVALID_POSITION).
delimeter=<delimeter_char>
- The character which will serve as text delimiter. If the parameter is not specified it defaults to CSV compatible double quote ( " ).
separator=<separator_char>
- The character which will serve as value separator. If the parameter is not specified it defaults to CSV compatible comma ( , )
pattern=<regular_expression>
- A regular expression expressing the value to separate the values by. This parse mode internally relies on the java.lang.String.split() method. The expression must comply with the Java Pattern specification.
trim=<true|false>
- The value of true trims white spaces from the beginning and end of each parsed value. Be aware that this mode is not CSV compatible and doesn't meet the requirements of RFC 4180. The default value is false (do not trim).
id=<identifier>
- Identifier of the file to read & parse from. It must be equal to the ID specified in the File open or create command. The parameter doesn't have to be specified if the script opens/creates just one file and no ID is specified in the open/create command.
RETURNS
The command returns 0 (SUCCESS) if the text is located and read successfully or 4 (INVALID_POSITION) if the line and column parameters do not point to a valid position in the file. On success, the command populates the Parse variable group and also updates the Line one with information about the processed line.
EXAMPLES
Let's have a set of data listed as an example on Wikipedia:
|
1997 |
Ford |
E350 |
ac, abs, moon |
3000.00 |
|
1999 |
Chevy |
Venture "Extended Edition" |
|
4900.00 |
|
1999 |
Chevy |
Venture "Extended Edition, Very Large" |
|
5000.00 |
|
1996 |
Jeep |
Grand Cherokee |
MUST SELL!
|
4799.00 |
The corresponding CSV file looks as follows:
1997,Ford,E350,"ac, abs, moon",3000.00
1999,Chevy,"Venture ""Extended Edition""","",4900.00
1999,Chevy,"Venture ""Extended Edition, Very Large""","",5000.00
1996,Jeep,Grand Cherokee,"MUST SELL!
air, moon roof, loaded",4799.00
The following script parses the lines one by one and prints out the individual CSV values (to see the results open a text editor on the connected remote desktop). It also calculates and prints out a sum of all prices located usually in the fifth value on the line. Note that we cannot simply iterate over the number of lines in the file because the second last line contains a multiline value.
File open file="data.csv"

# We declare the fifth variable just to supress compiler error in the Eval cmd below
Var sum=0 _FILE_PARSE_VALUE5=0

for (i=1; {i}<{_FILE_LINE_COUNT}; i={i}+1) {
  File parse line={i}
  Typeline "Line #{i}:"
  for (j=1; {j}<{_FILE_PARSE_COUNT}+1; j={j}+1) {
    Typeline " Value #{j}: {_FILE_PARSE_VALUE{j}}"
  }

  # Add the car price from column 5 to the sum
  Eval sum={sum}+{_FILE_PARSE_VALUE5}

  # As the parse command updates the Line var group with number of the last
  # processed line, this will alow us to skip lines with multiline values
  Var i={_FILE_LINE_NUMBER}
}
Typeline "Summary value: ${sum}"
When the script is executed it types the following output on the desktop:
Line #1:
Value #1: 1997
Value #2: Ford
Value #3: E350
Value #4: ac, abs, moon
Value #5: 3000.00
Line #2:
Value #1: 1999
Value #2: Chevy
Value #3: Venture "Extended Edition"
Value #4:
Value #5: 4900.00
Line #3:
Value #1: 1999
Value #2: Chevy
Value #3: Venture "Extended Edition, Very Large"
Value #4:
Value #5: 5000.00
Line #4:
Value #1: 1996
Value #2: Jeep
Value #3: Grand Cherokee
Value #4: MUST SELL!
air, moon roof, loaded
Value #5: 4799.00
Summary value: $17699
Another example: Let's have a text file with numbers separated by one or more spaces or tabulators:
1 14 23 9 100
117 5 7
To calculate the sum of all numbers into a variable called "count" one would typically use the following script. Note that as the data file is not CSV, it is necessary to use a Java regular expression "\s".
File open file="C:\numbers.txt"
Eval count=0
Var _FILE_PARSE_COUNT=0 _FILE_PARSE_VALUE1=0

for (i=1; {i}<{_FILE_LINE_COUNT}+1; i={i}+1) {
  File parse line={i} pattern="\s"
  for (j=1; {j}<{_FILE_PARSE_COUNT}+1; j={j}+1) {
     Eval count={count}+{_FILE_PARSE_VALUE{j}}
  }
}
File delete
File delete [line=<line_number>] [column=<column_number>] [length=<length_in_chars>] [id=<identifier>]
* Red colour indicates obligatory parameters
OPTIONS
line=<line_number>
- The line number to delete. Numbering starts at 1. If the line number is out of the range the command fails with exit code of 4.
column=<column_number>
- The column (character number) to delete the text from. Numbering starts at 1. If not specified the command deletes from the beginning of the line (column=1). If the column is greater than the number of characters on the line the command fails with exit code of 4.
length=<length_in_chars>
- Optional length specifying how many characters should be deleted. The resulting delete area may exceed the text line bounds and in such a case the delete operation is applied to the terminating newline character and then to the following line or lines. If the length exceeds the file size, all the content file content after the specified position is deleted. If the length parameter is not specified the command deletes just to the end of the specified line including the new line character.
id=<identifier>
- Identifier of the file to read & parse from. It must be equal to the ID specified in the File open or create command. The parameter doesn't have to be specified if the script opens/creates just one file and no ID is specified in the open/create command.
RETURNS
The command returns 0 (SUCCESS) if the text is located and deleted successfully or 4 (INVALID_POSITION) if the line and column parameters do not point to a valid position in the file. The command saves the deleted text to the _FILE_DELETED variable. As the delete operation changes file size and eventually the number of lines, it updates variables from the Counter group as well as the Line one.
EXAMPLES
File delete line="1"
- Delete the first line (including the newline character).
File delete line="2" length={_FILE_LENGTH}
- Delete everything from the second line to the end of the file and leave just the first line.
for (i=1; {i}<{_FILE_LINE_COUNT}; i={i}+1) {
  File delete line={i} length=10
}
- Delete first 10 characters on each line.
File read line=1
File delete line="1" column={_FILE_LINE_LENGTH}+1 length=1
- Remove the newline character located at the end of the first line and join the first and second line.
File close
File close [id=<identifier>] [save=<true|false>]
* Red colour indicates obligatory parameters.
OPTIONS
save=<true|false>
- True saves the file to the file system, false discards any changes. The default value is "true". The file is saved only if it has been modified by the script and/or if another output file was specified.
id=<identifier>
- Identifier of the file to close. It must be equal to the ID specified in the previous File open or create command. The parameter doesn't have to be specified if the script opens/creates just one file and no ID is specified in the open/create command.
RETURNS
The open command returns either 0 (SUCCESS) or 2 (FAILED_TO_SAVE) on an I/O error. It also clears up all File specific variables from the context.
EXAMPLES
File open file=test.txt
...
File close
- Close the file. If the content has been modified, save the changes to the test.txt file.
File open file=test.txt outfile=test2.txt
...
File close
- Close the file. The content loaded from test.txt will be written to test2.txt regardless of whether it has been modified or not.
File open file=test.txt id="testfile"
...
File close id="testfile" save=false
- Close the file and discard any eventual changes. As the "testfile" ID was assigned to the file in "File open", it must be specified in the "File close" one as well as in any other File call between these two commands.
3.4.3 Mail
説明
Mail- IMAPまたはPOP3サーバーから受信メールを取得します。SMTPサーバーからメールを送信するには Sendmail コマンドを使用します。
このコマンドは3つのアクションをサポートしています:
-
Get - サーバーからメールをダウンロードする。メッセージはオプションで属性によってフィルタリングすることができます。
-
Set - メッセージの 見た フラグを設定します。
-
Delete - メッセージを削除します。
Gmailメッセージの削除は、「転送とPOP/IMAP」タブの設定ページにあるオプションによって左右されますのでご注意ください。メッセージはアーカイブ、ゴミ箱への移動、または即時削除される可能性があります。期待どおりの結果を得るために、オプションを必ずご確認ください。
すべての行動がサポートする認証パラメータ以下の通りです:
server=<サーバー・アドレス>
-
サーバー名またはIPアドレス。imap.gmail.com.オプションでポート番号が含まれる場合もあります。
protocol=<IMAP|POP3>
-
サーバタイプ(プロトコル)。"IMAP "または "POP3 "のいずれか。パラメータが省略された場合、コマンドのデフォルトは "IMAP" となります。もしセキュリティパラメータが"グーグル"または「マイクロソフトこのオプションに関係なく、プロトコルはIMAPにフォールバックします。
user=<ユーザー名>
-
メールサーバーのユーザー名。
security=<password|google|microsoft>
-セキュリティタイプ(6.2.2以降):
-
"password" - プレーンパスワード認証。パスワードはpasswordパラメータで指定できます。
-
"google" - Gmail IMAPサーバーへのOAuth2認証
-
"microsoft" - MS Outlook IMAPサーバーへのOAuth2認証。
OAuth2スキームのいずれかを有効にするには、認証トークンを Tools→OAuth Token Manager ウィンドウに表示されます。トークンの有効期限は長いですが、ユーザー側で無効にしたり(パスワードの変更、Google Dev ConsoleやMS Azureアカウントによる無効化など)、長期間(通常6ヶ月)使用しなかったりすると無効になります。ダウンロードされたトークンは暗号化され、Robotの設定ファイルに保存されます。
password=<パスワード>
-パスワード。セキュリティが「パスワード」に設定されている場合にのみ使用されます。
これらのパラメータは、最初の Mail コマンドでのみ使用する必要があります。これらのパラメータは内部的に保存され、同じスクリプト実行セッション内で呼び出された後続のコマンドで再利用されます。
認証パラメータは特殊変数を通して指定することもできます。この方法により、コマンドラインやworkitem あるいは、パから認証データを挿入したり、パスワードなどの機密情報を Safe Boxに保存したりすることが可能になります。
|
変数名 |
説明 |
|---|---|
|
_EMAIL_SERVER |
サーバー名またはIPアドレス |
|
_EMAIL_PROTOCOL |
サーバーの種類。"POP3 "または "IMAP "のいずれか。 |
|
_EMAIL_USER |
ユーザー名 |
|
_EMAIL_SECURITY |
セキュリティは「password」、「google」、「microsoft」のいずれかです |
|
_EMAIL_PASSWORD |
パスワード |
メールの取得
Mail get "はローカルにメッセージをキャッシュせず、常に新しいデータをロードするので、メッセージをフィルタリングするか、検索するメッセージの最大量を設定することをお勧めします。例えば
Mail get max=10 read=false subject="Request"
は、件名に "Request "という単語を含む未読メールを、直近の10件から検索します。
検索されたメッセージは日付順に並べ替えられます(新しいものから)。添付ファイルは自動的にハードディスク上の一時的な場所にダウンロードされ、セッションの終了時に削除されます。メッセージの属性は変数の形でスクリプトに公開されます:
メールを日付順に返す場合は、まず標準のメール クライアント内でこの設定を行って、メール サーバー側に保存する必要があります。
|
変数名 |
説明 |
|---|---|
|
EMAIL_TOTAL_COUNT=<数> |
最後に接続したメールフォルダ内のメッセージ総数 |
|
EMAIL_NEW_COUNT=<数> |
最後に接続したメールフォルダ内の新着(未読)メッセージ数 |
|
EMAIL_COUNT=<数> |
指定された条件にマッチした検索メッセージの数 |
|
EMAIL_FROM_<n>=<アドレス> |
n番目のメッセージの送信者アドレス |
|
EMAIL_TO_<n>=<アドレス(es)> |
受信者、またはセミコロンで区切られたn番目のメッセージの受信者のリスト。 |
|
_EMAIL_SUBJECT_<n>=<文章> |
n番目のメッセージの件名 |
|
_EMAIL_BODY_<n>=<文章> |
n番目のメッセージの本文 |
|
EMAIL_READ_<n>=<true|false> |
n番目のメッセージのSEENフラグインジケータ(false=未読、true=既読)。 |
|
EMAIL_FOLDER_<n>=<名前> |
n 番目のメッセージが属するフォルダ名。 |
|
EMAIL_UID_<n>=<id> |
n番目のメッセージの識別子。これは "set "操作と "delete "操作に使われる。 |
|
EMAIL_ATT_COUNT_<n>=<数> |
n番目のメッセージの添付ファイルの数 |
|
EMAIL_ATT_NAME_<n>_<k>=<名前> |
n 番目のメッセージの k 番目の添付ファイルのファイル名。 |
|
EMAIL_ATT_FILE_<n>_<k>=<file_path> |
ローカルハードディスク上の、n番目のメッセージのk番目の添付ファイルへのファイルパス。 |
SYNOPSIS
Mail get [server=<server_address>] [protocol=<IMAP|POP3>] [user=<user_name>] [password=<password>] [folder=<folder_name>] [from=<email_address>] [subject=<text>] [body=<text>] [attachment=<text>] [read=<true|false>] [max=<number>]
-
赤色は必須パラメータです。
オプション
folder=<フォルダ名>
-
接続先のIMAPサーバ上のフォルダ。パラメータが省略された場合、またはサーバのタイプがPOP3の場合、デフォルトは "INBOX "です。
from=<メールアドレス>
-
送信者アドレスまたはその一部。
subject=<テキスト>
-
メッセージの件名、またはそれに含まれるフレーズ。
body=<テキスト>
-
メッセージ本文、または本文に含まれるフレーズ。
attachment=<テキスト>
-
添付ファイル名、または添付ファイルに含まれる文字列。例えば、テキストファイルが添付されたメッセージを取得するには ".txt" を使用します。
read=<true|false>
-
既読(true)か未読(false)のメッセージだけを取り出します。
max=<数値>
-
処理する最新のメッセージの最大数。このパラメータを使用すると、大量のメッセー ジを含むアカウントでの長い遅延を避けることができます。デフォルト値は100です。
uid=<メッセージID>
-取得するメッセージの識別子。これは、以前に "Mail get "を呼び出したときに設定された _EMAIL_UID変数から取得することができます。このパラメータが指定されると、他の全てのフィルタリングパラメータは無視され、 コマンドはメッセージのみを返します。
シノプシス
Mail set [server=<erver_address>] [protocol=<IMAP|POP3>] [user=<user_name>] [password=<password>] [folder=<folder_name>] [uid=<message_id>] [read=<true|false>] 。
-
赤色は必須パラメータです
オプション
folder=<フォルダ名>
-接続先のIMAPサーバ上のフォルダ。パラメータが省略された場合、またはサーバのタイプがPOP3の場合、デフォルトは "INBOX "です。
uid=<メッセージID>
-更新されるメッセージの識別子。これは "Mail get" で設定された _EMAIL_UID 変数から取得できます。このパラメータが省略された場合、コマンドは最近実行された "Mail get" アクションによって取得されたすべてのメッセージを更新します。
read=<true|false>
-SEEN フラグのターゲット状態。メッセージの状態を未読にするには "false "を、既読にするには "true "を使う。
SYNOPSIS
Mail delete [server=<server_address>] [protocol=<IMAP|POP3>] [user=<user_name>] [password=<password>] [folder=<folder_name>] [uid=<message_id>] 。
-
赤色は必須パラメータです
オプション
folder=<フォルダ名>
-接続先のIMAPサーバ上のフォルダ。パラメータが省略された場合、またはサーバのタイプがPOP3の場合、デフォルトは "INBOX "です。
uid=<メッセージID>
-削除するメッセージの識別子。これは "Mail get" で設定された _EMAIL_UID 変数から取得できます。このパラメータが省略された場合、コマンドは直近に実行された "Mail get "アクションによって取得されたすべてのメッセージを削除します。
戻り値
このコマンドは0(成功)のみを返します。メールサーバーへの接続に失敗した場合はエラーが発生し、スクリプトが終了します。
使用例
Mail get server=imap.gmail.com user=john.doe@gmail.com password=welcome max=10 read=false
Mail set read=true
-
指定したGoogleアカウントから最近10通の未読メールを検索し、"既読 "としてマークします
Var _EMAIL_SERVER=imap.gmail.com
Var _EMAIL_USER=john.doe@gmail.com
Var _EMAIL_PASSWORD=welcome

Mail get max=20 read=false attachment=".xls"
for (i=1; {i}<={_EMAIL_COUNT}; i={i}+1) {
   Excel open file={_EMAIL_ATT_FILE_{i}_1}
   Excel select ref=A1
   Log "Value at A1 of the file {_EMAIL_ATT_NAME_{i}_1} is: {_EXCEL_CELL_VALUE}"
   Mail set uid={_EMAIL_UID_{i}} read=true
}
-
最初の添付ファイルとしてMicrosoft Excel 97ファイル(.xls)を含む未読メッセージを最大20件ダウンロードします。ファイルを開き、最初のセルの値を記録します。その後、メッセージを「既読」にします。
この例では、メールによるプロセスの自動化方法を示します。ユーザーはリクエスト(フォーム)を指定されたアドレスにメールで送信し、実行中のロボットインスタンスがそれを受信し、処理します。
4. Image Comparison Capabilities
4.1 Image Comparison Overview
Image comparison methods are algorithms and/or technologies which analyze the image of the connected desktop. They are used in scripts to verify the desktop contents, retrieve artefacts such as GUI components or text and act upon the results. Most methods work with one or more image files ("template images") and/or image folders ("template image collections"). These artefacts are described closer in the Image Collections and Image Meta Data chapters.
Image comparison method plugins are closely integrated with the three following scripting language commands and their Java method counterparts. These are in the comparison method context usually called hosting commands or Java methods:
|
Command |
Java Method(s) |
Description |
|---|---|---|
|
Apply the selected image comparison method to the currently connected desktop once. Typically used to verify the existence of a component or to get its coordinates, to retrieve text or to verify whether the screen content is expected. |
||
|
Save a screenshot of the remote desktop to a file and optionally apply the selected image comparison method through an internal call of the Compareto command. |
||
|
Pause the execution until ('match') or while ('mismatch') the selected image comparison method produces the result of "success" (the return code of 0). Typically used to wait until the expected component or text appears on the screen or disappears from the screen. |
Each comparison method is identified by its unique name (also referred to as code), for example, "search2" or "object". Besides the standard "passrate" and "cmparea" parameters supported by the command framework, each method may declare any number of optional parameters specific for the particular algorithm. These parameters are then visible to the calling command.
As all image comparison methods are internally implemented as plugins, users are free to develop their custom algorithms and integrate them into the scripting language and the Java script API. See the ImageComparisonModule interface for details.
The following examples demonstrate the call of the most frequently used "search2" algorithm with all the framework provided parameters of "passrate" and "cmparea" and its own specific parameter of "order":
Compareto "buttonOk.png" passrate="70" method="search2" cmparea="x:258,y:114,w:417,h:298" sort="none"
Screenshot "s.jpg" template="buttonOk.png" passrate="70" method="search2" cmparea="x:258,y:114,w:417,h:298" sort="none"
Waitfor    "match" template="buttonOk.png" passrate="70" method="search2" cmparea="x:258,y:114,w:417,h:298" sort="none"
The same example in the form of a Java Script:
compareTo(new File[] { new File( "buttonOk.png" ) }, 70.0f, new Rectangle(258, 114, 417, 298), "none" );
screenshot(new File( "s.jpg" ), (String) null , (Rectangle) null , new File[] { new File( "buttonOk.png" ) }, 70.0f, new Rectangle(258, 114, 417, 298), "none" , false);
waitForMatch(new File[] { new File( "buttonOk.png" ) }, 70.0f, (String) null , new Rectangle(258, 114, 417, 298), (String) null , "none" , (String) null);
There are two built-in mechanisms allowing to handle failed image comparisons in a general way:
-
The ComparisonFailureFallback fall back procedure,
-
The Image Doctor wizard and the Imagedoctor command.
4.1.1 Image Collections
Image collections typically represent images capturing various visual appearances or possible states of a single graphical object, for example of a button on various environments and/or operating systems. Collections may be employed by the CompareTo, Screenshot and WaitFor match/mismatch scripting language commands or the corresponding Java methods to locate the component on the screen seamlessly on all environments.
T-Plan Robot Enterprise version 2.0 and higher supports image collections through semicolon-separated image file lists. For example, to search for an "OK" button represented by two template images buttonOK1.png and buttonOK2.png located in the template folder one would use:
Compareto "buttonOK1.png;buttonOK2.png" method=search
T-Plan Robot Enterprise version 2.2 introduces dynamic image collections represented by folders. This mechanism allows adding, remove and edit template images dynamically, without having to update the script code. Each folder is searched recursively for Java supported images of lossless format (PNG, BMP, WBMP, GIF) and the specified image comparison action is performed on the generated image list.
For example, images from the previous example can be moved to a folder called buttonOK and the command can be changed to:
Compareto "buttonOK" method=search
Images retrieved from the folder are by default processed in the natural order returned by the underlying operating system. Version 2.3.3 introduced a new optional mechanism allowing to change this behaviour and sort the images before comparison:
-
To configure the default sort mode see the CompareTo Command panel in the Preferences window. This setting will be used application wide unless the sort mode is overruled by the script as is described in the next bullet.
-
Scripts may set the sort mode through the setting of the _COMPARETO_SORT_MODE variable to the desired sort mode index. The variable acts as a switch and the sort mode are applied by all comparison commands until the variable gets reset or the end of the script is reached. Acceptable values are:
0 - Sort by image file name (ascending)
1 - Sort by image file name (descending)
2 - Sort by the image file last modification date (ascending)
3 - Sort by the image file last modification date (descending)
For example, to process the images from the previous example in the file name descending order (buttonOK2.png first) use:
Var _COMPARETO_SORT_MODE=1
Compareto "buttonOK" method=search
To reset the sort mode to the default one simply set the variable to an empty string:
Var _COMPARETO_SORT_MODE=
Image collections can be freely combined into file lists consisting of images and image collections. For example, to search for the "OK" button or an "Approve" button represented by the buttonApprove1.png and buttonApprove2.png images one would use:
Compareto "buttonOK;buttonApprove1.png;buttonApprove2.png" method=search
Or, having created a folder called buttonApprove for the two images one could write:
Compareto "buttonOK;buttonApprove" method=search
4.1.2 Image Meta Data(画像メタデータ)
T-Plan Robot バージョン 2.2 以降では、テンプレート画像が、 ソース座標 や クリックポイントなどの画像メタデータを含む追加のテキストファイルとともにハードドライブに保存されます。画像比較に使用されるたびに、このデータが読み込まれ、定義済み変数の形式でスクリプトで利用できるようになります。
メタデータファイルはJavaの.properties形式で、その名前は画像ファイル(通常は<imagefile>.<formatextension>.properties)に由来します。GUIでは、旧バージョンやサードパーティの画像エディタで作成された既存のテンプレートのメタデータファイルを作成できます。ただし、ソース座標は失われるため、この場合、GUIではクリックポイントだけを編集して保存することができます。
ソース座標テンプレート作成時のデスクトップイメージの元の座標を保存します。これらの座標は_COMPARETO_SOURCE_X変数と_COMPARETO_SOURCE_Y変数を通してスクリプトに公開されます。これらの変数は、メタデータファイルが利用できない場合、またはデータが入力されていない場合(v2.2以前またはサードパーティツールで作成されたテンプレート)には入力されません。
ソース座標は、オブジェクトが画面上を移動したかどうかをテストするスクリプティング・アクションを可能にします。このアクションの典型的なコードは次のとおりです:
Compareto "buttonOK" method=search
if ("{_COMPARETO_SOURCE_X}" != "{_SEARCH_X}" && "{_COMPARETO_SOURCE_Y}" != "{_SEARCH_Y}") {
    # オブジェクトが移動した
    ...
}
クリック ポイントは 、クリック、プレス、リリース、ドラッグといったマウス操作に最適な位置を表します。デフォルトでは画像の中心に設定されていますが、テンプレート画像の矩形の内側、あるいは外側の任意の位置を指定するようにカスタマイズできます。クリックポイントの座標は、テンプレート画像の左上隅を基準とした相対座標として内部的に保存されます。
クリックポイントを使うのはイメージ検索.オブジェクトを画面上に配置すると、クリックポイントを絶対座標に再計算し、_COMPARETO_CLICK_X変数と_COMPARETO_CLICK_Y変数に格納します。メタデータファイルが存在しない場合(v2.2より前に作成されたテンプレート)、この変数も利用可能で、デフォルトは画像センターになります。次のコード・スニペットは、オブジェクトを探し、成功したらそのクリック・ポイントをクリックします:
Compareto "buttonOK" method=search
if ({_EXIT_CODE} == 0) {
    Mouse click to="x:{_COMPARETO_CLICK_X},y:{_COMPARETO_CLICK_Y}"
}
4.1.3 Image Comparison Recommendations
Reliability of most image comparison methods decreases with factors which produce image differences on the pixel level. To minimize these impacts consider the following hints:
-
Change the remote desktop background to a solid colour. Choose such a colour which is not contained in the application window which you are going to test. This will ensure that the template images that contain the background will not fail in another environment. It is also likely to make your scripts faster (fewer colours usually improve the performance of image comparison methods.
-
Change in the environment or display settings also affect the functionality of image comparison. If you create your templates on a 24-bit colour remote desktop and later on restart the VNC server in the 8-bit colour depth, it won't work.
-
If the mouse pointer is rendered as part of the desktop image (meaning that the pointer remains visible even if you move the local mouse pointer out of the desktop view) it is a good practice to use the Mouse move command to move your mouse pointer to a constant position before comparison. Also, make sure that the mouse pointer is not on your template images!
-
Do not perform image comparison against images with lossy compression such as JPEG. Though the tool will complain initially, it will finally let you do it (though the comparison will most likely fail due to too many mismatching pixels). PNG and BMP formats are preferred because they preserve 100% of the image information and guarantee reliable and stable comparison results. GIF is generally also a good one; be however aware that its palette is limited to 256 colours and many tools flatten the colours when they don't meet the limit. It is recommended to retest (compare) a GIF template against a desktop image right after it is created to make sure it works correctly.
-
Some systems and applications tend to highlight buttons and menu items when the mouse pointer is above them. You may then want to create two templates, one for regular and another one for the highlighted state and use them as a template list for all applicable image searches.
4.2 Image Search Methods
Image Search Methods search the screen for an object (component) based on template image(s), image collection(s) or object parameters such as the size, colour or shape. The method typically returns a list of locations and/or rectangles on the screen where the specified object was detected. This method group is often employed to automate actions such as "find and click a button" or "make sure that a component is visible on the screen".
The Image Search Methods supported by T-Plan Robot are:
-
The Image Search V2 (code "search2") method searches the screen for components by template images and collections. The algorithm features three search modes (exact, tolerant and fuzzy) and ordering of results by the lowest difference or location.
-
The Image Search (code "search") method is an older version of the V2 algorithm. It is also capable of searching the screen for components by template images and collections with a limited tolerance to minor image changes.
-
The Object Search (code "object") method locates objects by colour, size and an optional sample template image. The algorithm is capable of searching for rotated instances of the object and provides certain robustness against eventual object overlapping.
Note: The other methods listed above are more suitable for GUI automation, as this method rather targets analysis of graphical systems such as GIS outputs, maps, charts and similar. -
The Google Cloud Vision (code "vision") is an experimental method linking to the Google AI. It is supported since Robot 8. It may be used to verify whether certain objects are on the screen.
4.2.1 Image Search V2V2 ("search2")
説明
Image Search V2((画像検索 v2)は、1 つ以上のテンプレート画像および/またはイメージコレクションによって表されるコンポーネントまたはオブジェクトをデスクトップ画面で検索します。これは通常、デスクトップ画面の内容の確認(「オブジェクトが確実に表示されていることを確認する」)や、後続のマウス操作やキーボード操作のためのコンポーネントの位置特定(「見つけてクリックまたはドラッグする」、「見つけて押す/入力する」など)に使用されます。
search2 "アルゴリズムは、従来の画像検索メソッド("search")を改良した新世代の手法であり、以下の改善点があります::
-
使いやすい - デスクトップ画像の微小な変化に対する許容度を制御する唯一のパラメータは、標準の「passrate」です。そのデフォルト値は50%に設定されており、Flashアプリケーションなどデスクトップ画像レベルでの自動化が困難とされる環境を含む、ほとんどの環境において、箱から出してすぐに信頼性の高い検索を実行します。
-
高速パフォーマンス - パスレートパラメータが低い値であっても、検索は大幅に高速化されます。また、このアルゴリズムは画像ピクセルのコピーを回避し、デスクトップバッファで直接動作するため、他の類似の方法よりもメモリ消費量が最大90%少なくなります。
-
結果ソート - ベストマッチによる結果(マッチする場所)のデフォルトソートは、パスレート値が低すぎてメソッドが複数のファジーマッチを生成しても、ベストマッチの場所が常に最初に報告されることを保証します。これにより、最初のマッチ(最も正しい可能性が高いマッチ)を使って作業し、他の遠隔的に類似したマッチを無視することができます。
-
拡大縮小画像の検索 - リリース4.0で導入されたscaleパラメータは、入力コンポーネント画像のスケーリングされたインスタンスを検索します。これにより、さまざまな解像度のデバイス(Android、iOS ...)で単一の検索を再利用できるようになりました。
-
長方形以外のテンプレート画像はリリース8.1からサポートされています。テンプレート画像には透明または半透明のピクセルを指定すると、画像検索時に自動的に無視されます(一致とみなされます)。これにより、背景のない、あるいはオブジェクトの特徴が削除された、あらゆる形状のテンプレート画像を作成することができます。新しいテンプレート・イメージ・エディター v2または他のサードパーティの画像エディタを使用してください。円形のChromeアイコンのテンプレート画像の例です:
一致した位置の座標は、SEARCHで始まる変数のセットとして呼び出し元スクリプトに公開されます。このシステムは従来の「search」メソッドと互換性があります:
|
作成方法 変数 |
説明 |
|---|---|
|
_SEARCH_MATCH_COUNT=<number> |
オブジェクト検索によって特定された一致する場所の数。 |
|
_SEARCH_X<n>=<X-coordinate>
|
n "は1から_SEARCH_MATCH_COUNT値の間である。 |
|
_SEARCH_X=<X-coordinate>
|
最初のマッチ位置のX,Y座標(_SEARCH_X_1と_SEARCH_Y_1の同義語)。 |
マッチ位置の幅と高さを取得するには、 _compareto_template_width。および _COMPARETO_TEMPLATE_HEIGHT変数変数を使用します。これらは、ホスティングコマンドまたはJavaメソッド呼び出しによって設定されます。
バージョン4.4以降、このメソッドでは一致する位置の数を制限できるようになりました。これは、完全なデスクトップ検索では一致する項目が多すぎたり時間がかかりすぎる場合に、「最初のN件を見つけて停止する」といったシナリオをサポートすることを目的としています。スクリプトから制限を設定するには、(ja) Varコマンドを使用して_SEARCH2_MATCH_LIMIT変数を設定します。リセットするには変数を空の値に設定します。例えば値を1に設定すると、最初の一致位置で検索が停止します:
//Set the match limit to 1
Var_search2_match_limit=1
Compareto comp.png method=search2

// マッチ制限をリセットする
Var_search2_match_limit=1
パフォーマンスの問題を防ぐため、マッチするロケーションの最大数が内部的に1,000に制限されました。この制限は、メソッドの環境設定で変更することができます。
互換性に関する注記: リリース8.2以降、「search2」アルゴリズムは「拡張」アルゴリズムにフォールバックします
オプション
このメソッドは、ホスティングコマンドまたはJavaメソッド呼び出しを通じて指定された1つ以上の テンプレート画像 および/またはイメージコレクションを必要とします。
「search2」メソッドにおいて、「passrate」パラメータは、テンプレート画像と画面上の対応位置との間に必要な最小類似度を指定します。デフォルト値は50%であり、これはほとんどのケースで良好な性能と精度のバランスを保証します。低コントラスト環境などで一致が過剰に発生する場合は、合格率を高く設定してください。最高の性能を得るには合格率を100%に設定します。。
「cmparea」パラメータはオプションであり、省略された場合はデフォルトで全画面表示となります。
このメソッドは、以下の2つの特定のパラメータをサポートします:
sort=<best|none|top|bottom|left|right>
-結果のソートモード(オプション):
-
"best" - 最適な一致順(差分が最小の最適な位置を最初に)でソートします。差分値が同じ位置は、自然な読み順(左から右、上から下)で並べ替えられます。このモードは、パラメータが指定されていない場合のデフォルトです。
-
"none" - 並べ替えを行わず、結果を自然な「読み取り」順序(左から右、上から下)のまま表示します。このモードでは、従来の「検索」メソッドと同じ順序で結果が表示されます。
-
"top" - 上から下へ(最上位から順に)並べ替え。
-
"bottom" - 位置を底から上へ(一番下から順に)並べ替える。
-
"left" - 位置を左から右へ並べ替え(左端が最初)。
-
"right" - 位置を右から左へ並べ替え(右端が最初)。。
scale=<float_number(s)>
-scale は、入力画像のスケールされたインスタンスを検索するためのオプションパラメータです。値は、単一の浮動小数点数(スケール係数)またはセミコロン「;」で区切られた数値のリストです。 それ以上の数値がある場合は、マッチするかリストがなくなるまで、指定した順番で処理されます。
この値が0より大きい場合、拡大率として扱われます。例えば、2.0という値は、幅と高さが2倍に拡大されたコンポーネントを検索します。
ダイナミック・スケーリングを採用するために指定できる2つの負の定数があります。これらの定数は、現在のデスクトップの解像度と、テンプレート(コンポーネント)画像が作成されたデスクトップのサイズとの差に応じて、入力画像を拡大縮小します。
対応する音階モードは以下の通
-
-1("ストレッチモード") は、デスクトップの幅と高さの変更に従って入力画像を拡大縮小します。結果として得られる画像は、同じ幅と高さの比率(幅と高さの比率)を持つこともあれば、持たないこともあります。
-
-2("プロポーショナル・スケール・モード") は、デスクトップの幅と高さの相対的な変化を小さくして、幅と高さの両方のスケーリングに使用します。結果として得られる画像は、同じ比率(幅と高さの比率)になります。
戻り値
このメソッドは、入力テンプレート画像の少なくとも1つに対して、少なくとも1つの一致する場所が見つかった場合、呼び出しコマンド(メソッド呼び出し)に0(成功)を返させます。そうでない場合は、値1を返します。
トラブルシューティング
失敗した「search2」比較に対処するには:
-
スクリプトが検索失敗後に終了するよう設計されている場合、ロスレス形式(PNGまたはBMP)でスクリーンショットを作成することが推奨されます。そのコードの例を以下に示します。これにより、比較後に失敗した比較を再現しデバッグすることが可能になります。スクリーンショットは、 ログインダイアログ内の「静的画像クライアント」経由で読み込むか、比較コマンド/メソッド呼び出しプロパティウィンドウ内の 「RD画像を読み込む」ボタンを使用して読み込むことができます。
-
画像変化に対する許容度を高めるには、単純に通過率を下げてください。ファジーレベルを非常に低く設定することを恐れないでください。ただし、GUI の「比較」ボタンを使用して、正しいコンポーネントの位置が最初に報告されることを必ずテストしてください。パス率によって検索の不具合を修正できない場合は、代替のテンプレート画像を作成し、テンプレートリストまたはイメージコレクションに追加してください。
-
比較の失敗を引き起こす最も一般的な要因については(ja) 画像比較のススメ章を参照してください。。
-
明らかな理由なく検索が失敗した場合は、スクリーンショットと画像テンプレートを添付の上、Tプラン・サポート.までメールでお送りください。
使用例
Compareto buttonOk.png  method="search2" passrate="90" sort="bottom"
if ({_EXIT_CODE} > 0) {
  Screenshot failure.png desc="Failed to find the OK button."
  Exit 1 desc="Failed to find the OK button."
} else {
  Mouse click to=x:{_SEARCH_X},y:{_SEARCH_Y}
}
-
最下部のOKボタンを探してクリックしてください。ボタンが見つからない場合は終了画面のスクリーンショットを撮影し、終了コード1でスクリプトを終了させてください。
// ボタンを検索し、一つ一つクリックする
Compareto "button.png" passrate="100" method="search2"
if ({_EXIT_CODE} == 0) {
    for (i=1; {i}<{_SEARCH_MATCH_COUNT}+1; i={i}+1) {
        Mouse click to=x:{_SEARCH_X_{i}},y:{_SEARCH_Y_{i}} wait=1s
    }
}

// ボタンが消えるか状態が変わるまで15秒待つ
Waitfor "mismatch" method="search2" passrate="100" template="button.png" timeout="15s"
if ({_EXIT_CODE} > 0) {
    Exit 1 desc="Some buildings failed to turn the state!"
}
-
画面に複数のボタンがないか探し、ひとつひとつクリックします。その後、すべてのボタンが消えるか、またはその状態が変化するか、画面を確認してください。
// スクロールボタンを見つける
Compareto "scrollbutton.png" method="search2"
if ({_EXIT_CODE} > 0) {
    Exit 1 desc="Failed to locate the scroll button!"
}

// その座標をX、Y変数に保存する
Var X={_COMPARETO_CLICK_X} Y={_COMPARETO_CLICK_Y}

// 100回ループを反復処理する
for (i=0; {i}<100; i={i}+1) {
    // スクロールボタンをクリック
    Mouse "click" to="x:{_COMPARETO_CLICK_X},y:{_COMPARETO_CLICK_Y}"

    // コンポーネントが画面上に表示されているか確認します。 ページがスクロールして
    // 画面に更新されるまでに時間がかかる可能性があるため、Waitforを使用します
    Waitfor match template="component.png" method="search2" timeout=3s
    if ({_EXIT_CODE} == 0) {
        // 見つかった場合 -> forループを終了する
        break
    }

    // 最終ループ #99 -> コンポーネントが見つかりません、スクリプトを終了します
    if ({i} == 99) {
        Exit 2 desc="Failed to scroll to the component!"
    }
}
-
スクロールされたページ(ウィンドウ)に表示されているコンポーネントを検索する方法の例です。この例では、スクロールダウンボタンをクリックし続け、ループの中でコンポーネントの存在をチェックします。スクロールボタンをクリックする作業は、最終的にはPgDownキーを押すことで置き換えることができます。
4.2.2 画像検索 ("search")
説明
画像検索(コード「search」)は、1 つ以上のテンプレート画像および/またはイメージコレクションによって表されるコンポーネントまたはオブジェクトをデスクトップ画面で検索します。これは通常、デスクトップ画面の内容(「オブジェクトが確実に表示されていることを確認する」)の検証、または後続のマウスまたはキーボード操作のためのコンポーネントの位置特定( (「見つけてクリックまたはドラッグ」、「見つけて押す/入力する」など)。
この方法は、3つの独立した許容メカニズムを持つプレーンピクセル比較を使用します:
-
ピクセルベースの許容誤差 は、テンプレート画像と一定量のピクセルが異なる出現箇所をアルゴリズムが検索することを可能にします。これは、一致に必要なピクセルの割合を定義する「passrate」パラメータによって実現されます。例えば、テンプレート画像サイズが10x10(100ピクセル)でパスレートを99%に設定した場合、アルゴリズムは最大1ピクセル異なる位置まで全ての一致箇所を検出します。パスレートを低く設定するほど、パフォーマンスは低下し、検索に要する時間は長くなることに注意してください。
-
RGB 許容値は、0 から 256 までの整数である 許容範囲 パラメータによって有効になります。この値は、デスクトップピクセルの赤、緑、青の各成分が、対応するテンプレートピクセルと同等と見なされるために許容される最大差異を示します。この値により、画像のぼかしや背景との融合などによりピクセルがわずかに変化する画像の処理が可能になります。この挙動は、アプリケーション更新時に装飾テキストや一部の画像が一定の方法でレンダリングされないFlashアプリケーションで報告されています。許容値が高いほど誤検出の可能性が高まる点に注意してください。ほとんどのシナリオでは、ぼかしレベルに応じて値を[0, 100]の範囲に設定すべきです。パラメータが指定されない場合、デフォルトはゼロとなり、アルゴリズムは完全な色一致を用いてピクセルを比較します。
-
透明度/半透明度に基づく許容値により、テンプレート画像の特定のピクセルを無視できます。画像検索アルゴリズムはデフォルトで、透過度成分アルファが最小アルファパラメータ(minalpha)で指定された閾値未満の、すべての透明または半透明(部分的に透明)ピクセルを「合格」と見なします。たとえば、100ピクセルのテンプレート画像に90個の透明ピクセルが含まれ、最小アルファ値が0xFF(完全に不透明なピクセルのみを検索するよう強制)に設定されている場合、デスクトップ画像との比較対象となるのは残りの10個の非透明ピクセルのみとなります。
透明度を基にした許容値は、背景色やコンポーネント色の変化に対して頑健な画像比較を構築する強力な手法です。たとえば、リモートデスクトップ上にレンダリングされたアイコンを検索する場合、アイコンテンプレート内の背景色ピクセルを透明にマークすることで、リモートデスクトップの色が変化しても画像比較が確実に通過するようになります。テンプレート画像は、一般的な画像エディタでさらに加工して、重要でないピクセルを削除し、検索対象のオブジェクトの骨格だけを残すこともできます。これは、地理情報システム(GIS)など、オブジェクトのレンダリングが不安定な特定の種類のアプリケーションをテストする唯一の方法であることが多いのです。
T-Plan Robot Enterprise 自動背景透明化 が removebg および bgcolor パラメータを通じてサポートされています。これにより、サードパーティ製エディタで画像を編集することなく、テンプレート画像の背景を無視することが可能になります。このアルゴリズムは、入力として不透明なテンプレート画像(透明度のない画像)を受け取り、内部の透明度フィルターを適用して背景と同一または合理的に類似した全てのピクセルを除去します。背景色はデフォルトでテンプレート画像の最初のピクセルが使用されますが、bgcolor パラメータで明示的に指定することも可能です。自動透明化は GUI、特にテンプレート画像エディターおよびCompareウィンドウで説明されている比較 GUI コンポーネントを使用して、簡単に設定できます。
また、サードパーティの画像エディタを使用して、テンプレート画像に透明度を導入することもできます。
例えば、WindowsやLinux/Unixのユーザーは、Gimpなどを利用して、以下のように透明度を設定することができる:
-
テンプレート画像を、例えば Gimpで開きます。
-
レイヤー>透明度>カラーをアルファに変換します
-
透明色を選択してください。通常、Gimpが提供するデフォルト設定(白い背景色)のままにしておいても問題なく動作します。
-
テンプレート画像をファイルに保存してください。
-
テンプレート画像エディタで再テストしてください。 これは、画像に背景色と非常に近い色しか含まれていない場合、Gimp がすべてのピクセルを透明または半透明にしてしまい、デフォルトの minalpha 値での画像検索にテンプレートが使用できなくなる可能性があるため、必要な作業です。テンプレート画像エディタは、このようなケースを検出し、画像検索パラメータの変更を提案することができます。
結果として得られた一致位置の座標は、呼び出し元スクリプトに対して、_SEARCH_で始まる変数のセットとして公開されます:
|
作成方法 変数 |
説明 |
|---|---|
|
_SEARCH_MATCH_COUNT=<number> |
オブジェクト検索によって特定された一致する位置の数。 |
|
_SEARCH_X_<n>=<X-coordinate>
|
n番目のマッチ位置のX,Y座標。ここで「n」は1から_SEARCH_MATCH_COUNT値の範囲にある。 |
|
_SEARCH_X=<X-coordinate>
|
最初の一致位置のX座標とY座標(_SEARCH_X_1 および _SEARCH_Y_1 の同義語)。 |
マッチ位置の幅と高さを取得するには、 _COMPARETO_TEMPLATE_WIDTH および _COMPARETO_TEMPLATE_HEIGHT 変数を使用します。これらは ホスティングコマンドまたはJavaメソッド呼び出しによって設定されます。
注意:一致する位置の数はComparetoコマンドの設定パラメータによって制限され、最大値に達すると検索は停止します。
オプション
このメソッドは、ホスティングコマンドまたは Java メソッド呼び出しによって指定される 1 つ以上の テンプレート画像 および/またはイメージコレクションを必要とします。「passrate」パラメータは、「search」メソッドのコンテキストにおいて、テンプレート画像と画面上のマッチ位置の間で完全に一致しなければならないピクセルの最小比率を指定します。 デフォルト値は 100% (ピクセル差は許容されない) です。「cmparea」パラメータはオプションであり、省略した場合はデフォルトで全画面になります。
サポートされている特定のパラメータ:
トレランス=<0-255>
- The toleranceパラメータは制御しますRGB許容差 わずかな色の変化まで許容します。0から255までの整数で指定し、0は許容値なし(完全一致)を、255は最大許容値を示します。これは、デスクトップピクセルの赤・緑・青成分が、対応するテンプレートピクセルと同等と見なされる最大許容差を示します。許容値が高いほど、誤った一致検出の可能性が高まります。
このパラメータは、ぼかし処理や背景との合成などによりピクセルがわずかに変化する画像の処理を可能にします。この挙動は、装飾テキストや一部の画像が時間経過とともに一定の方法でレンダリングされないFlashアプリケーションで報告されています。ほとんどの場合、ぼかしレベルに応じて値は[0, 100]の範囲に設定すべきです。パラメータが指定されない場合、デフォルト値はゼロとなり、アルゴリズムは正確な色一致を用いてピクセルを比較します。
removebg=<true|false>。
removebg パラメータは、自動背景透過をオン(「true」)またはオフ(「false」)に切り替えます。値「true」は、テンプレート画像の背景色を無視する自動透過を適用します。テンプレート画像(または複数のテンプレート画像)に既に透明または半透明のピクセルが含まれている場合、背景フィルターは適用されず、このパラメータおよびbgcolorパラメータは無視されます。デフォルト値は「false」(背景フィルターはオフ)です。
bgcolor=<HTMLColor>。
bgcolor パラメータはオプションであり、removebg パラメータによって有効化された 自動背景透過 モード用のカスタム背景色を定義できます。HTML 風の表記法による RGB 値を受け付けます。例えば、白は "ffffff"、黒は "000000" などです。値は6文字で構成され、R、G、Bの各成分は2桁の16進数(00~ff)で指定します。bgcolorが指定されていない場合、メソッドはテンプレート画像の最初のピクセル(画像左上隅)から背景色を選択します。
minalpha
minalpha パラメータは半透明の許容範囲を設定します。このパラメータは removebg フィルタでフィルタリングされた画像や、 すでに透明や半透明の画素があるテンプレートに適用できます。デフォルト値の 255 は検索アルゴリズムに指示して完全に不透明な画素だけを比較させ、 透明や半透明 (半透明) の画素はすべて無視させます。255より小さい値は、アルファ成分が指定された限界と等しいかそれ以上の半透明のピクセルも比較するアルゴリズムになります。
最小アルファパラメータは、背景カラーフィルタがあまりにも多くのピクセル、あるいはすべてのピクセルを透明または半透明にする状況を解決するためのものです。この場合、検索アルゴリズムは少数の不透明な画素とだけ比較することになり、通常予期せぬ一致結果を招きます。アルファリミットを下げると、比較可能なピクセルの数が増えるので、画像検索アルゴリズムの精度を上げるために使うことができます。しかし、半透明のピクセルの比較は色の類似性に基づいているため、古典的な画像検索よりもパフォーマンスが著しく低下し、最小アルファ値が極端に低いと予期しない一致結果が生じる可能性があることに注意してください。
戻り値
このメソッドは、入力テンプレート画像の少なくとも1つに対して、少なくとも1つのマッチする場所が見つかった場合、呼び出しコマンド(メソッド呼び出し)に0(成功)を返させます。そうでない場合は、値1を返します。
トラブルシューティング
失敗した「検索」比較に対処するために:
-
スクリプトが検索失敗後に終了するよう設計されている場合、ロスレス形式(PNGまたはBMP)でスクリーンショットを作成することが推奨されます。そのコードの例を以下に示します。これにより、比較後に失敗した比較を再現しデバッグすることが可能になります。スクリーンショットは、 ログインダイアログ内の「静的画像クライアント」経由で読み込むか、比較コマンド/メソッド呼び出しプロパティウィンドウ内の は「RD画像を読み込む」ボタンを使用して読み込むことができます。
-
合格率を下げるか、RGB許容値パラメータ(「tolerance」)を上げて、一致するまで「比較」ボタンでテストしてください。パラメータで検索の不具合が修正できない場合は、代替テンプレート画像を作成し、テンプレートリストまたはイメージコレクションに追加してください。
-
比較に失敗する最も一般的な要因については(ja) 画像比較のススメ章を参照されたい。
-
明らかな理由なく検索が失敗した場合は、スクリーンショットと画像テンプレートをT-Plaまでメールでお送りください。サポート.
使用例
Compareto buttonOk.png  method="search" tolerance="50"

if ({_EXIT_CODE} > 0) {
  Screenshot failure.png desc="Failed to find the OK button."
  Exit 1 desc="Failed to find the OK button."
} else {
  Mouse click to=x:{_SEARCH_X},y:{_SEARCH_Y}
}
-
OKボタンを探してクリックしてください。ボタンが見つからない場合は終了スクリーンショットを撮影し、終了コード1でスクリプトを終了させてください。
詳細なコンポーネント検索例については、「search2」メソッド仕様を参照してください。 または以下の抜粋を参照してください:
例
Compareto buttonOk.png  method="search2" passrate="90" sort="bottom"
if ({_EXIT_CODE} > 0) {
  Screenshot failure.png desc="Failed to find the OK button."
  Exit 1 desc="Failed to find the OK button."
} else {
  Mouse click to=x:{_SEARCH_X},y:{_SEARCH_Y}
}
-
最下部のOKボタンを探してクリックしてください。ボタンが見つからない場合は終了画面のスクリーンショットを撮影し、終了コード1でスクリプトを終了させてください。
// すべてのボタンを探してクリックする
Compareto "button.png" passrate="100" method="search2"
if ({_EXIT_CODE} == 0) {
    for (i=1; {i}<{_SEARCH_MATCH_COUNT}+1; i={i}+1) {
        Mouse click to=x:{_SEARCH_X_{i}},y:{_SEARCH_Y_{i}} wait=1s
    }
}

// ボタンが消えるか状態が変わるまで15秒待ちます
Waitfor "mismatch" method="search2" passrate="100" template="button.png" timeout="15s"
if ({_EXIT_CODE} > 0) {
    Exit 1 desc="Some buildings failed to turn the state!"
}
-
画面上で複数のボタンを探し、一つ一つクリックする。その後、すべてのボタンが消えるか状態が変わるか画面を確認する。
// スクロールボタンを見つける
Compareto "scrollbutton.png" method="search2"
if ({_EXIT_CODE} > 0) {
    Exit 1 desc="Failed to locate the scroll button!"
}

// その座標をX、Y変数に保存する
Var X={_COMPARETO_CLICK_X} Y={_COMPARETO_CLICK_Y}

// 100回ループを反復処理する
for (i=0; {i}<100; i={i}+1) {
    // スクロールボタンをクリック
    Mouse "click" to="x:{_COMPARETO_CLICK_X},y:{_COMPARETO_CLICK_Y}"

    // コンポーネントが画面上に表示されているか確認します。ページがスクロールして画面に
    // 更新されるまでに時間がかかる可能性があるため、Waitforを使用します
    Waitfor match template="component.png" method="search2" timeout=3s
    if ({_EXIT_CODE} == 0) {
        // Found -> break the for loop
        break
    }

    // 最後のループ #99 -> コンポーネントが見つかりません、スクリプトを終了します
    if ({i} == 99) {
        Exit 2 desc="Failed to scroll to the component!"
    }
}
-
スクロールされたページ(ウィンドウ)内に表示されているコンポーネントを検索する方法の例。この例では、スクロールダウンボタンを繰り返しクリックし、ループ内でコンポーネントの存在を確認します。スクロールボタンをクリックする操作は、最終的にはPgDownキーの押下で置き換えられる可能性があります。
4.2.3 オブジェクト検索 ("object")
説明
オブジェクト検索(コード名「object」)は、特定のRGB範囲内の特定の色または複数の色を持つオブジェクトを検出します。オプションのテンプレート画像によるオブジェクトリストのフィルタリングも可能で、オブジェクトの回転も検出します。この手法は、単純な画像分析タスク、例えば「画面に特定の色が含まれているかテストする」、「画面上のすべての赤いオブジェクトを見つける」、「画面上のあらゆる回転角度の黒い三角形やその他の形状をすべて見つける」といった処理を扱うために設計されました。
この手法は常に可能な限り最大のオブジェクトを特定し、その内部に含まれる他のオブジェクトを再帰的に探索しないため、フレーム化や重ね合わせ、統合が頻繁に行われる従来のGUIコンポーネントには適していません。しかし、この方法は、例えば 地理情報システム (GIS) アプリケーションや単純な画像データを生成するシステムによって生成された、低彩度のシーンを含む マップ や画像、および スキーム のテストでは非常に優れた性能を発揮します。この方法は、特定のカラーまたはカラー範囲のオブジェクトが画面上に存在するかどうかを確認するためにも使用できます。例えば、「この特定の領域に赤いメッセージはありますか?」といった質問に答えるために使用できます。
アルゴリズムはまず、入力された色条件を満たす最初のピクセルを画像内でスキャンする。その後、そのような各オブジェクトの外形に沿って追跡し、その境界矩形を一連の変数の形でコンテキストに格納します:
|
作成方法 変数 |
説明 |
|---|---|
|
_OBJECT_COUNT=<number> |
Object Searchで特定されたオブジェクトの数。 |
|
_OBJECT_X_<n>=<X-coordinate>
|
X、Y座標と幅および高さ
|
|
_OBJECT_X_<n>=<X-coordinate>
|
n番目のオブジェクト中心のX,Y座標。ここで
|
オブジェクトをより正確に記述する元の形状(java.awt.Shapeオブジェクト)は、JavaスクリプトからgetContext().getObjectSearchShapes()メソッドを通じてのみ利用可能です。
オプション
このメソッドは、ホスティングコマンドまたはJavaメソッド呼び出しを通じて指定された1つのテンプレート画像をオプションで受け入れます。
passrateパラメータは、"object "メソッドがテンプレート画像とともに呼び出された場合にのみ役割を果たします。この画像には、指定された色(色範囲)の形状が、どの回転レベルでも正確に1つ含まれていなければなりません。入力された "color "パラメータで特定されたオブジェクトのリストは、passrateパラメータで指定された比率までのテンプレート画像の形状に似ている形状だけを残すようにフィルタリングされます。rotationsパラメータも指定され、それが1より大きい場合、オブジェクトリストは、指定された回数回転されたテンプレート形状のリストと照合されます。テンプレート画像が指定されていない場合、このメソッドは passrate の値に関係なく、指定された色とサイズのパラメータに一致するすべてのオブジェクトを探します。
標準パラメーターの "cmparea "はオプションで、省略した場合のデフォルトはフルスクリーン。
サポートされている特定のパラメータ:
color=<HTMLColor>
colorパラメータは、HTMLスタイルの6文字のRGB 16進数フォーマットでオブジェクトの色を定義します(白は'000000'、黒は'fffff')。パラメータが指定されていない場合、デフォルトは黒です。
tolerance=<0-255>
寛容(トレランス)パラメータは、0から255の間のオプションの整数値です。これは画像検索メソッドによって指定されます。これは、ピクセルの赤、緑、青の各成分が、オブジェクトの色として指定された 色このパラメータは、オブジェクトの色を単一色ではなく色範囲で指定することを可能にします。また、形状が単一色ではなく類似した色範囲で形成されるぼやけた画像の処理にも役立ちます。許容値が高いほど、誤った形状検出の可能性が高くなります。ほとんどのシナリオでは、ぼやけ具合に応じて値を[0, 100]の範囲に設定する必要があります。パラメータが指定されない場合、デフォルト値はゼロとなり、アルゴリズムは単色オブジェクトのみを検索します。
bridgecolors=<HTMLColor1;HTMLColor2;...HTMLColorN>
bridgecolorsパラメータはオプションで、追加で許容されるオブジェクトの色をセミコロンで区切ったリストを含めることができます。これにより、既知の色の他のオブジェクトがその上に描かれることが予想される連続オブジェクトを検索することができます。これらの色は常に完全一致で比較され、tolerance パラメータでは動作しません。
rotations=<1-360>
オプションの回転(ローテーション)パラメータは、テンプレート画像が提供されている場合にのみ意味を持ちます。これは回転の粒度を定義します。基本的には、オブジェクトフィルタリングのために、テンプレートオブジェクトを何回回転させるかを指定します。例えば、36という値は10度ステップで形状を回転させます。明らかに、回転数の増加は回転したオブジェクトの認識精度を高めますが、パフォーマンスを低下させます。低い回転値は、passrateパラメータを下げることによって補うことができます。この方法はパフォーマンスの面でやや優れていますが、テンプレートオブジェクトと十分に類似したオブジェクトを誤検出するリスクを高めます。
min=w:<width>;h:<height>
結果オブジェクトをフィルタリングするためのオプションの最小サイズ(幅および/または高さ)。パラメータには、セミコロンで区切って幅と高さを両方指定することも(例:"w:100;h:100")、いずれか一方の寸法のみを指定することもできます(例:"h:100")。
max=w:<width>;h:<height>
結果オブジェクトをフィルタリングするためのオプションの最大サイズ(幅および/または高さ)。パラメータには、セミコロンで区切って幅と高さを両方指定することも(例:「w:100;h:100」)、いずれか一方の寸法のみを指定することもできます(「h:100」)。
overlapmode=<true|false>
オプションのオーバーラップモードフラグは、画面上のオブジェクトが重なり合う(競合する)ことを許可するかどうかを定義します。パラメータ値が「true」の場合、メソッドは部分的に重なり合ったオブジェクトを検出するために追加の処理を行います。
draw=<true|false>
draw パラメータはオプションのフラグで、Robot のデスクトップビュー上に配置されたオブジェクトをハイライト表示します。このパラメータが "true "の場合、アルゴリズムはデスクトップビューアGUIコンポーネントのデスクトップ画像上にオブジェクトの矩形を描画します。これはデバッグやデモンストレーションに便利です。これらの描画は、スクリプトが終了するか、"clear=true" パラメータを持つ別のオブジェクト検索が実行されると、リセット(削除)されます。
clear=<true|false>
clear パラメータを使用すると、以前に呼び出された Object Search メソッドによって作成されたすべての図面を消去することができます。詳細は draw パラメータを参照してください。
戻り値
このメソッドは、指定された条件に合致するオブジェクトが少なくとも1つ見つかった場合、呼び出しコマンド(メソッド呼び出し)が0(成功)を返すようにします。それ以外の場合は1の値を返します。
トラブルシューティング
失敗した "オブジェクト "比較に対処するには:
-
スクリプトが検索失敗後に終了するよう設計されている場合、ロスレス形式(PNGまたはBMP)でスクリーンショットを作成することが推奨されます。そのようなコードの例を以下に示します。これにより、の「静的スクリーンショットを読み込んだ後にログインダイアログの画像クライアント」や、比較コマンド/メソッド呼び出しのプロパティウィンドウの「RD画像を読み込む」ボタンを使って、失敗した比較を再現・デバッグできます。
-
パスレートを下げるか、RGBトレランスパラメーター(「トレランス」)を上げて、一致するまで「比較」ボタンでテストしてください。。パラメータで検索がうまくいかない場合は、代替のテンプレート画像を作成し、テンプレートリストまたはイメージコレクションに追加してください。
-
比較の失敗を引き起こす最も一般的な要因については(ja) 画像比較のススメ章を参照されたい。
-
明らかな理由なく検索が失敗した場合は、スクリーンショットと画像テンプレートを添付の上、T-Planサポートまでメールでお送りください。.
4.2.4 Google Cloud Vision(”vision”)
Google Vision(「ビジョン」)手法は、Google AI(Cloud Vision)を使用して画面上の物体を識別します。これはRobot 8によって導入されました。テキストまたは正規表現を使用して、画面に目的の物体が含まれているかどうかを確認できます。例えば、「dog」というテキストを使用して、AIが画面上に少なくとも1匹の犬を検出するかどうかをテストできます。
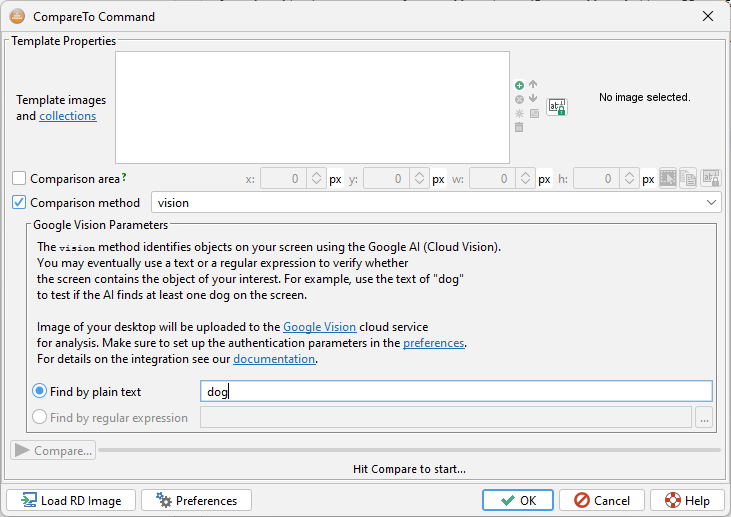
デスクトップの画像は、分析のためにGoogle Visonクラウドサービスにアップロードされます。このサービスは画面上で検出された内容の結果セットを返し、指定されたパラメータと照合されます。
Google Cloud VisionはGoogle Vision OCR機能と同じアカウントを共有します。サービスの認証パラメータは、ドキュメントに記載されているとおりに設定してください。
オプション
text=<keyword>
-
結果と照合するテキスト(キーワード)。
pattern=<regular_expression>
-
java.util.regex.Pattern 正規表現に準拠し、結果とマッチする。
戻り値
このメソッドは、指定された条件に合致するオブジェクトが少なくとも1つ見つかった場合、呼び出しコマンド(メソッド呼び出し)が0(成功)を返すようにします。それ以外の場合は1の値を返します。
4.2.5 Enhanced Search ("enhanced")
search2アルゴリズムと同様に、入力テンプレート画像またはイメージコレクションと合格率によって表されるコンポーネントをデスクトップ上で検索します。特徴マッチングの原理に基づいて設計されており、以下のような大幅な改善を実現します:
-
色の変化に対応する能力
-
わずかなサイズ変更や回転にも対応
-
インターネット接続不要(AIに依存しない)
「search2」アルゴリズムに対する欠点は以下の通りです::
-
性能が低下する(通常2~4倍遅くなる)
-
合格率の低い値は幻覚を引き起こす可能性がある(存在しないコンポーネントを検出する)
-
古いLinuxシステム(Ubuntu 18やRHEL 8など)ではサポートされていません(今後有効化予定)
他の検索アルゴリズムとの互換性を維持するため、結果として得られた一致位置は、_SEARCH 接頭辞付きの変数群の形で呼び出し元スクリプトに公開されます。結果は常に類似度順にソートされ、最も一致度の高い位置が最上位に配置されます。
|
作成方法 変数 |
説明 |
|---|---|
|
_SEARCH_MATCH_COUNT=<number> |
オブジェクト検索によって特定された一致する位置の数。 |
|
_SEARCH_X<n>=<X-coordinate>
|
n番目のマッチ位置のX,Y座標。ここで「n」は1から_SEARCH_MATCH_COUNT値の範囲にある。 |
|
_SEARCH_X=<X-coordinate>
|
最初の一致位置のX座標とY座標(_SEARCH_X_1 および _SEARCH_Y_1 の同義語)。 |
オプション
このメソッドは、ホスティングコマンドまたはJavaメソッド呼び出しを通じて指定された1つ以上の テンプレート画像 および/またはイメージコレクションを必要とします。 。
“ passrate "パラメータは、テンプレート画像と画面上の対応位置との間に必要な最小類似度を指定します。デフォルト値は80%です。値が低いほど検索が曖昧になり、誤った一致(漠然と類似したコンポーネント)や幻影すら引き起こす可能性があります。
“ cmparea “パラメータはオプションで、省略された場合はデフォルトで全画面表示となります。
戻り値
このメソッドは、少なくとも1つの一致する位置が見つかった場合に呼び出しコマンド(メソッド呼び出し)が0(成功)を返し、それ以外の場合は1を返します。
使用例
Compareto ok.png  method="enhanced" passrate="85"

if ({_EXIT_CODE} > 0) {
  Screenshot failure.png desc="Failed to find the OK button."
  Exit 1 desc="Failed to find the OK button."
} else {
  Mouse click to=x:{_SEARCH_X},y:{_SEARCH_Y}
}
-
OKボタンを見つけてクリックします。ボタンが見つからない場合は、終了スクリーンショットを撮り、終了コード1でスクリプトを終了します。
4.3 Text Recognition Methods
4.3.1 Text OCR ("tocr")
DESCRIPTION
The Text OCR method (code "tocr") allows calling an external Optical Character Recognition (OCR) engine to extract text from the remote desktop image. The preferred OCR engine must be selected and configured in the preferences. Robot 5.x supports:
-
Tesseract OCR is the default one. It is free and supports all major platforms (MS Windows, Linux/Unix, Mac OS X). The disadvantages are lower performance (speed) and accuracy.
-
ABBYY Fine Reader is a commercial OCR engine available at an extra cost. It is faster and more accurate than Tesseract. It is supported on MS Windows only.
-
Google Vision is a cloud service performing OCR. As the desktop image gets uploaded through a secure connection (HTTPS) to the Google site please consider your privacy and security before choosing this method. The OCR process is fairly fast and accurate. The biggest factor in the overall performance is your network speed.
The recognized text may be optionally tested for the presence of a phrase using the "text" (plain text search), "text" and "distance" (tolerant text search) or "pattern" (regular expression matching) parameters.
Regular expression matching matches the recognized text against the specified java.util.regex.Pattern compliant regular expression. Up to version 4.1.3 the expression must match the whole text and no searching for a matching substring is performed. Version 4.1.4 supports searching of the text for matching locations and returns their text and coordinates the same way as the text parameter.
The tolerant (fuzzy) text search is based on the Levenshtein distance. It is defined as the minimum number of edits needed to transform one string into the other, with the allowable edit operations being insertion, deletion, or substitution of a single character. This metric is enabled through the "distance" parameter which is an integer number specifying how many characters may be omitted or not recognized properly at a maximum to consider the sample text provided in the "text" parameter equivalent. Unlike the regular expressions, the tolerant matching always searches the recognized text for any occurrence of a string matching the given text and distance. There's no need to specify that the string is preceded or trailed by another text.
The method stores the OCR results into a set of TOCR prefixed variables as follows:
|
Variable Name |
Description |
|---|---|
|
_TOCR_ERROR=<errorText> |
Contains the error text thrown by the OCR engine. |
|
_TOCR_TEXT=<text> |
The recognized text (all lines separated by new line characters). |
|
_TOCR_TEXT_X=<X-coordinate>
|
The bounding rectangle of the recognized text (since 3.4). |
|
_TOCR_LINE_COUNT=<number> |
Number of recognized text lines (rows). |
|
_TOCR_LINE<n>=<lineText> |
Text of the n-th line where <n> is between 1 and _TOCR_LINE_COUNT. |
|
_TOCR_LINE_X<n>=<X-coordinate>
|
The bounding rectangle of the n-th line (since 3.4). |
When the text or pattern parameter is specified to search the recognized text for the given string the method creates result variables as follows:
|
Variable Name |
Description |
|---|---|
|
_TOCR_MATCH_COUNT=<number> |
The number of locations (strings) in the recognized text that match the pattern
|
|
_TOCR_MATCH=<matchingString> |
The first matching string. If text is employed and distance is set to 0 or it is not
|
|
_TOCR_MATCH_<n>=<matchingString> |
The n-th matching string where <n> is between 1 and _TOCR_MATCH_COUNT.
|
|
_TOCR_MATCH_INDEX=<index> |
Index (position) of the first match within the recognized text. Indexing starts with 0
|
|
_TOCR_MATCH_INDEX_<n>=<index> |
Index of the n-th match where <n> is between 1 and _TOCR_MATCH_COUNT.
|
|
_TOCR_MATCH_X=<X-coordinate>
|
The bounding rectangle of the first matching string (since 3.4). |
|
_TOCR_MATCH_X_<n>=<X-coordinate>
|
The bounding rectangle of the n-th matching string where <n> is between 1 and
|
|
_TOCR_MATCH_CLICK_X=<X-coordinate>
|
Center coordinates of the first matching string (since 3.4). They
|
|
_TOCR_MATCH_CLICK_X_<n>=<X-coordinate>
|
Center coordinates of the n-th matching string where <n> is between 1 and
|
OPTIONS
The method accepts no template images. The parameter of "passrate" is not applicable in the context of OCR and it is ignored. The parameter of "cmparea" is optional and defaults to the full screen when omitted.
Supported OCR parameters:
text=<textToSearchFor>
Optional text to search the recognized text for. The hosting command will then return either 0 when the OCR was performed correctly and the recognized text contains the given string or 1 otherwise. Indices and screen coordinates of the text locations are then stored to the _TOCR script variables and may be farther processed. This parameter can not be used together with the pattern one.
distance=<0-[textLength]>
Optional Levenshtein distance used in conjunction with the "text" parameter to perform tolerant text matching. See the method specification for details.
pattern=<regularExpression>
Optional java.util.regex.Pattern compliant regular expression to test the recognized text against. This parameter cannot be used together with the text one.
-
-
Up to version 4.1.3 the expression must match the whole text (no searching for a matching substring is performed).
-
Since version 4.1.4 the parameter will search the text for matching locations the same way as the text parameter. Indices and screen coordinates of the matching text locations are then stored to the _TOCR script variables and maybe farther processed. This enhancement allows creating actions like "find a matching text location and click it" within a single "Click ocr" command.
-
See the Tesseract OCR help page for details on its specific parameters.
RETURNS
The method makes the hosting command throw a runtime error on misconfiguration or an I/O error. Text of the error is made available through the _TOCR_ERROR variable.
The return code otherwise depends on the input parameters. If the method is called to perform just OCR with no result testing it always returns 0 even if no text was recognized. If the method is called with the parameters of "text" or "pattern" it returns 0 if the recognized text matches the given string/regular expression or 1 otherwise.
EXAMPLES
Var _TOCR_LINE_COUNT=0
Compareto method="tocr" cmparea="x:33,y:2,w:200,h:22"
for (i=1; {i}<{_TOCR_LINE_COUNT}+1; i={i}+1) {
Typeline "{_TOCR_LINE{i}}"
}
- Recognize text in the specified desktop area and type it onto the desktop.
Compareto method="tocr" cmparea="x:33,y:2,w:200,h:22" pattern="[aA]pplication"
if ({_EXIT_CODE} > 0) {
Exit 1
}
- Exit the script when the recognized text doesn't match the 'Application' or 'application' word.
Compareto method="tocr" cmparea="x:33,y:2,w:200,h:22" pattern=".*[aA]pplication.*"
if ({_EXIT_CODE} > 0) {
Exit 1
}
- The previous example modified to exit the script when the recognized text doesn't contain 'Application' or 'application'.
Compareto method="tocr" cmparea="x:33,y:2,w:200,h:22" text="apple" distance="2"
- Recognize text on the screen and verifies whether it is like and/or it contains a string like 'apple':
-
If the OCR recognizes text like 'There is an apple', the command will report success (the exit code of 0) because an exact match is found.
-
If the OCR recognizes text like 'There is an Apple', the command will report success because word 'Apple' can be changed to 'apple' by substitution of one character (A->a) which is within the tolerated distance of 2.
-
If the OCR recognizes text like 'There are Appls', the command will report success because word 'Appls' can be changed to 'apple' in two operations of (1) substitution (A->a) and (2) addition (+e) or substitution (s->e) which are still within the tolerated distance of 2.
-
If the OCR recognizes text like 'There is Doppler', the command will report success because word 'Doppler' contains a sequence matching 'apple' after a single substitution (o->a).
-
If the OCR recognizes text like 'There are Appis', the command will report failure (the exit code of 1) because word 'Appis' requires at least three operations (A->a, i->l, s->e) to be turned into 'apple' which is more than the tolerated distance of 2.
When the text is matched, the index of the match location in the text is stored to the TOCR_MATCH_INDEX variable. The index starts from 0 which represents the text beginning. The matching substring is further on saved under the _TOCR_MATCH variable. For example, the example above with the recognized text of _'There are Appls' will create the variables as _TOCR_MATCH=Appls and _TOCR_MATCH_INDEX=10.
4.3.2 画像ベースのテキスト認識 ("text")
説明
画像ベースのテキスト認識(v3.0以降、コード名「text」)は、事前に保存された文字の集合に基づいて、画面上のテキストとその座標を認識します。OCRと比較して:
-
OCRエンジンは 通常、文字の形状パターンによって認識します。多くのフォント、テキスト、背景色に対して、すぐに使用できます。キャリブレーションされていないフォントにOCRを適用すると、認識に失敗する可能性があります。このような状況では、回避策がないか、特定のフォントに合わせてエンジンをトレーニングするための長い手動プロセス( Tesseractトレーニングプロセスなど)が必要になります。
-
ロボットの画像ベーステキスト認識は、 画像から文字を認識します。画像コレクションが作成された特定のフォント、文字色、背景に対してのみ機能します。入力テキストの検索条件に基づいて、テキストの座標や部分文字列の位置を取得できます。
キャラクタ画像コレクションは、キャラクタキャプチャウィザードで簡単に作成・管理できます。 詳細はヘルプページをご覧ください。
"tocr"方式と同様に 、認識されたテキストは次の 3 つの方法で検証できます。:
-
「text」パラメータのみを指定すると、指定された文字列のプレーンテキスト検索がアクティブになり、見つかった場合は呼び出しコマンドが 0 (成功) を返し、見つからなかった場合には 1 (失敗) を返します。
-
text "と "distance "パラメーターの組み合わせで実行される。寛容な(ファジーな)テキスト検索.distance "パラメータはレーベンシュタイン距離これは、一方の文字列を他方の文字列に変換するために必要な最小の編集数として定義され、許容される編集操作は1文字の挿入、削除、置換である。このメトリックは、"text "パラメータで提供されるサンプルテキストを同等とみなすために、最大で何文字が省略されるか、または正しく認識されないかを指定する整数値である "distance "パラメータによって有効になります。正規表現とは異なり、トレラント・マッチングでは、認識されたテキストから、指定されたテキストと距離にマッチする文字列がないか常に検索します。文字列の前後に別のテキストがあることを指定する必要はありません。
-
正規表現マッチングは、認識されたテキストを指定されたjava.util.regex.パターン準拠の正規表現と照合します。この表現はテキスト全体に一致する必要があり、一致する部分文字列の検索は行われません。
このメソッドは、OCR結果を_TEXT接頭辞付き変数のセットに以下のように格納します:
|
変数名 |
説明 |
|---|---|
|
_TEXT_ERR=<error_text> |
エラーメッセージ。これはメソッドがテキストを実行できなかった場合にのみ表示されます。
|
|
_TEXT=<text> |
認識されたテキスト(完全な複数行形式)。この変数は、メソッドが正常に実行された場合(デスクトップ接続の欠如や無効な文字画像コレクションによる失敗を意味しない)に常に作成される。 |
|
_TEXT_X=<number>
|
認識されたテキストのX、Y座標と幅と高さ。 |
|
_TEXT_LINE_COUNT=<number> |
認識されたテキスト行数。 |
|
_TEXT_LINE<n>=<text> |
n行目のテキスト行、ここで<n>は1から_text_line_count。 |
|
_TEXT_LINE_X_<n>=<number>
|
n行目のテキスト行のX、Y座標と幅、高さ
|
|
_TEXT_MATCH=<text> |
認識されたテキストのうち、"テキスト" パラメータ(プレーンテキスト検索)、または"テキスト"と"距離"(寛容なテキスト検索)。 |
|
_TEXT_MATCH_INDEX=<number> |
_TEXT_MATCHによって参照される、一致するテキストの位置(インデックス)。インデックスは認識されたテキストの先頭に対応する0から始まります。 |
|
_TEXT_MATCH_X=<number>
|
_TEXT_MATCH_変数が参照する一致したテキストのX座標、Y座標、幅、高さ。 |
オプション
このメソッドは入力として1つの文字画像コレクションを必要とします。「text」メソッドのコンテキストにおける「passrate」パラメータは、文字の描画における微小な差異に対する許容度を定義します。この許容度は現在実験段階であり、一部の大型フォントでのみ機能します。そのため、合格率を100%に保つことを推奨します。「cmparea」標準パラメータを使用すると、テキスト認識を画面上の特定の矩形領域に制限できます。指定しない場合、デフォルトでは全画面が対象となります。
サポートされている特定のパラメータ:
text=<textToSearchFor>
認識されたテキスト内で検索する任意の文字列。認識が正しく行われかつ認識テキストに指定文字列が含まれる場合、ホスティングコマンドは0を返します。それ以外の場合は1を返します。このパラメータはパターンパラメータと併用できません。
distance=<0-[textLength]>
オプションのレベンシュテイン距離は、「text」パラメータと組み合わせて許容度のあるテキストマッチングを実行するために使用されます。
pattern=<regularExpession>
オプションjava.util.regex.Pattern に準拠した正規表現。認識されたテキストをテストするために使用されます。この表現はテキスト全体に一致する必要があります(部分文字列の一致検索は行われません)。このパラメータはtextパラメータと併用できません。。
戻り値
「text」、「distance」、「pattern」パラメータのいずれも使用されない場合、呼び出しコマンドは実際にテキストが認識されなくても成功を意味する0(成功)を返します。テキスト照合パラメータが使用された場合、認識されたテキストが一致するか否かに応じて、呼び出しコマンドは成功(0)または失敗(0以外の値)を返します。
トラブルシューティング
失敗した「テキスト」比較に対処するために:
-
画面上で認識しようとする背景色と、フォントの種類・サイズ・色は、文字画像コレクション内の文字画像と同じであることを確認してください。
-
内部アルゴリズムはコレクション画像からテキスト行の高さとスペースサイズを導出するため、異なるフォント種別やサイズの文字画像を単一コレクションに混在させないでください。異なるフォントや背景色の文字画像を混在させることは、文字が同一フォント種別かつサイズであれば問題ありません。
-
テキストがアンチエイリアス処理されている場合や規則的に描画されていない場合は、合格率を下げてみてください。ただし、これは大きなフォントでのみ有効です。
使用例
Var _TEXT_LINE_COUNT=0
Compareto "C:\MyAutomation\chars"   method="text" cmparea="x:33,y:2,w:200,h:22"
for (i=1; {i}<{_TEXT_LINE_COUNT}+1; i={i}+1) {
   Typeline "{_TEXT_LINE{i}}"
}
-
指定されたデスクトップ領域内のテキストを認識し、デスクトップ上にタイプします。
Compareto "C:\MyAutomation\chars"   method="text" cmparea="x:33,y:2,w:200,h:22" pattern="[aA]pplication"
if ({_EXIT_CODE} > 0) {
  Exit 1
}
-
認識されたテキストが「Application」または「application」という単語と一致しない場合、スクリプトを終了。
Compareto "C:\MyAutomation\chars"   method="text" cmparea="x:33,y:2,w:200,h:22" pattern=".*[aA]pplication.*"
if ({_EXIT_CODE} > 0) {
  Exit 1
}
-
前の例を修正し、認識されたテキストに「Application」または「application」が含まれない場合にスクリプトを終了するようにしました。
比較する"C:♪MyAutomation♪chars" method=「テキストcmparea=。"x:33,y:2,w:200,h:22"テキスト「リンゴ距離"2"
-
画面上のテキストを認識し、それが「like」であるか、または「apple」のような文字列を含むかどうかを確認します::
-
メソッドが「There is an apple」のようなテキストを認識した場合、コマンドは成功(終了コード0)を報告します。これは完全一致が見つかったためです。
-
メソッドが「There is an Apple」のようなテキストを認識した場合、コマンドは成功を報告します。これは単語「Apple」が1文字の置換(A→a)によって「apple」に変更可能であり、許容距離2内にあるためです。
-
メソッドが「There are Appls」のようなテキストを認識した場合、コマンドは成功を報告します。なぜなら単語「Appls」は、許容誤差範囲2内の2つの操作(1)置換(A→a)と(2)付加(+e)または置換(s→e)によって「apple」に変更できるからです。
-
メソッドが「There is Doppler」のようなテキストを認識した場合、コマンドは成功を報告します。単語「Doppler」は単一の置換(o→a)後に「apple」と一致する文字列を含むためです。
-
メソッドが「There are Appis」のようなテキストを認識した場合、コマンドは失敗(終了コード1)を報告します。単語「Appis」を「apple」に変換するには少なくとも3つの操作(A→a、i→l、s→e)が必要であり、許容距離2を超えているためです。
テキストが正常に一致した場合、テキスト内の一致位置のインデックスは _TEXT_MATCH_INDEX 変数に、その X, Y 座標と幅/高さは _TEXT_MATCH_X, _TEXT_MATCH_Y, _TEXT_MATCH_WIDTH, _TEXT_MATCH_HEIGHT に格納されます。一致した部分文字列はさらに _TOCR_TEXT 変数に保存されます。
例えば、認識テキストが「There are Appls」の場合、変数は _TEXT_MATCH=Appls および _TEXT_MATCH_INDEX=10 として生成されます。
4.4 Other Methods
4.4.1 Histogram Based Comparison ("default")
DESCRIPTION
The Histogram Based Comparison Method (code "default") was historically the first method provided by T-Plan Robot in 2005. It was designed for a quick check of the desktop screen against one or more full-screen template image(s). Though it has been obsoleted by better verification means such as the "search2" and "search" methods it may be still used in special cases.
The method is based on a simple histogram comparison. An image histogram is in simple words a list of colours located in the image together with the number of pixels of each colour. The method first calculates histograms both of the remote desktop and template images and compares them. Result of the image comparison is then calculated as the number of matching pixels divided by the total number of image pixels.
The following example illustrates how the method works. Let us have two simple 120x100 images (12000 pixels each):
|
Image 1
|
Image 2
|
|
||||||||||||||||||||||||||
The comparison result is in this case 9000px/12000px, which is 0.75, or better 75%. This corresponds to what a human would say when comparing the images visually - they are different just in one quarter.
Though this is a very primitive algorithm it is sufficient where you need to verify whether the desktop displays correct application provided that the application and desktop background colours differ. The algorithm is also quite robust in terms of window location changes which don't affect the full-screen colour histogram.
Be aware that the default method is designed to compare two images of the same size. If your template image has a different size than the remote desktop, both images will be internally cropped to the size of their intersection. As this may lead to unpredictable results it is not recommended to use the default method together with a custom comparison area (the "cmparea" parameter).
OPTIONS
The method requires one or more template images and/or image collections specified through the hosting command or Java method call. The parameter of "passrate" defines in the context of the "default" method the lowest acceptable result of the comparison of the template image and the screen histograms (see the example in the method description). It defaults to 95%. The "cmparea" is optional and defaults to the full screen when omitted.
No other method-specific parameters are supported.
RETURNS
The method makes the calling command (method call) return 0 (success) if the produced comparison result is greater than or equal to the specified pass rate. Otherwise, it returns the value of 1.
TROUBLESHOOTING
As the "default" method does not use any method-specific parameters, the only means of dealing with a failing histogram comparison is decreasing of the "passrate" parameter. To see the actual comparison result after a histogram comparison looks for the _COMPARE_RESULT variable in the variable viewer.
The general Image Comparison Recommendations consider the following reliability factors:
-
Remove all icons and items from the server desktop and make it as simple as possible. Note that most desktops also display a clock/date which introduces differences with the time & date updates. If such an object participates in the area you are comparing to, use the pass rate to increase the tolerance to mismatching pixels.
-
Check if the application window(s) you are testing have a stable size and open in a stable location. Variable window size and location significantly affects comparison results. It is a good idea to maximize the application window through a scripted key sequence (such as Alt+Space followed by X on Windows or Alt+F10 on Linux/Gnome) before comparison.
EXAMPLES
Compareto netscape1.png;netscape1.png method="default" passrate="90"
if ({_EXIT_CODE} > 0) {
Exit 1
}
- Compare the desktop screen to the netscape1.png and netscape1.png images with the pass rate of 90% and terminate the script with the exit code of 1 if neither of them matches the screen.
4.4.2 Image Difference ("diff")
DESCRIPTION
The Image Difference (code "diff") compares the desktop screen against one or more full-screen template image(s) and produces a set of differences. It is typically used with the Screenshot command to insert an image with the highlighted differences into the Report (see Examples below). The algorithm is edge-based and omits colour changes.
OPTIONS
The method requires one or more full-screen size template images and/or image collections specified through the hosting command or Java method call. The parameter of "passrate" defines the lowest acceptable level of difference to produce a PASS result. It defaults to 95%.
The "cmparea" is optional and defaults to the full screen when omitted. No other method-specific parameters are supported.
RETURNS
The method makes the calling command (method call) return 0 (success) if the produced comparison result is greater than or equal to the specified pass rate. Otherwise, it returns the value of 1.
EXAMPLES
Compareto myscreen.png method="diff" passrate="98"
if ({_EXIT_CODE} > 0) {
Exit 1
}
- Exit the script if the screen differs from the myscreen.png one more than by 2%.
Screenshot myapp.png template="expected_screen.png" passrate="95" method="diff" drawdiff="true"
- Draw differences between the desktop screen and the expected_screen.png image into a screenshot in the report file.
4.4.3 Variable Existence Test ("variable")
DESCRIPTION
The Variable Existence Test (code "variable") is not a real image comparison algorithm. It only uses the framework of the WaitFor command to wait for a session variable to appear or disappear in order to enable communication among scripts running in parallel within a workitem.
This mechanism can be used to implement the producer-consumer scenario:
-
One script (the "producer") performs a task, creates a session variable through the Varg command and suspends using Waitfor mismatch until the variable disappears.
-
Another script running in parallel (the "consumer") detects that the variable was created (Waitfor match), performs its task and deletes the variable using Varg to notify the first script of the job completion.
OPTIONS
The "name" parameter specifies the variable name.
The "passrate" parameter is accepted just for compatibility reasons but it is ignored if specified.
RETURNS
The method makes the calling command (method call) return 0 (success) if the variable exists. Otherwise, it returns the value of 1.
EXAMPLES
Waitfor match method="variable" name="FLAG" timeout="5m"
if ({_EXIT_CODE} > 0) {
Exit 1 desc="The other script failed to populate the FLAG variable within the timeout of 5 minutes!"
}
- Wait for another script to create a session variable called FLAG. If the variable fails to appear within 5 minutes exit the script.